Event Companion
Event Companion
INTRODUCTION#
Welcome to the Warhammer Event Companion! This document is designed to help you run and play in organised events, from local leagues to the world championships. It uses the most recent Chapter Approved Mission Deck to create the best experiences for all hobbyists.
Within this companion, you’ll find a ready-made framework for levelling the playing field and getting games underway quickly. Its recommendations will be followed in full at most Games Workshop Warhammer Events, and are considered the official way to play Warhammer 40,000 in an event setting, but can be adapted to suit your own circumstances.
The recommendations are presented as follows:
Warhammer Event Mission Sequence: Adjustments to the steps players would normally follow to generate a mission and prepare the battlefield.
Chapter Approved Mission Deck Errata & FAQs: Updates to certain cards and answers to frequently asked questions.
Pairings and Rankings: Advice for fairly pairing players and determining rankings.
Terrain Layouts: A suite of carefully designed terrain setups to be used in conjunction with the Chapter Approved Mission Deck.
Base Size Guide: The most up-to-date base sizes appropriate for all Warhammer 40,000 models that can be used in Warhammer Events.
Designer’s Note: This companion does not use the full contents of the Chapter Approved Mission Deck; it has been written to provide the best experience in a Warhammer Event. For this reason we have not included the Deployment or Twist cards, which are left for pick-up-and-play games.
This companion does not include rules and recommendations for doubles, teams or Dominatus Warhammer Events. These can be found on warhammer-community.com .
GENERATING COMMAND POINTS#
Excluding Core CP, each player can gain a maximum of 1CP per battle round (including he CP gained when a player discards an active Secondary Mission card).
WARHAMMER EVENT MISSION SEQUENCE#
Before attending a Warhammer Event, each player completes the following step:
1. MUSTER ARMIES#
Muster armies as described in the Warhammer 40,000 app, with the following exception: once they have mustered their army, a player selects one Force Disposition card available to them and records that on their roster.
A Warhammer Event battle is then waged by completing the remaining steps below:
2. DETERMINE MISSION#
Each player finds their opponent’s Force Disposition symbol on their Force Disposition card. The Primary Mission that is listed below that symbol is that player’s Primary Mission, which describes how to score VP.
3. DETERMINE A LAYOUT#
Each combination of Primary Missions has three recommended layouts, labelled A, B and C. These can be found in the Warhammer 40,000 app and at the end of this companion. As directed by the Warhammer Event organiser, the players either use the layout specified or randomly determine which of these layouts to use.
4. CREATE THE BATTLEFIELD#
Missions are played on rectangular battlefields 44" by 60" in size. Players set up the terrain areas as shown in the selected layout, then set up terrain features on those terrain areas as shown in the selected layout.
5. DETERMINE ATTACKER AND DEFENDER#
Players look at the selected layout and agree which edges of the battlefield the players have set up correspond with the Attacker’s and Defender’s battlefield edges labelled on the card. Roll off: the winner decides who will be the Attacker and who will be the Defender.
6. SELECT SECONDARY MISSIONS#
Secondary Mission cards detail additional ways to score VP. Players now secretly note down whether they will use Tactical or Fixed Secondary Missions. If using Fixed Missions, they also note down which two Fixed Missions they will use (see below). Players then reveal these decisions.
FIXED MISSIONS#
Fixed Missions are those marked with the symbol shown on the left. If you are using Fixed Missions, display your selected Fixed Mission cards face-up. Fixed Missions cannot be discarded and are active for you throughout the battle.
TACTICAL MISSIONS#
If you are using Tactical Missions, shuffle your Secondary Mission deck face-down.
At the start of your Command phase, draw two Secondary Missions face-up from your Secondary Missions deck; these Secondary Missions are active for you.
(Once per battle) At the end of your Command phase, you can spend 1CP to discard one of your active Secondary Mission cards and draw one new Secondary Mission card.
ACHIEVING SECONDARY MISSIONS#
At the end of each player’s turn, each player does the following, starting with the player whose turn it is:
First, if you met the conditions on one or more Secondary Missions, you can gain the VP specified on that card. If you do, and if you are using Tactical Secondary Missions, discard that Secondary Mission – it is achieved.
Then, if it is your turn and you are using Tactical Secondary Missions, you can discard one or more of your active Secondary Missions. If you do, you gain 1CP.
7. DECLARE BATTLE FORMATIONS#
Players secretly note down, in order:
Which of their units will start the battle embarked within which TRANSPORTS .
Which of their units will start the battle in strategic reserves .
Players then reveal these decisions.
8. DEPLOY ARMIES#
Players take it in turns to set up their units (excluding those in strategic reserves ) one at a time, wholly within their deployment zone, starting with the Defender. If you set up a TITANIC unit when it is your turn to set up a unit, skip your next turn to set up a unit. Once you have finished setting up your units, if your opponent has any units that have not been set up, they set up those units.
9. REDEPLOY UNITS#
Some rules let you redeploy certain units after both armies are deployed. Unless otherwise stated, you resolve those rules in this step. Players alternate resolving any such rules, starting with the Attacker. Units placed in strategic reserves in this step do not count towards the combined points value of your strategic reserves units.
10. DETERMINE FIRST TURN#
Roll off: the winner takes the first turn.
11. RESOLVE PRE-BATTLE RULES#
Players alternate resolving any pre-battle rules units from their army may have, starting with the player who will take the first turn.
12. BEGIN THE BATTLE#
The first battle round begins.
13. END THE BATTLE#
The battle ends after five battle rounds have been completed. Even if you have no models remaining in your army at the start of your turn, players continue to play out their turns until the battle ends.
14. DETERMINE VICTOR#
Each player scores 10VP if their army is painted to a Battle Ready standard. At the end of the battle, the player with the most VP is the victor. If the players are tied, the battle is a draw. The maximum VP that can be scored from each source of VP is listed below. Any VP you score in excess of these maximums are ignored.
VP SOURCE
MAXIMUM VP
PRIMARY MISSION
Up to 15VP per battle round
SECONDARY MISSIONS
Up to 15VP per battle round*
BATTLE READY ARMY
‘CUMULATIVE’ AND ‘OR’ CONDITIONS#
Some cards include a condition marked as ‘cumulative’ that follows a normal condition. If a player achieves the cumulative condition, they gain the VP for both that and the normal condition.
Some cards include one or more conditions marked ‘or’ that follow a normal condition. A player can only gain VP for one of these conditions or the normal condition.
LEAVES THE BATTELEFIELD#
Some cards refer to a unit or units leaving the battlefield. A unit leaves the battlefield if it is destroyed, if it embarks on a TRANSPORT , or if a rule removes that unit from the battlefield (e.g. to place it in strategic reserves ).
ONE#
When a card states ‘one’, underlined, it means exactly one, not one or more.
VP UP TO A LIMIT#
Some cards award VP up to a limit, e.g. (up to 5VP). In such cases, any VP you score in excess of this limit are ignored.
WHEN DRAWN#
Some Secondary Mission cards begin with a ‘When Drawn’ section. Note that this section only applies if you are using Tactical Secondary Missions.
CHAPTER APPROVED MISSION DECK#
ERRATA AND FAQs
When playing in a Warhammer Event Mission, the following amendments to cards in the Chapter Approved Mission Deck are used.
None.
Questions about the Chapter Approved Mission Deck will be reviewed periodically and answered below. Newly added entries are marked in red.
Q: For the purposes of VP scoring limits, is the end of the battle the same timing as the end of the fifth battle round? A: No, VP scored at the end of the battle are not subject to the 15VP per battle round scoring limit. Q: When a mission action places an operation marker and applies a status (e.g. 'decoyed'), does removing that operation marker also remove that status?
A: Yes.
Q: Some Primary Mission cards let a player place operation markers on the battlefield. Can I remove these?
A: Your Primary Mission card will specify how and when you can remove operation markers from the battlefield. If it doesn’t, you cannot remove operation markers.
Q: For the Death Trap Primary Mission, one objective reads ‘One or more enemy units that started the turn within a terrain area were destroyed, if that terrain area is trapped.’ Does that terrain area have to have been trapped at the point that enemy unit was destroyed?
A: No.
Q: For the Surveil the Foe Primary Mission, one objective reads ‘One or more enemy units were surveilled this turn, unless each of those units is within range of one or more objectives that have one or more operation markers within range of them.’ For an enemy unit within range of an objective with an operation marker, can I achieve this objective if I remove the operation marker after surveilling that unit, as long as it is within the same turn?
A: Yes.
Q: For the Vital Link Primary Mission, if there is more than one central objective, can I score the cumulative VP for my operation markers regardless of which central objective(s) they are within?
A: Yes, as long as you control the objective(s) those operation markers are within.
PAIRINGS AND RANKINGS#
There are countless different ways in which a Warhammer Event can be run. While broad-stroke concepts like pairing off players with the same record are straightforward enough, the nuance of running a successful Warhammer tournament is the subject of continuous conversation and evolution. The following recommendations are followed at most official Games Workshop events, and are designed to create the fairest, most fun experience possible for every attendee, regardless of standing.
PAIRING PLAYERS#
While the first round of most tournaments is randomly paired, subsequent round pairing can be done in a number of ways. The first pairing metric will almost always be player record, e.g pairing a player with a win/loss record of 3-1 with another player with the same win/loss record, and so on. Given that most rounds will include numerous players with the same record, however, deciding pairings beyond this metric can be quite nuanced, and the different methods available can have significant impacts on the experience of players at an event. We recommend pairing players by the following criteria:
First – by record (i.e. the number of wins, losses and draws)
Second – by win path (i.e. the timing of the rounds in which a player won or lost their games)
Third – randomly within players of the same ranking
RANKING PLAYERS#
In many tournaments, the overall Best General will be the single remaining undefeated player at the end of the event. Sometimes, however, there are not enough rounds available to determine a single undefeated player, and players often wish to know their ranking regardless of whether they won the whole event. To help break ties between players who end an event with the same record, we recommend ranking players by the following criteria:
First – by overall record (wins, losses and draws)
Second – by their opponents’ win records (i.e. those with more wins against opponents with better win records would place higher)
Third – by total Victory points (VP)
Designer’s Note: Traditionally, many organisers use total VP or VP differential to determine ranking. However, the number of VP scored within any one game of Warhammer 40,000 rarely tells a clear story about how close that game actually was. Often, a more challenging opponent will be harder to score against (and thus yield a lower score despite the victory being all the more hard-earned), or the nature of how the two armies match up may dictate a risky strategy that doesn’t pay off (and thus yield a wide score disparity despite almost working out).
As such, we do not recommend using VP as a pairing metric, nor as a ranking metric until all other metrics have been exhausted, or when further tie-breaking is required (e.g. in larger events where identical rankings become more likely). By contrast, opponent win record is an ideal metric, because when two players end up with the same record, the overall skill of their opponents is a better indicator of which player had the more challenging path along the way.
WIN PATH#
A player’s ‘win path’ refers not to their number of wins and losses, but to the timing of those wins and losses. While pairing by win path has an incidental tendency to pair people by strength of schedule, its greatest impact is on the overall enjoyment experienced by all players, as it tends to pair players based upon shared experience.
For example, let’s take two 3-1 players. One of them lost their first game; they likely lowered their expectations for winning the whole event after this, but are probably in a great mood after three consecutive victories. The other won their first three games then lost their fourth – a sharp disappointment after a 3-0 start. Should these players face off, their shared enjoyment may be at odds as they are in very different emotional places. Win path ensures players enter their match with recent common experiences upon which to build a friendship during their next game of Warhammer.
THE RULES APPENDIX, ERRATA AND FAQS#
There are myriad ways to enjoy the Warhammer hobby, and these all manifest themselves at a tournament: gifted hobbyists with beautiful armies, skilled competitors aiming for Best General, casual players looking to face new opponents and make new friends (by far the most common type of attendee), and even practitioners of the niche hobby of Rules Lawyer! These particular hobbyists often find unusual rules interactions at the very fringes of Warhammer 40,000, which can create interesting challenges for tournament organisers looking to provide clear answers and an easy gaming experience for their attendees.
To address any such uncertainties, the Warhammer 40,000 app contains a comprehensive Rules Appendix, along with faction-specific errata and FAQ entries. Should an odd rules interaction come up during your event and the Core Rules do not provide a clear answer, we recommend consulting these resources.
RECOMMENDED TERRAIN AREA FOOTPRINTS#
We have listed the terrain area footprints these recommended layouts use. You can find a PDF with these footprints ready for you to print on warhammer-community.com .
TERRAIN AREA FOOTPRINT SIZE
QUANTITY
TERRAIN FEATURES#
Each layout is shown with the terrain features from the Battlefields: Armageddon box using the 'Warhammer recommended' build configuration from the construction booklet. We’ve denoted each terrain feature from that set as either a dense or light terrain feature in these layouts. The configurations of the terrain features and terrain areas are designed to create the best experience with the Hidden rule and movement rules for various units, and to create plenty of interesting decisions during a battle. We’ve also purposely left space between a terrain feature and the edge of the terrain area to allow a line of models to be on the terrain area from the ‘outside’.
If you do not have the Battlefields: Armageddon terrain, it is possible to recreate these layouts with your own terrain that is close to the same size of the various terrain features by denoting for all players if they are dense or light terrain features .
TERRAIN LAYOUTS#
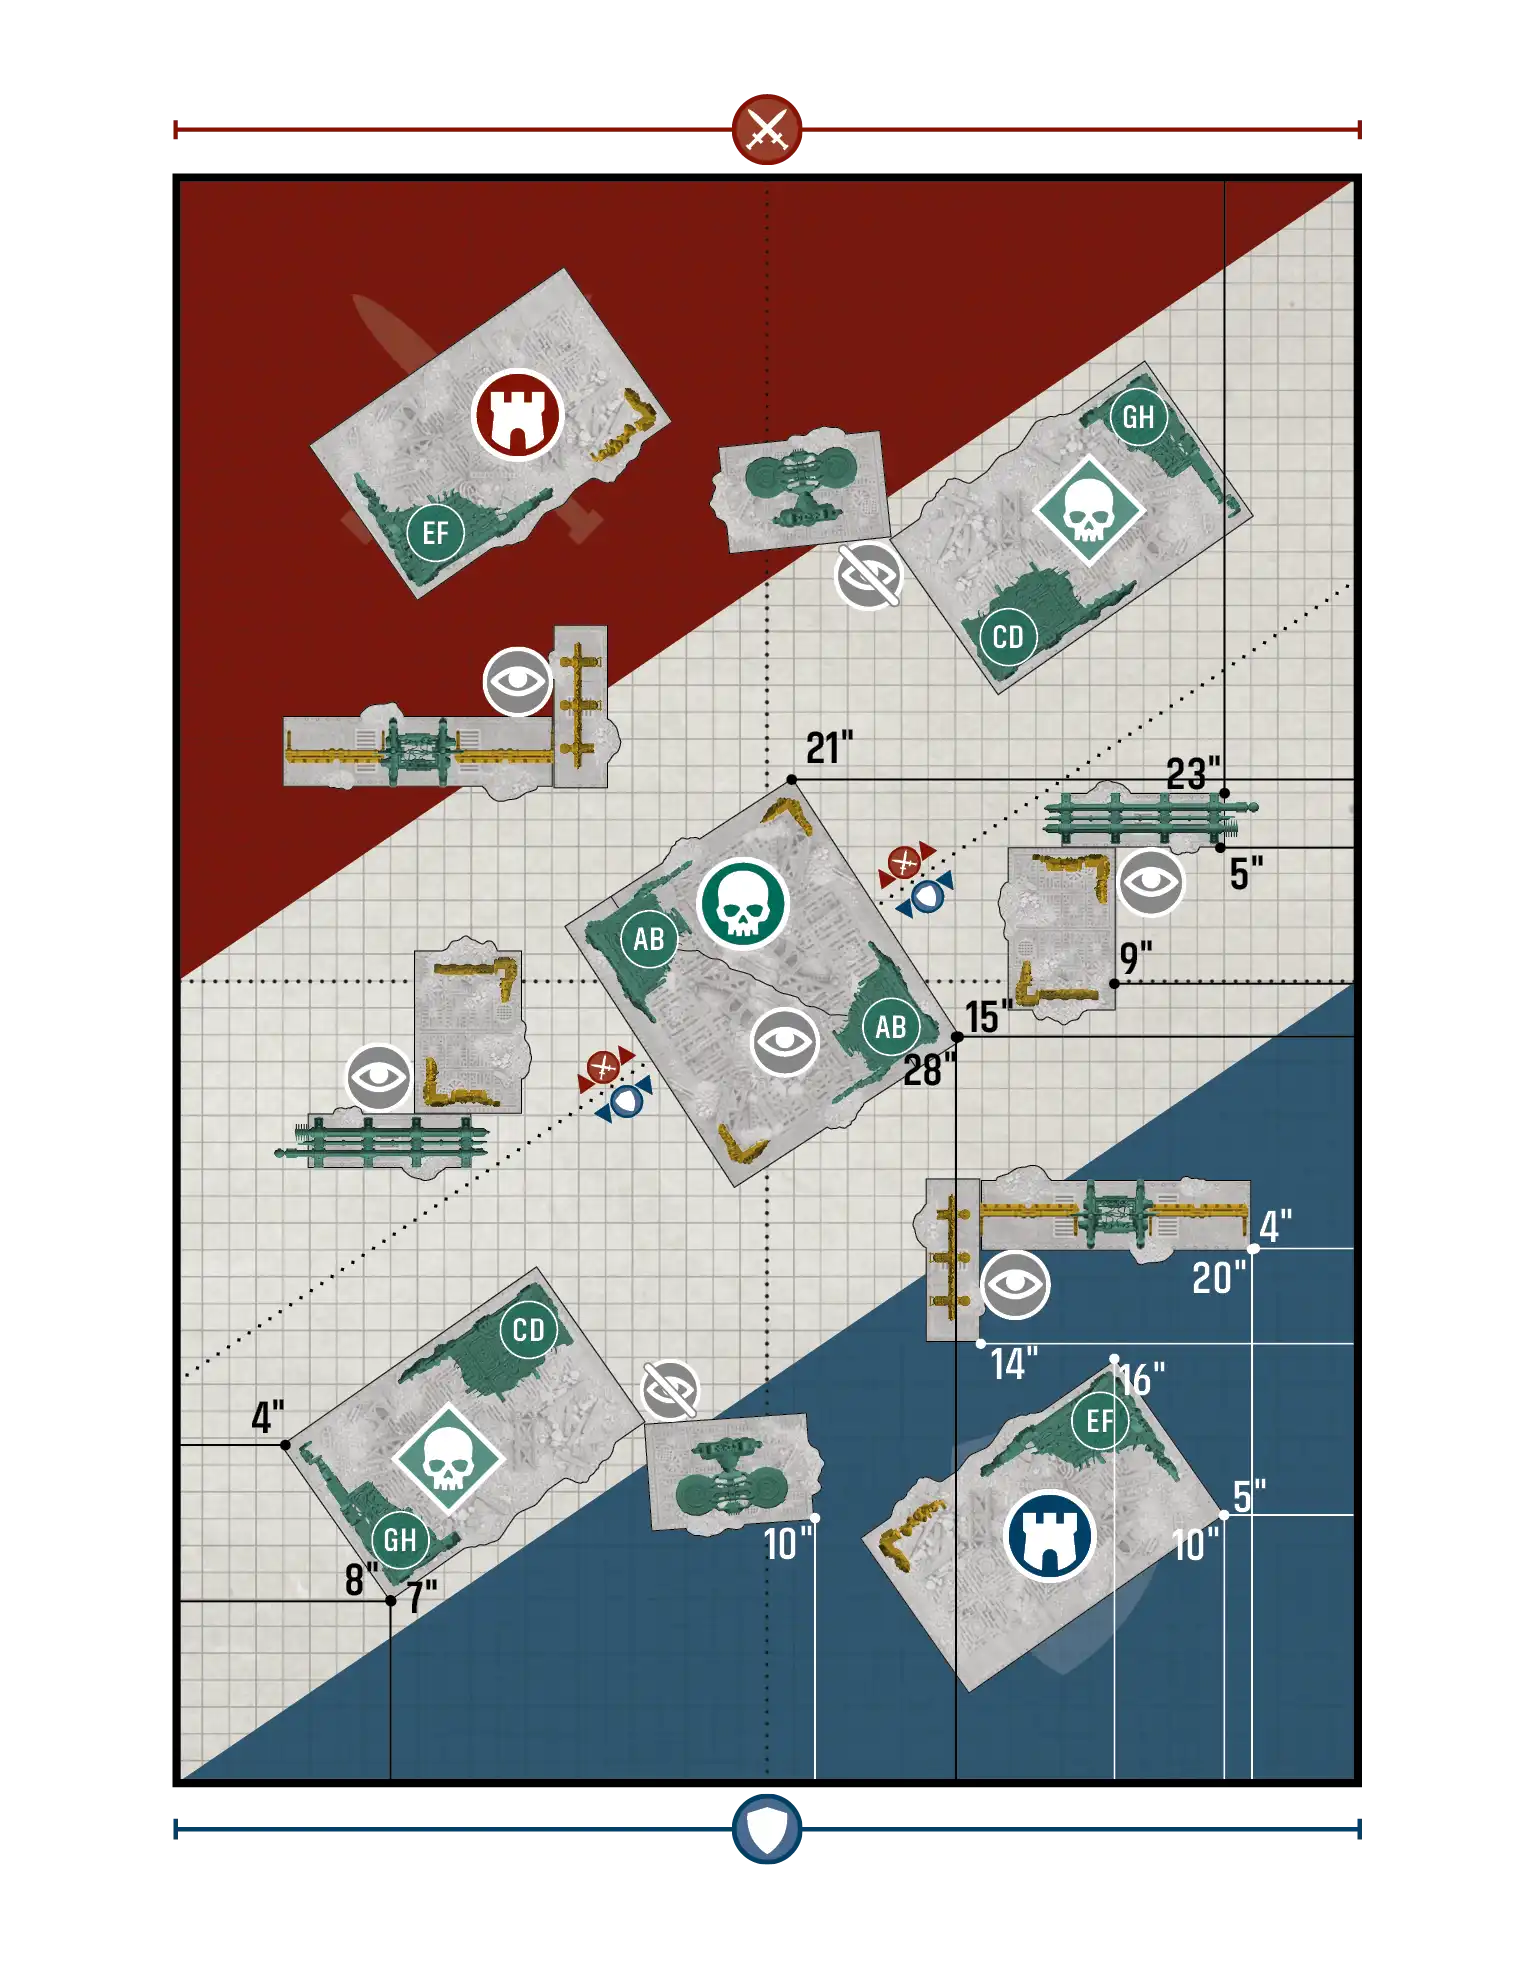
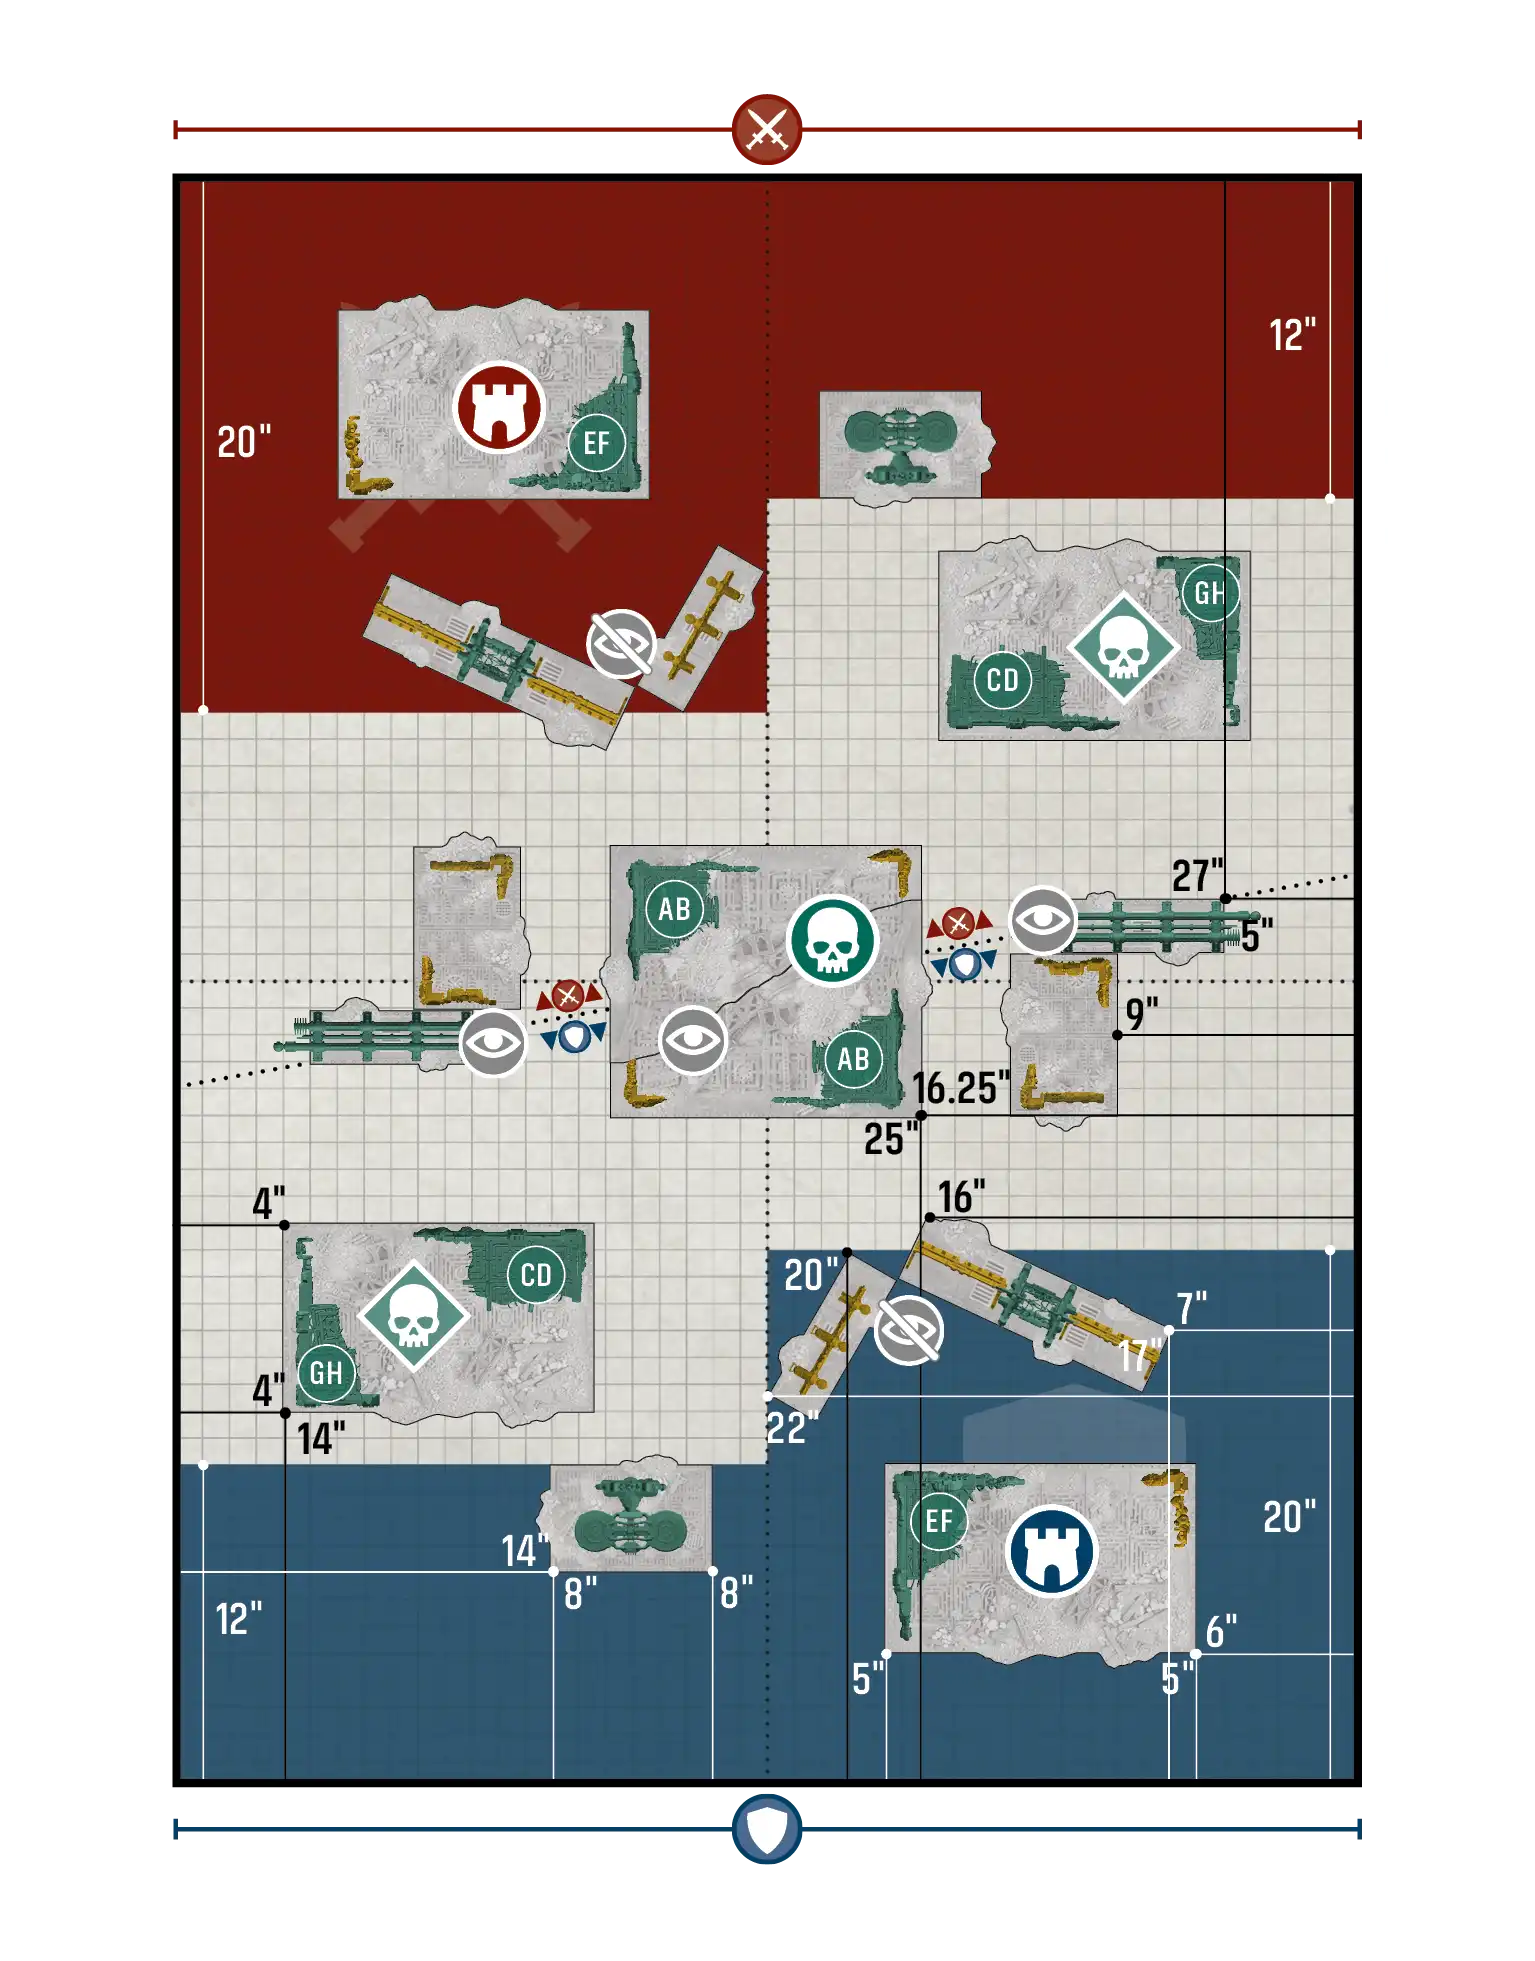
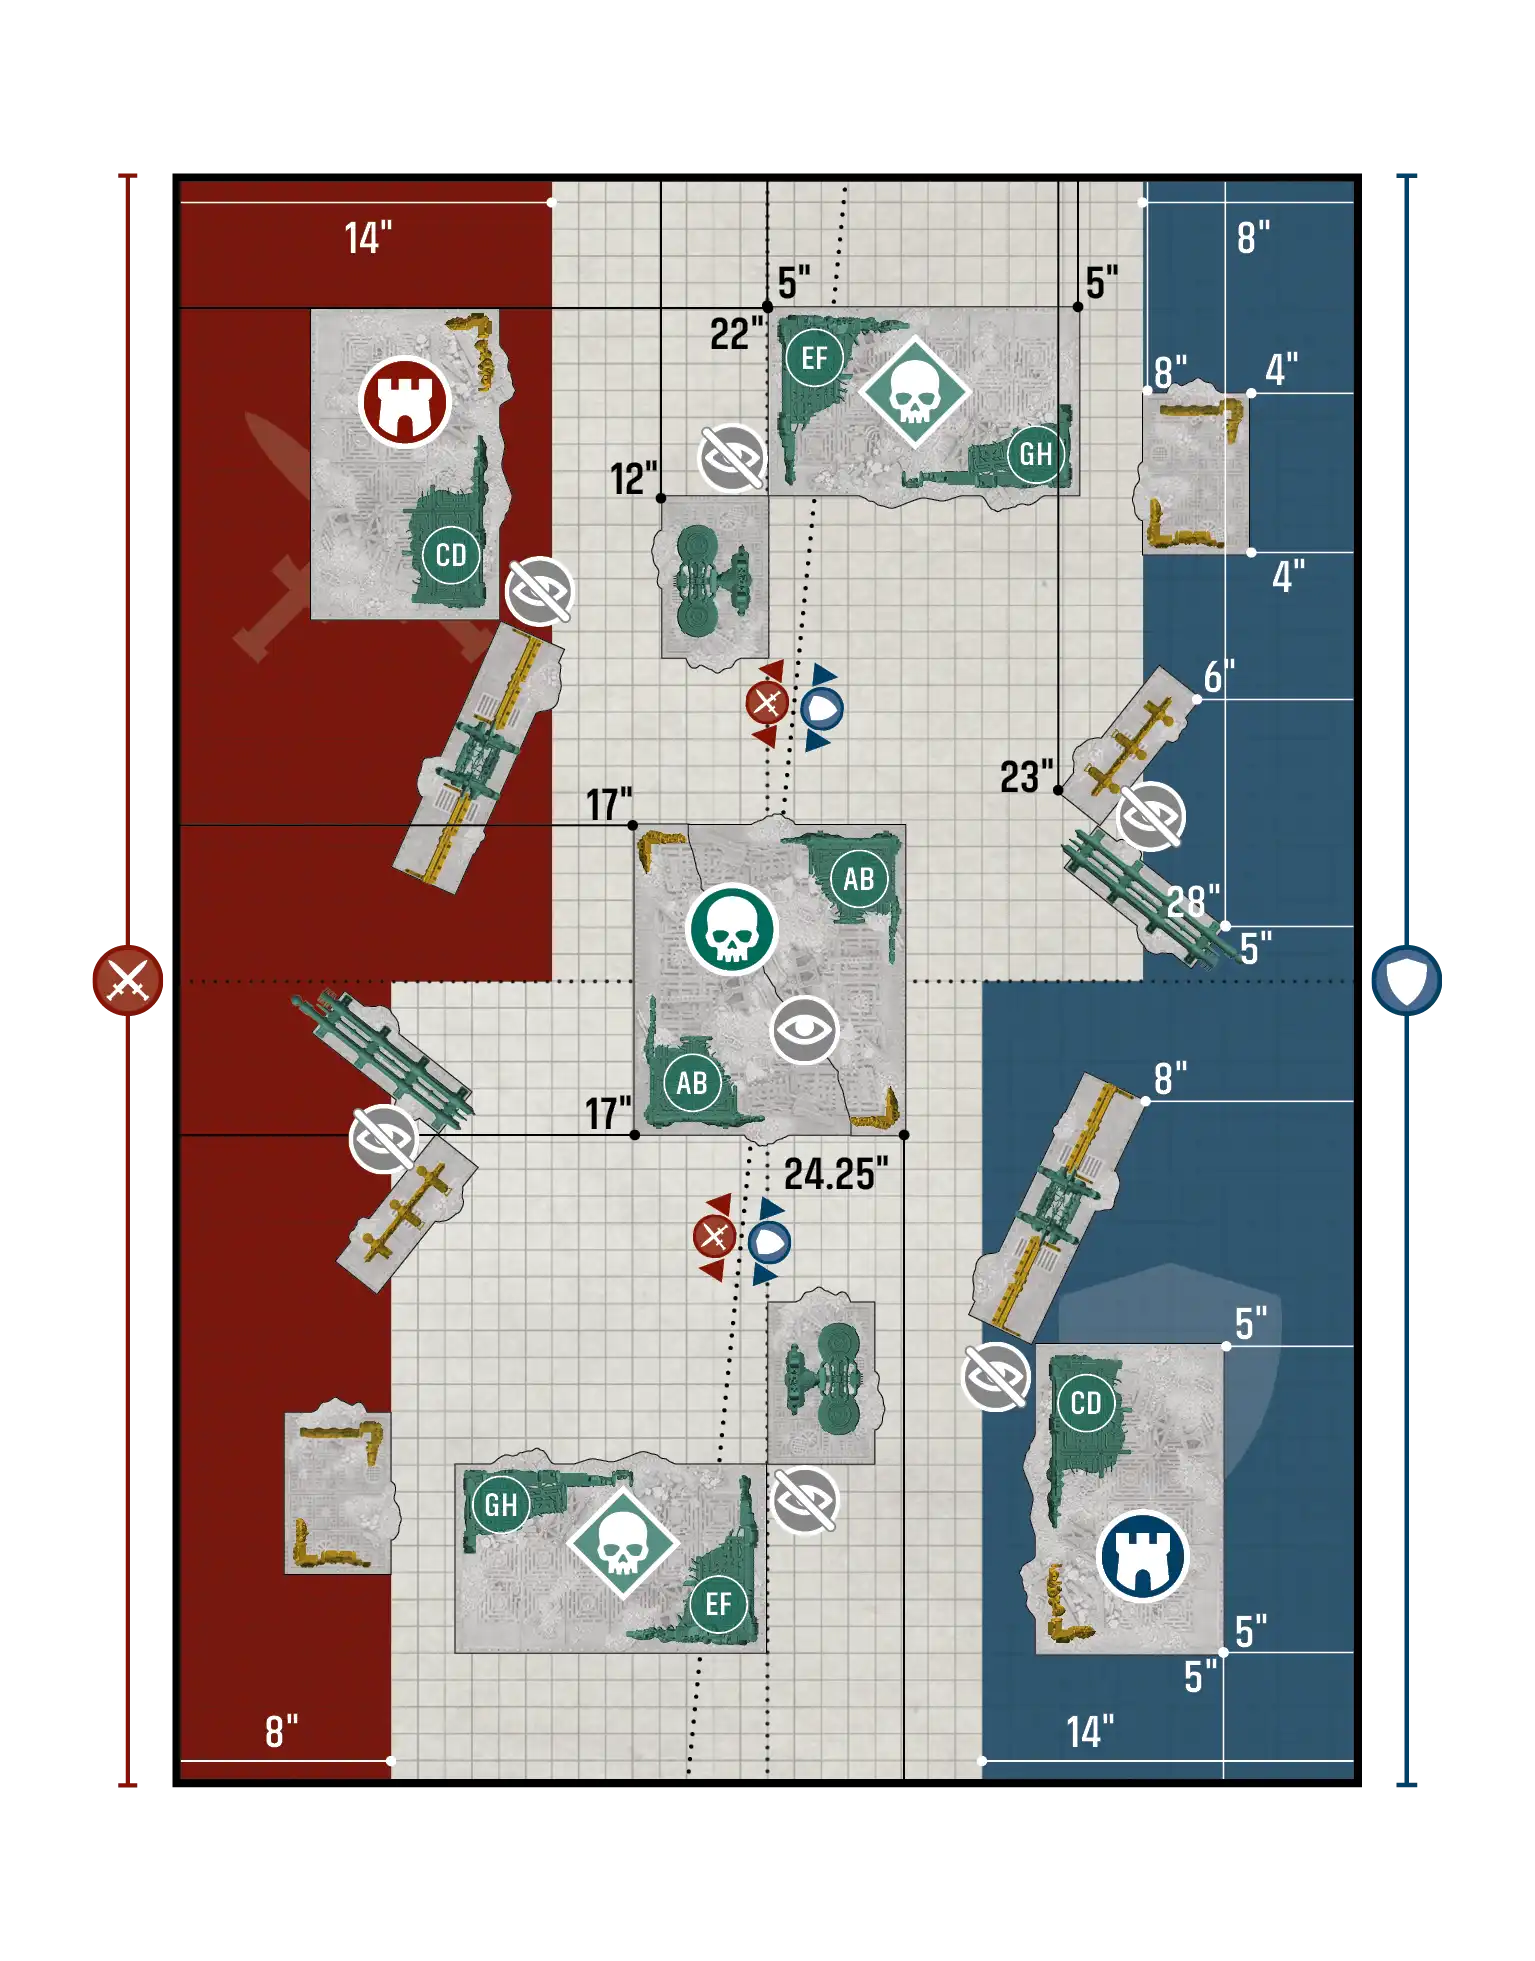
The following layouts are presented for Warhammer Event organisers and players to use in all of their games of Warhammer 40,000 using the most recent Chapter Approved Mission Deck. These are the layouts that are used at Games Workshop events and are designed for the best experience by the Warhammer Studio team, to reflect battlefields that create risk-and-reward decisions with each player's objectives in mind.
Each combination of Primary Missions has three recommended layouts, labelled A, B and C. As directed by the Warhammer Event organiser, the players either use the layout specified or randomly determine which of these layouts to use.
Disruption / Disruption - Layout A#
Disruption / Disruption - Layout B#
Disruption / Disruption - Layout C#
Disruption / Priority Assets - Layout A#
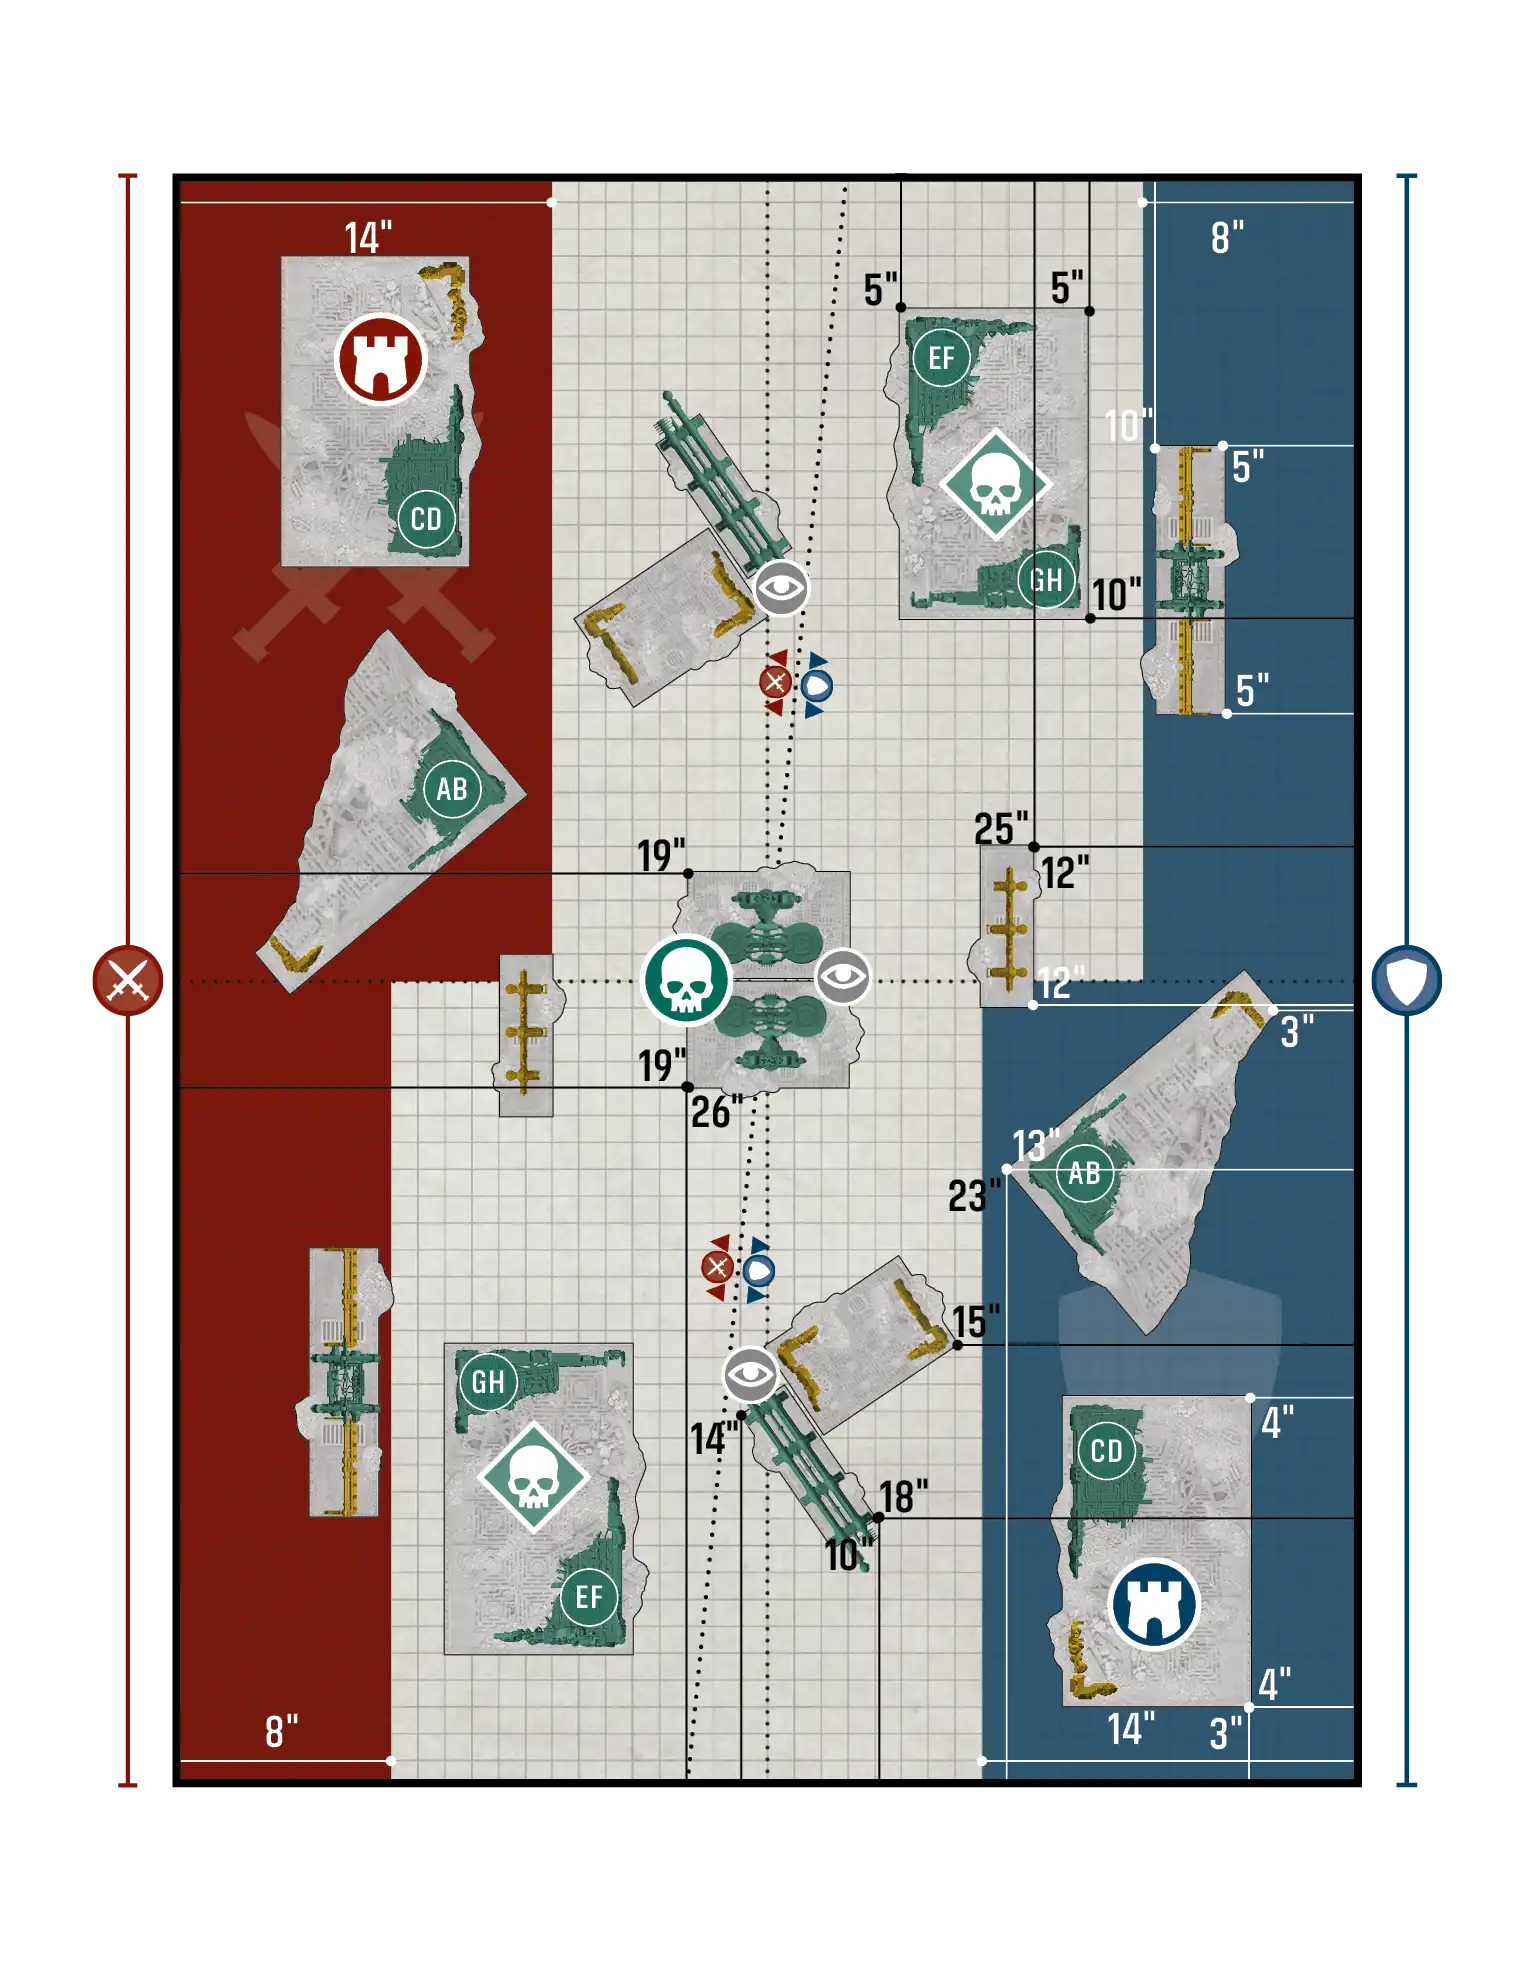
Disruption / Priority Assets - Layout B#
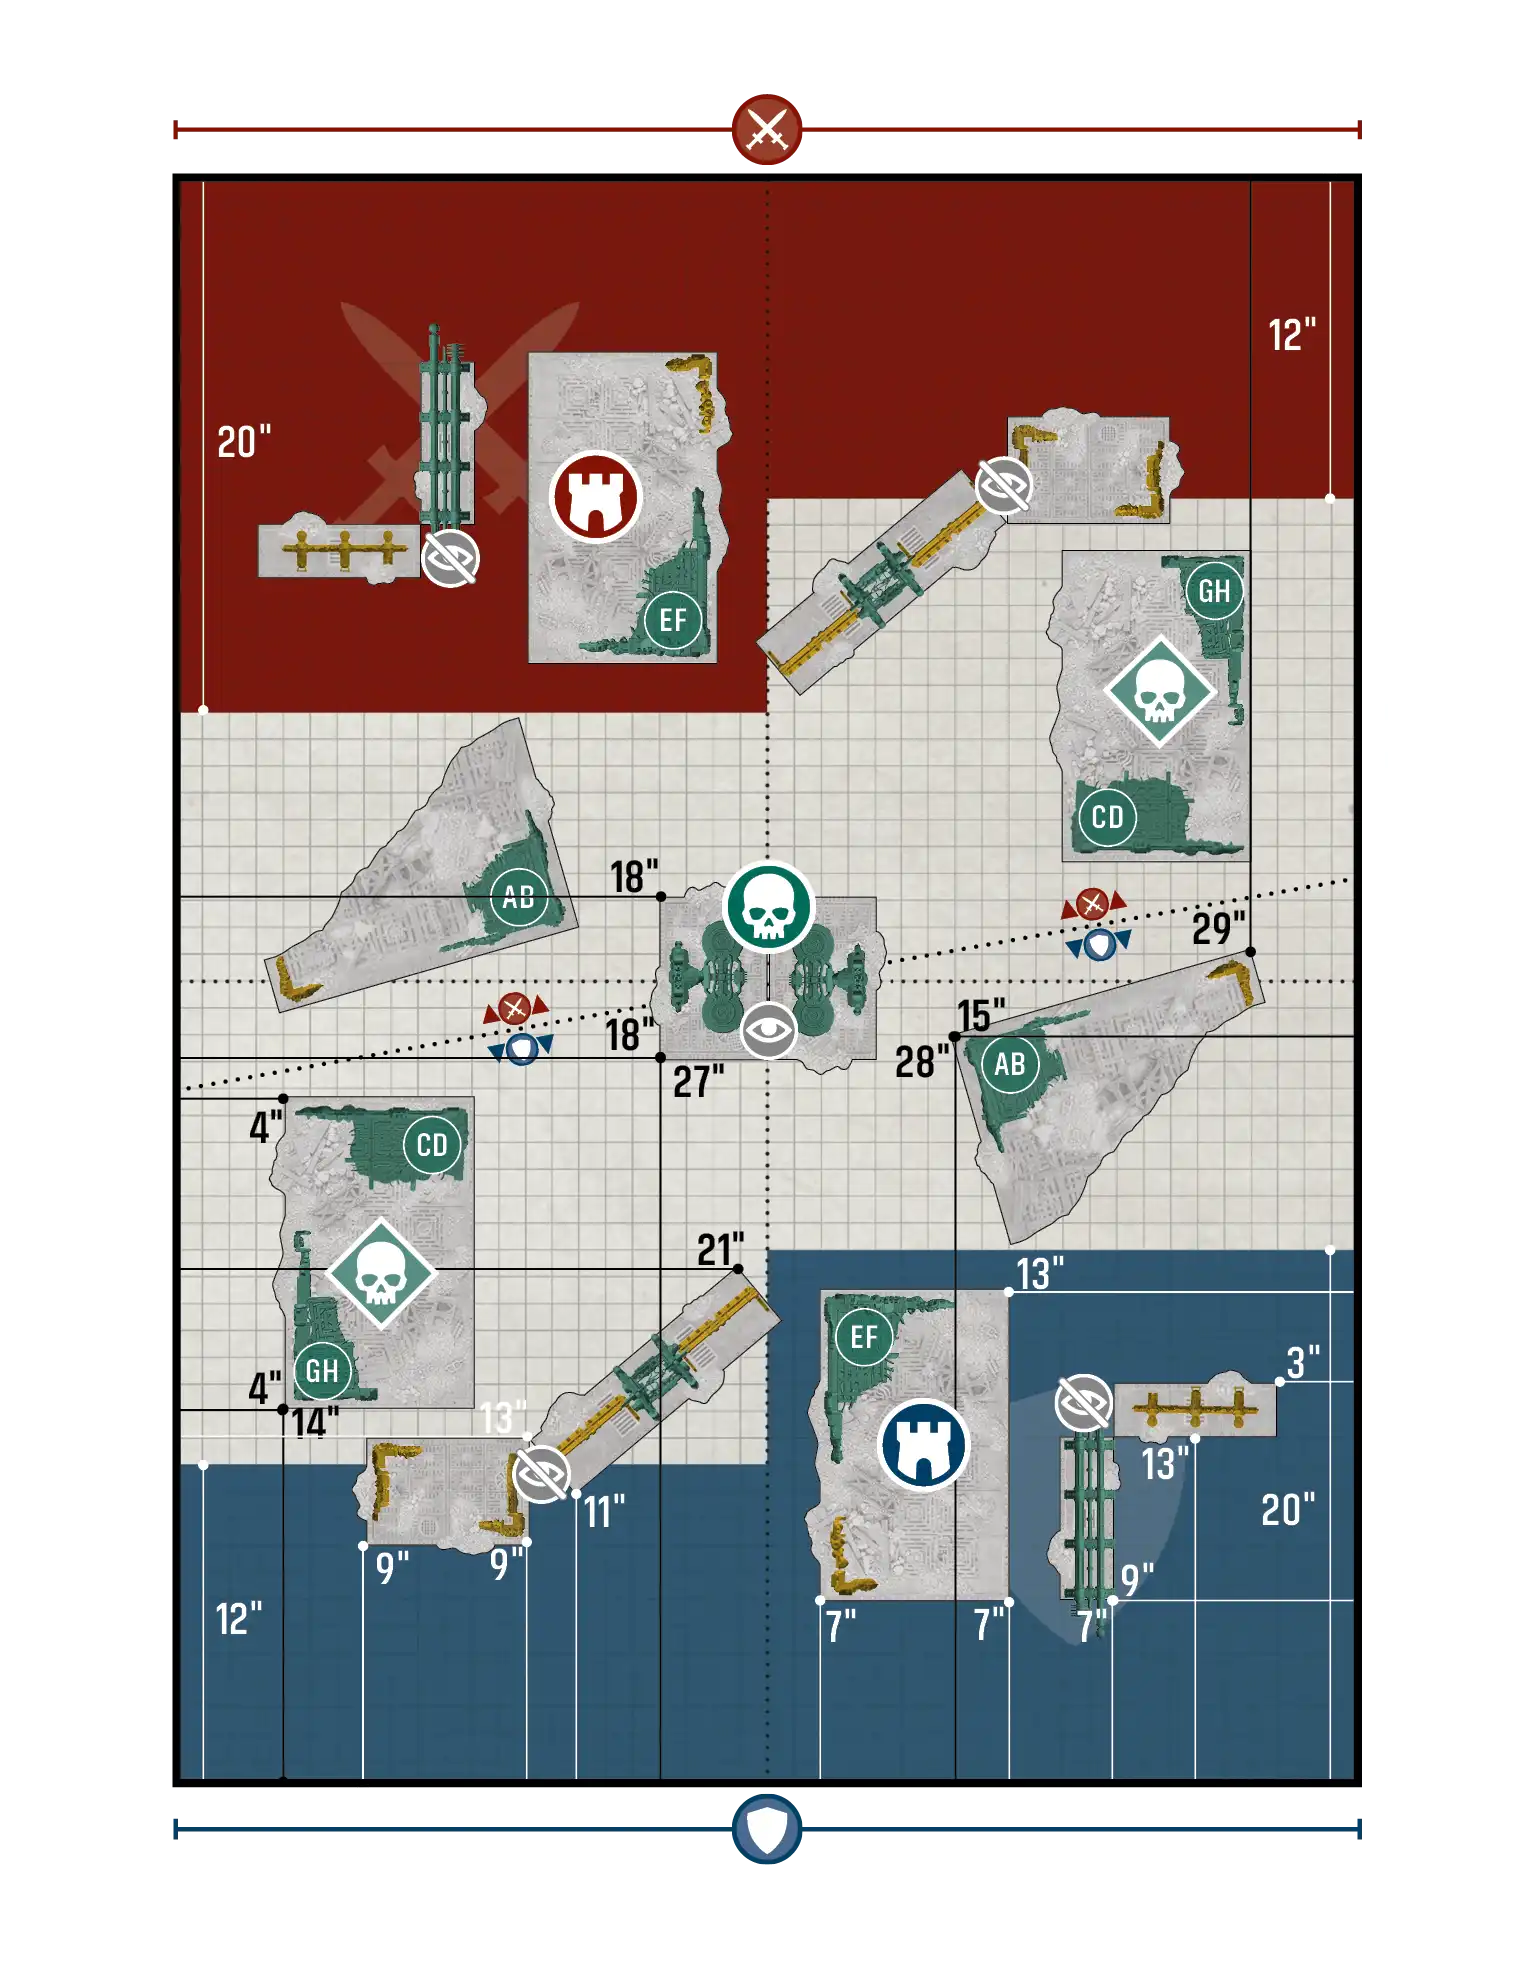
Disruption / Priority Assets - Layout C#
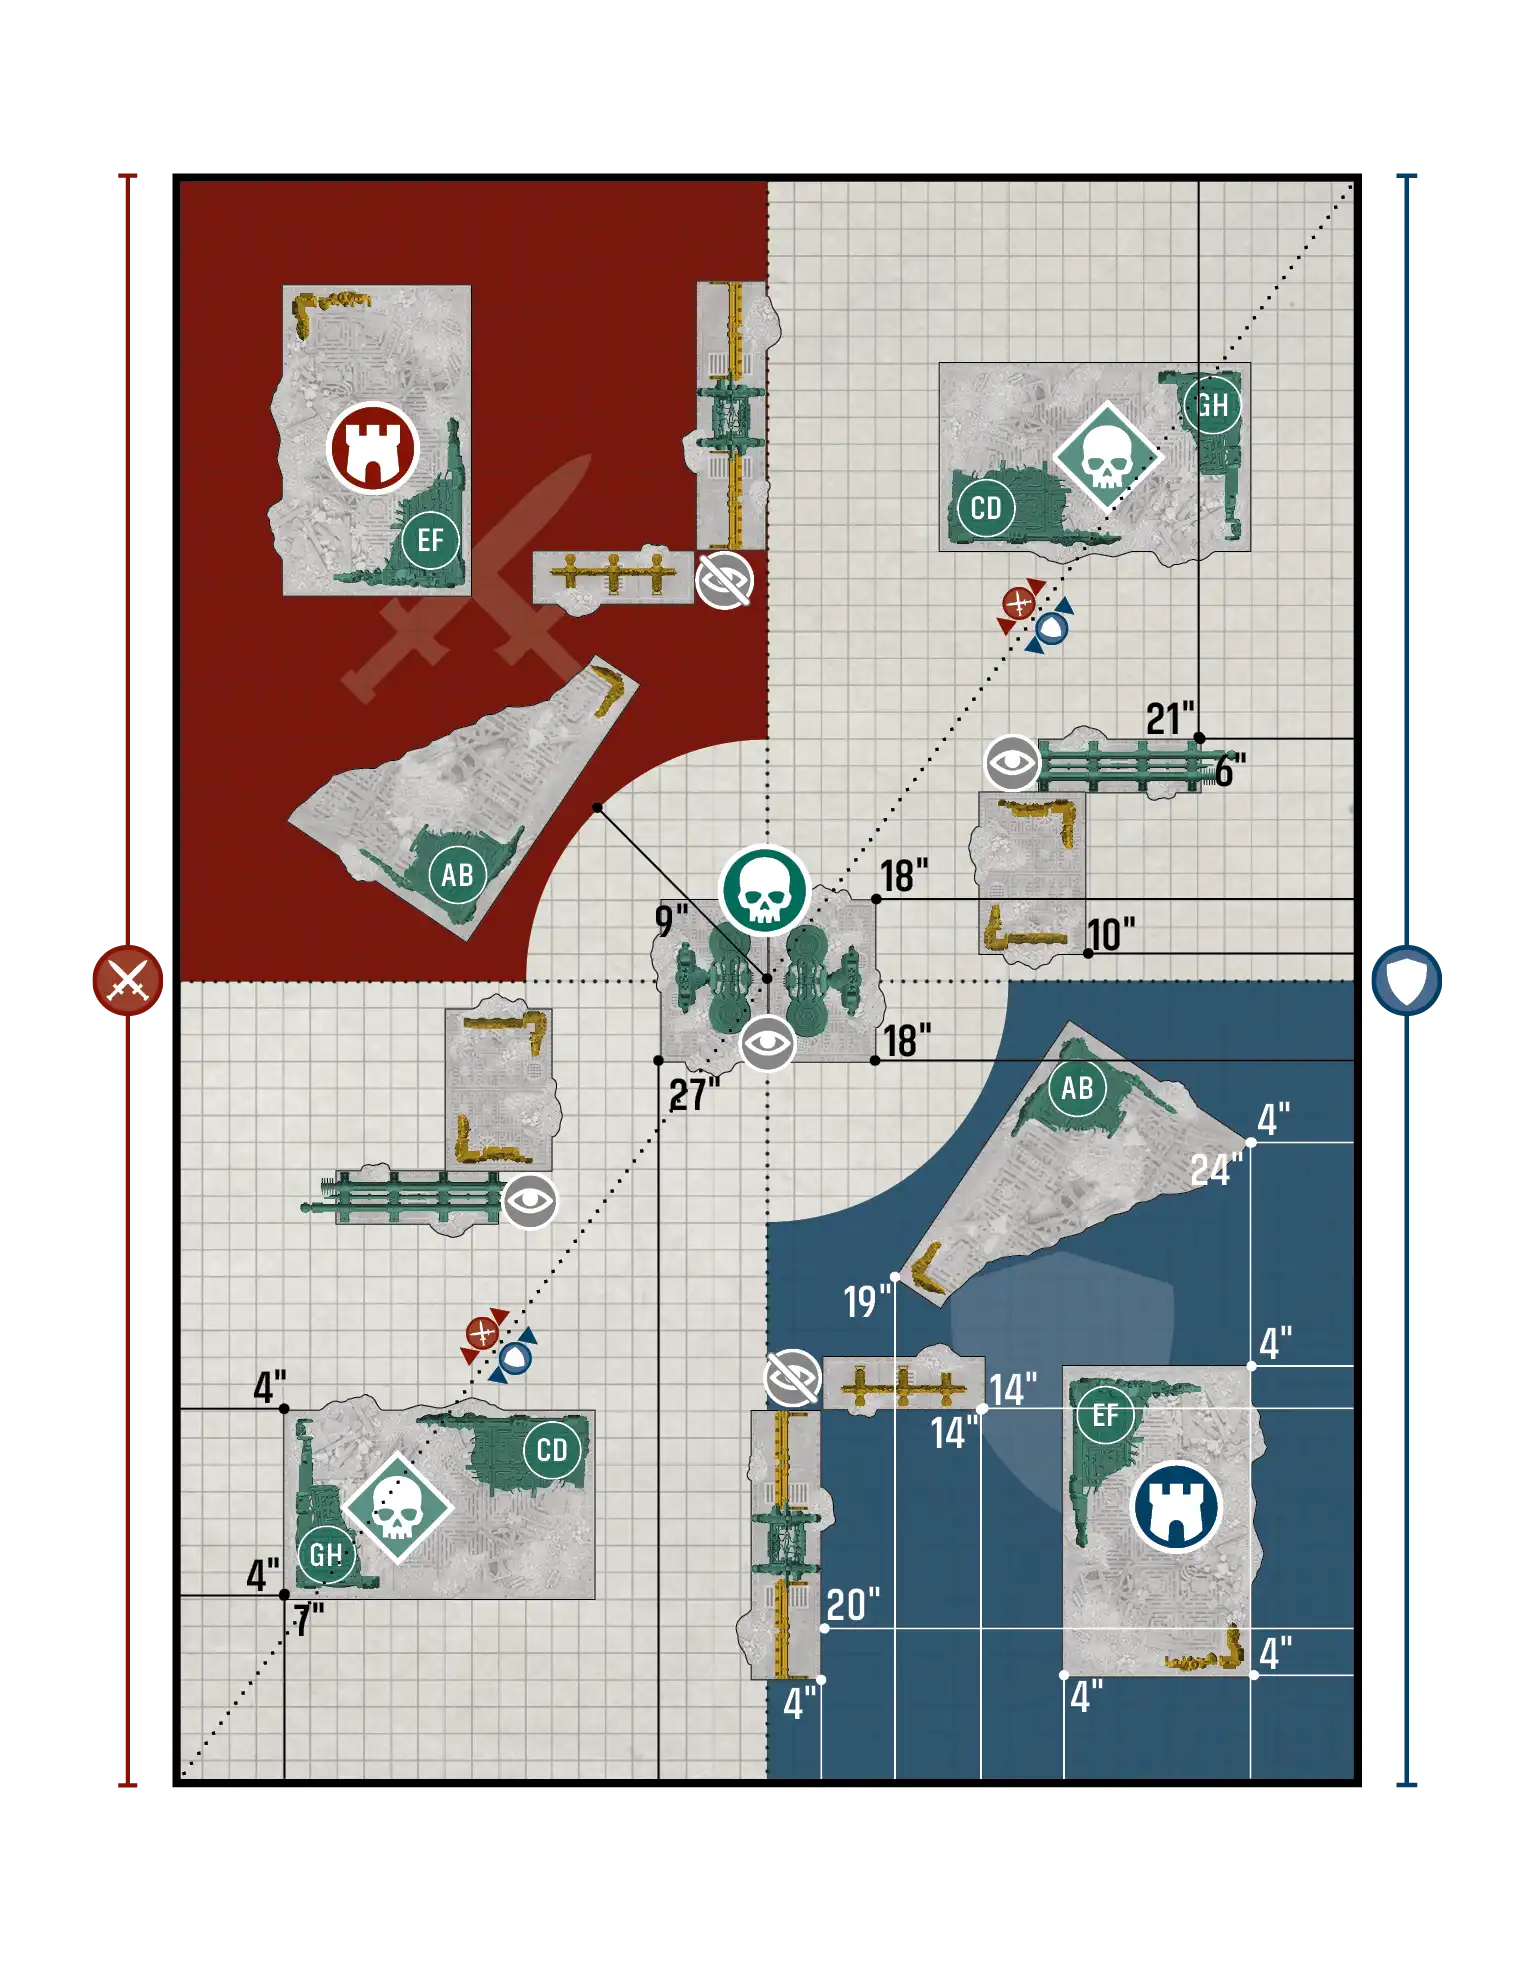
Disruption / Reconnaissance - Layout A#
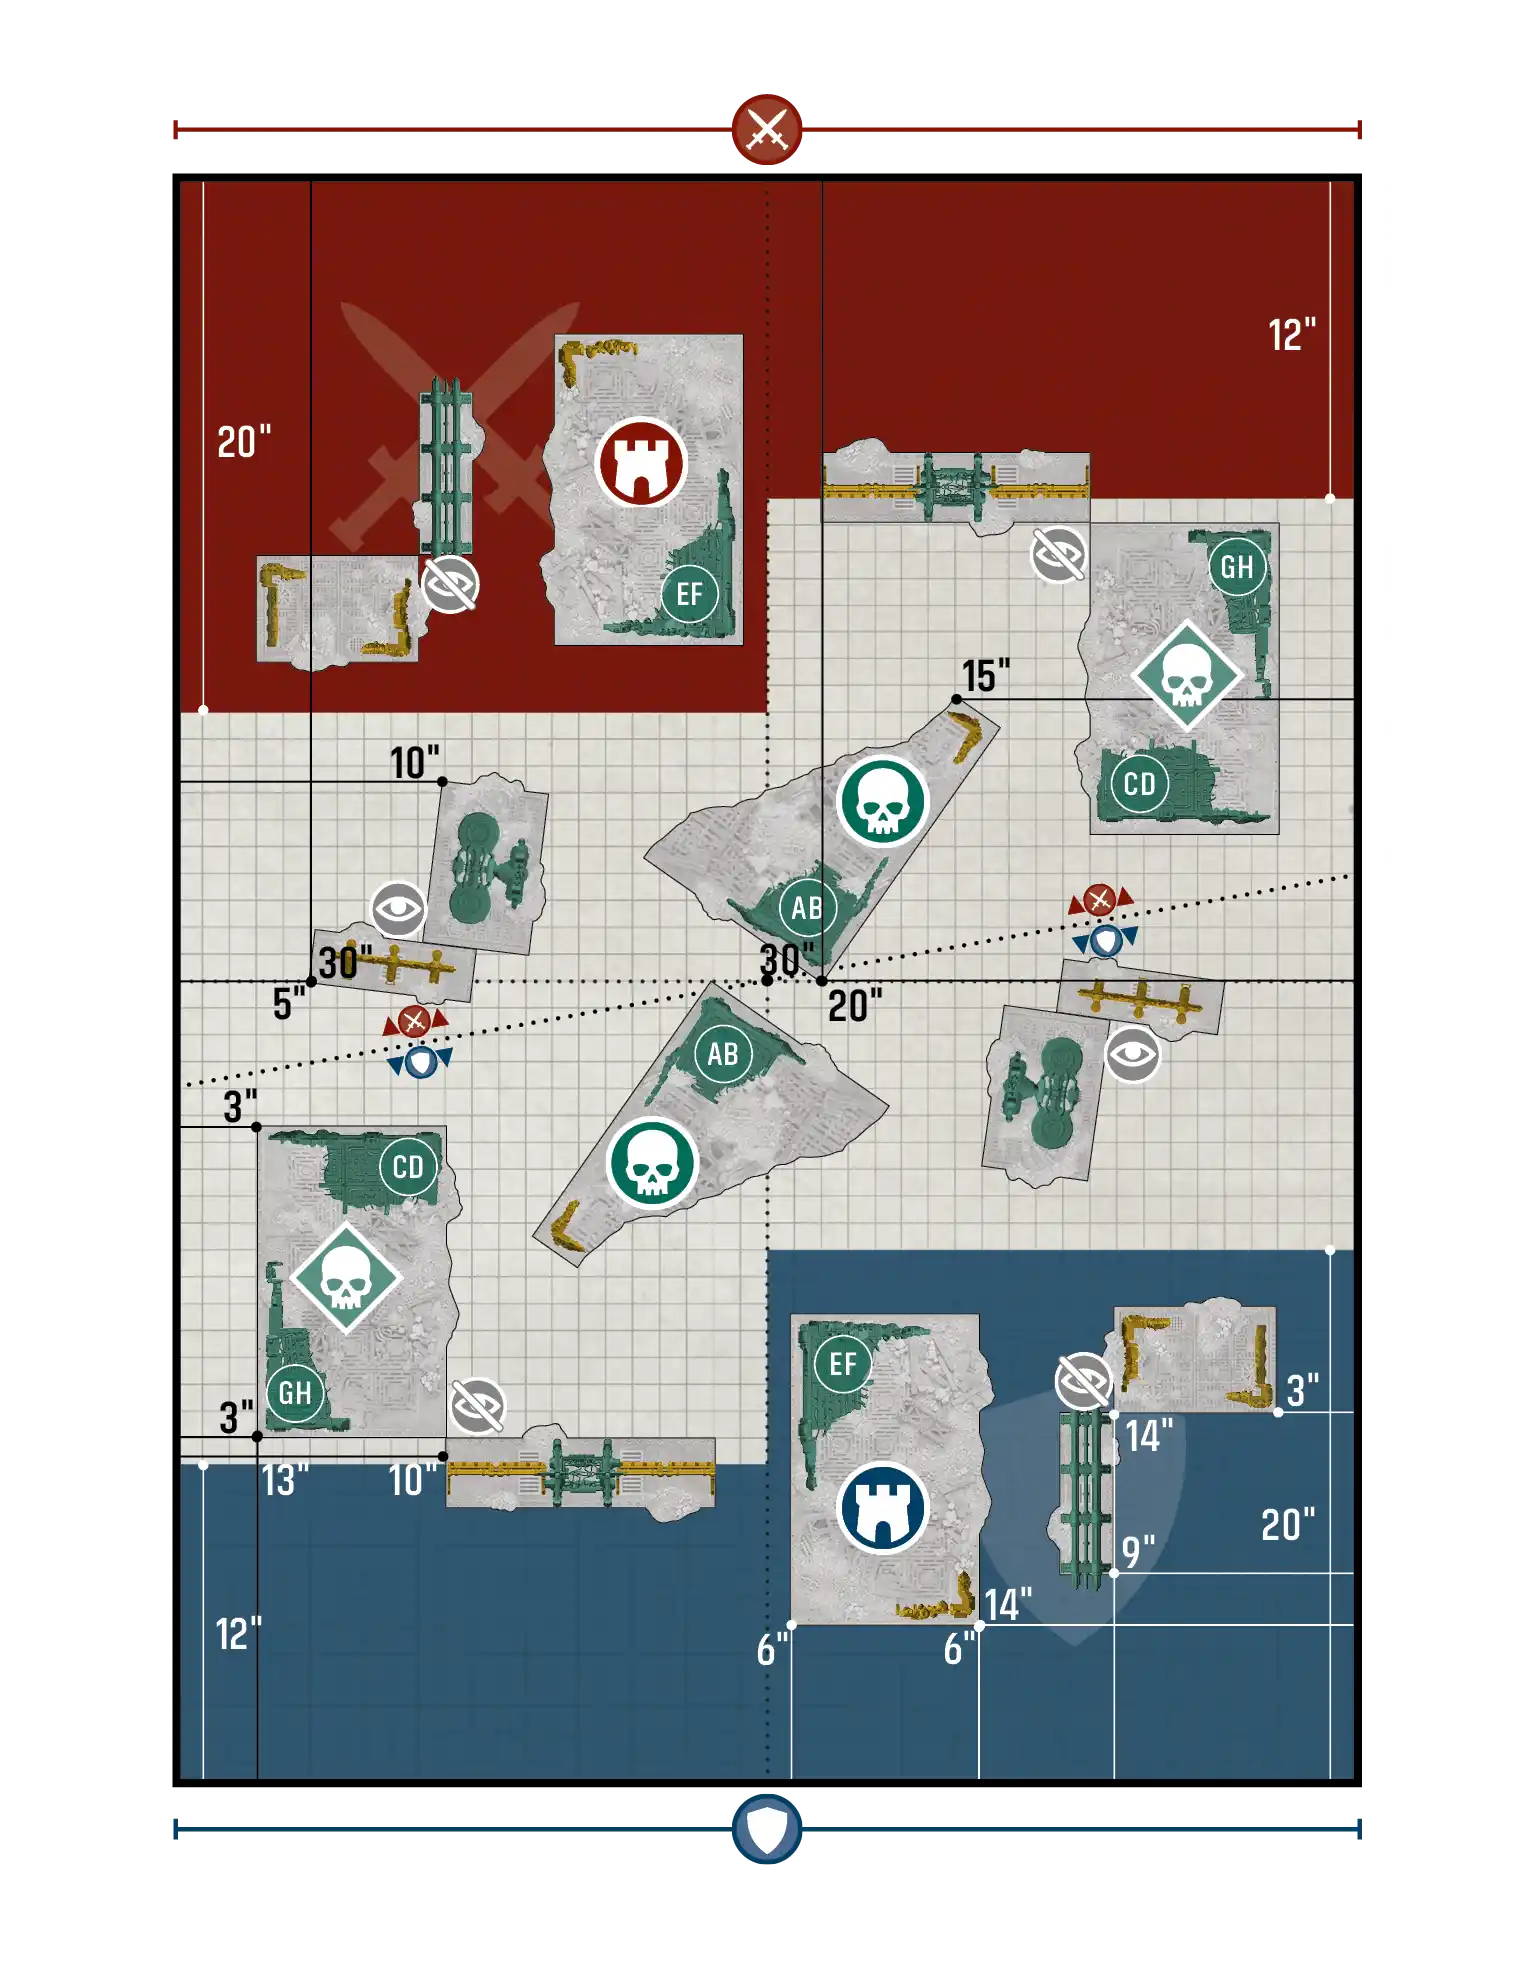
Disruption / Reconnaissance - Layout B#
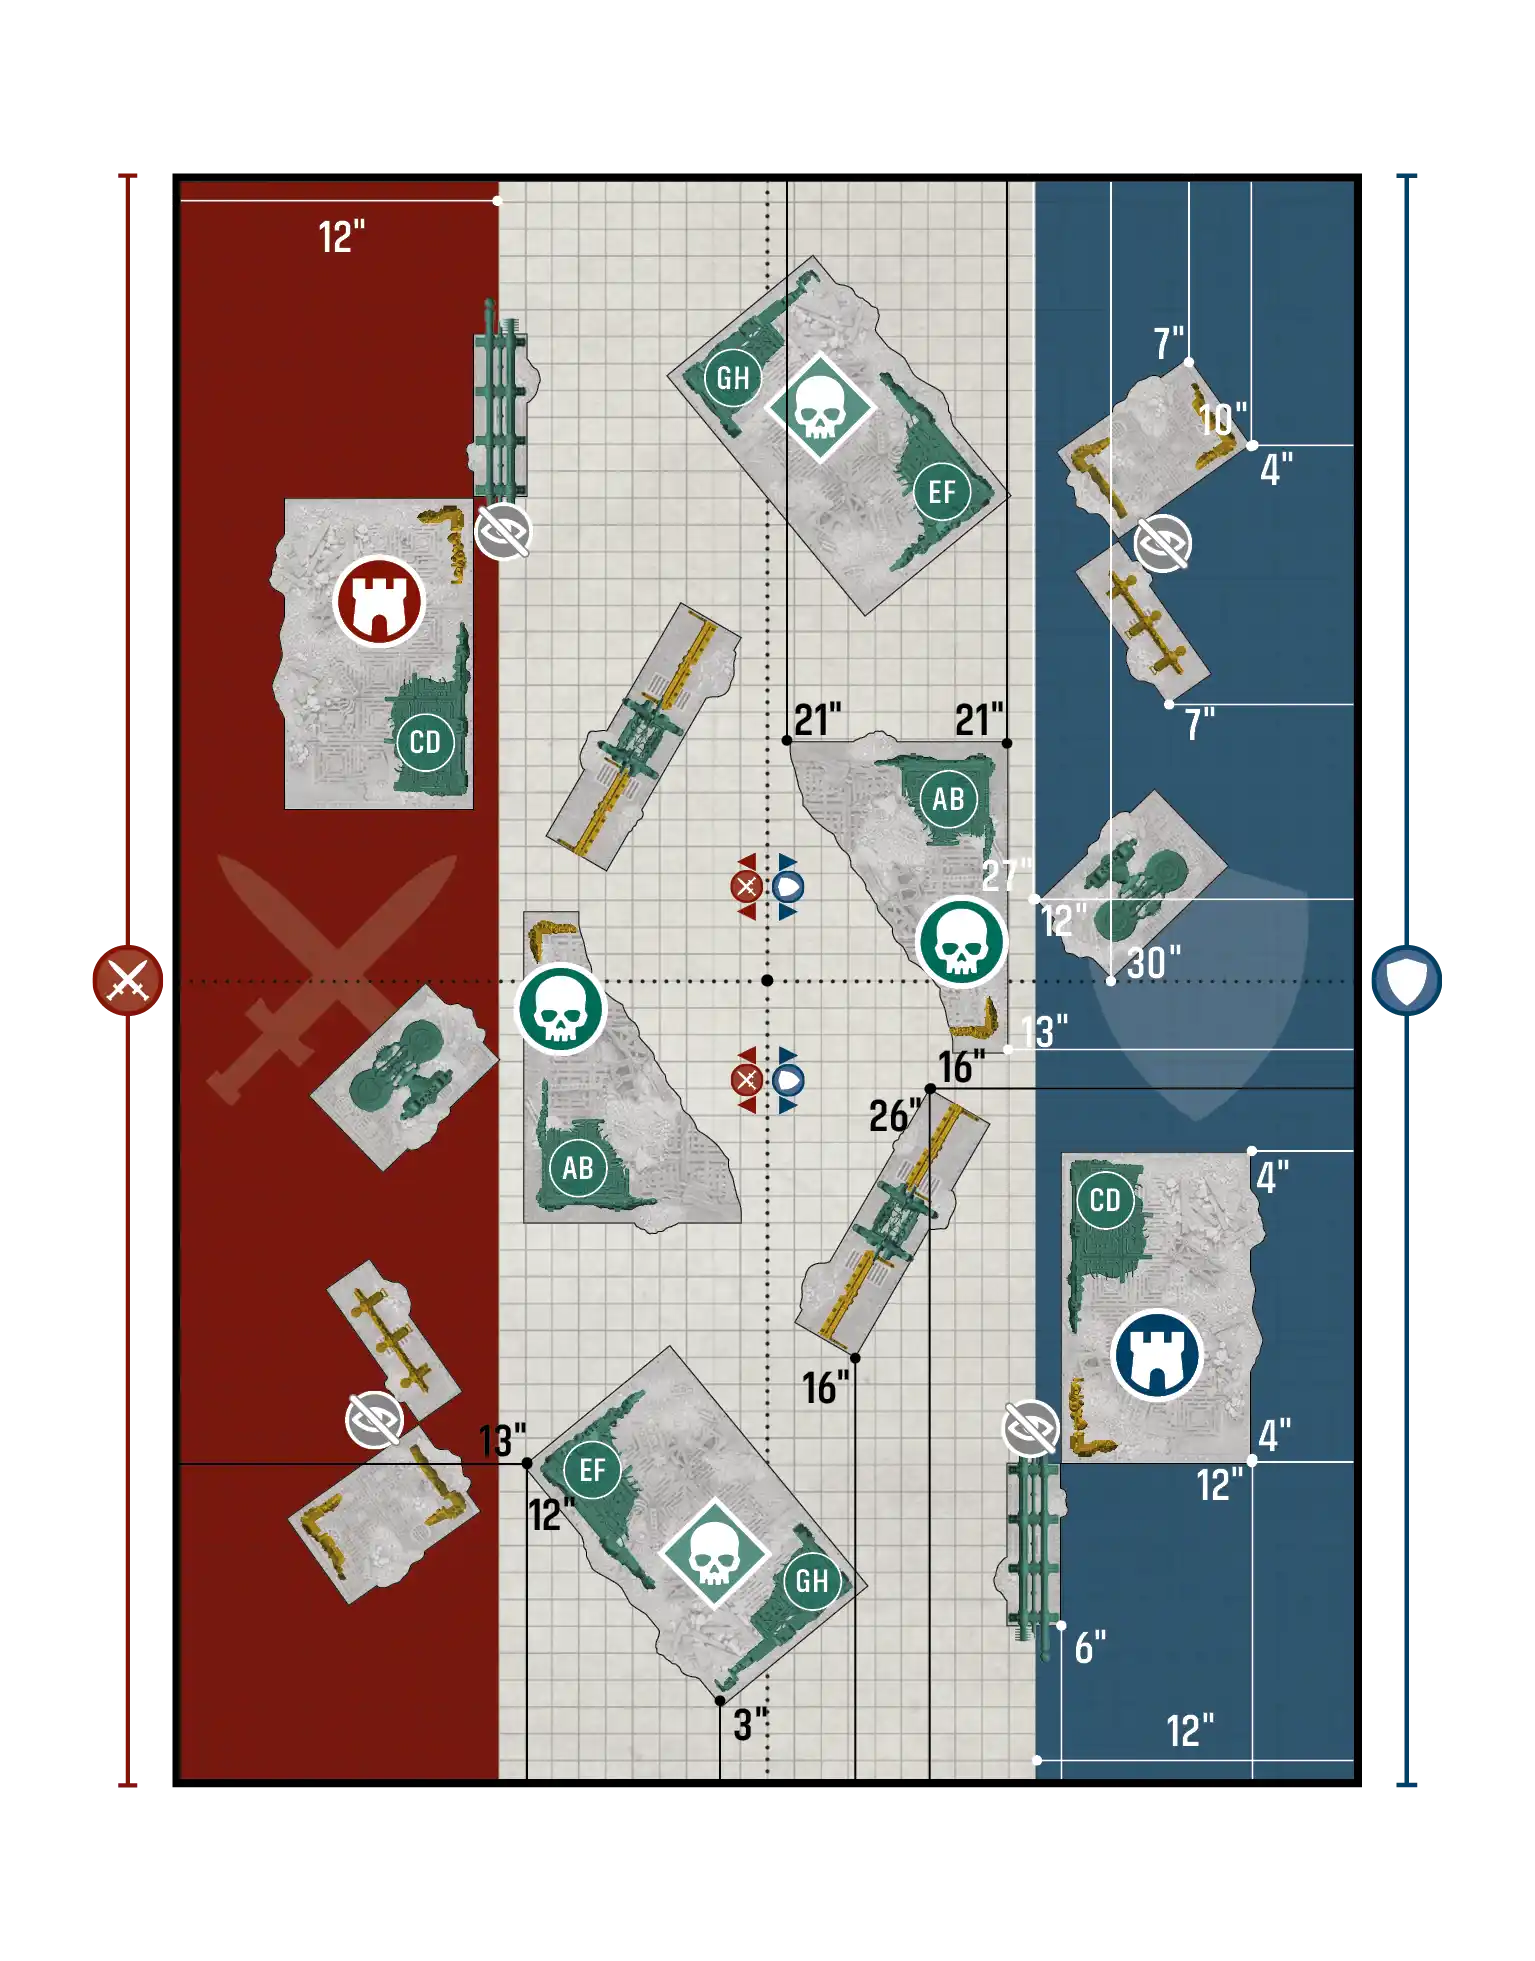
Disruption / Reconnaissance - Layout C#
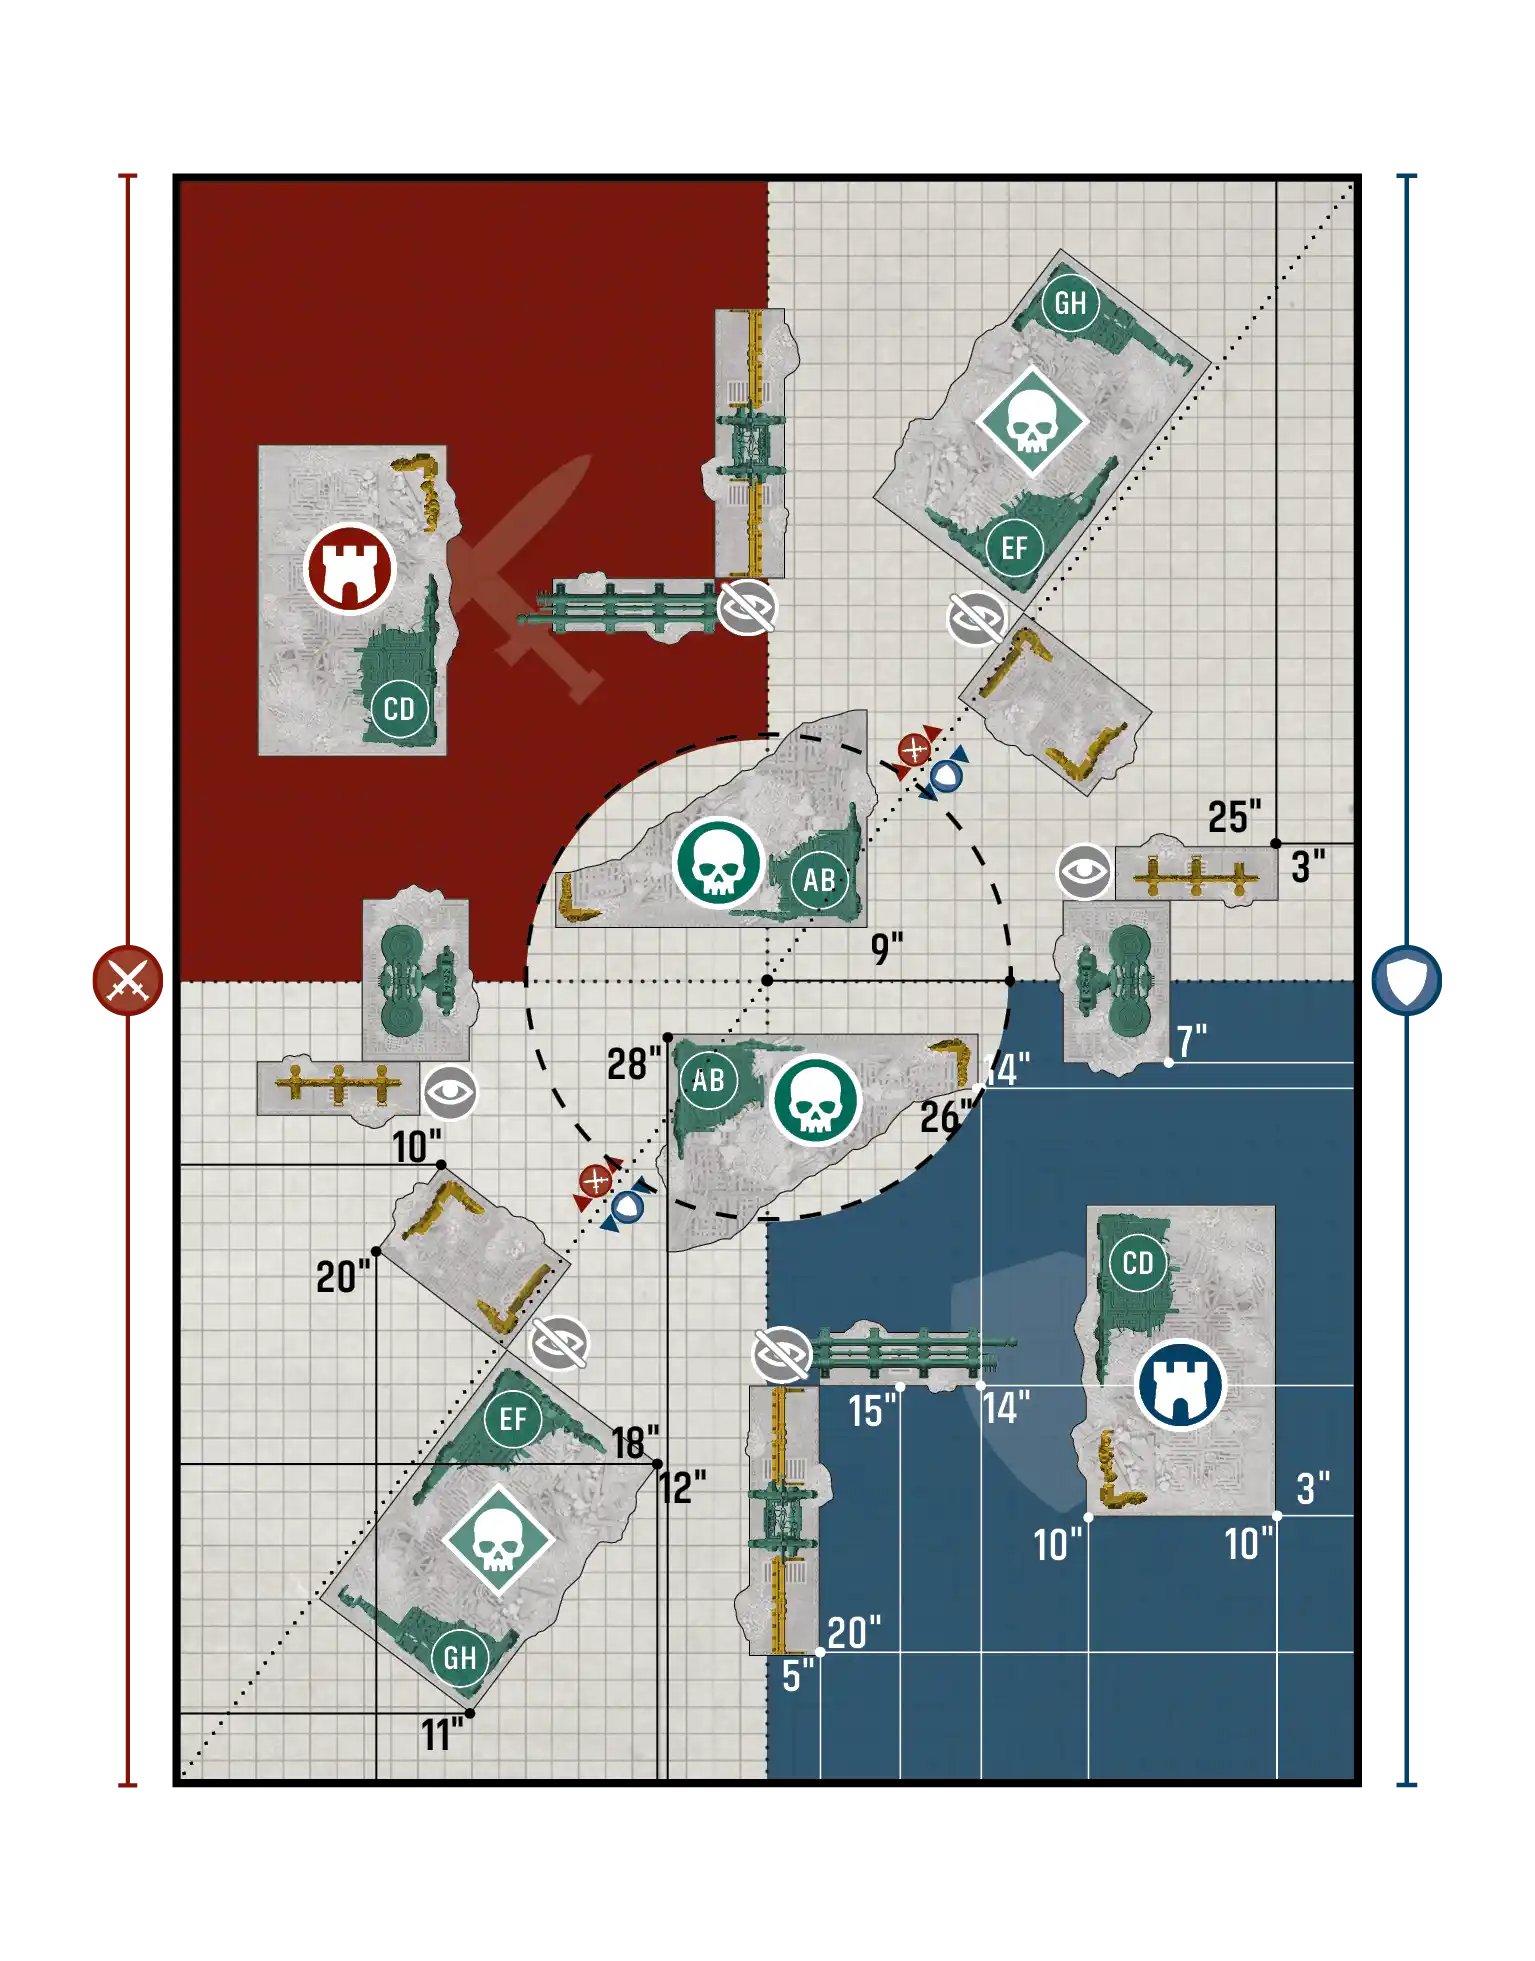
Priority Assets / Priority Assets - Layout A#
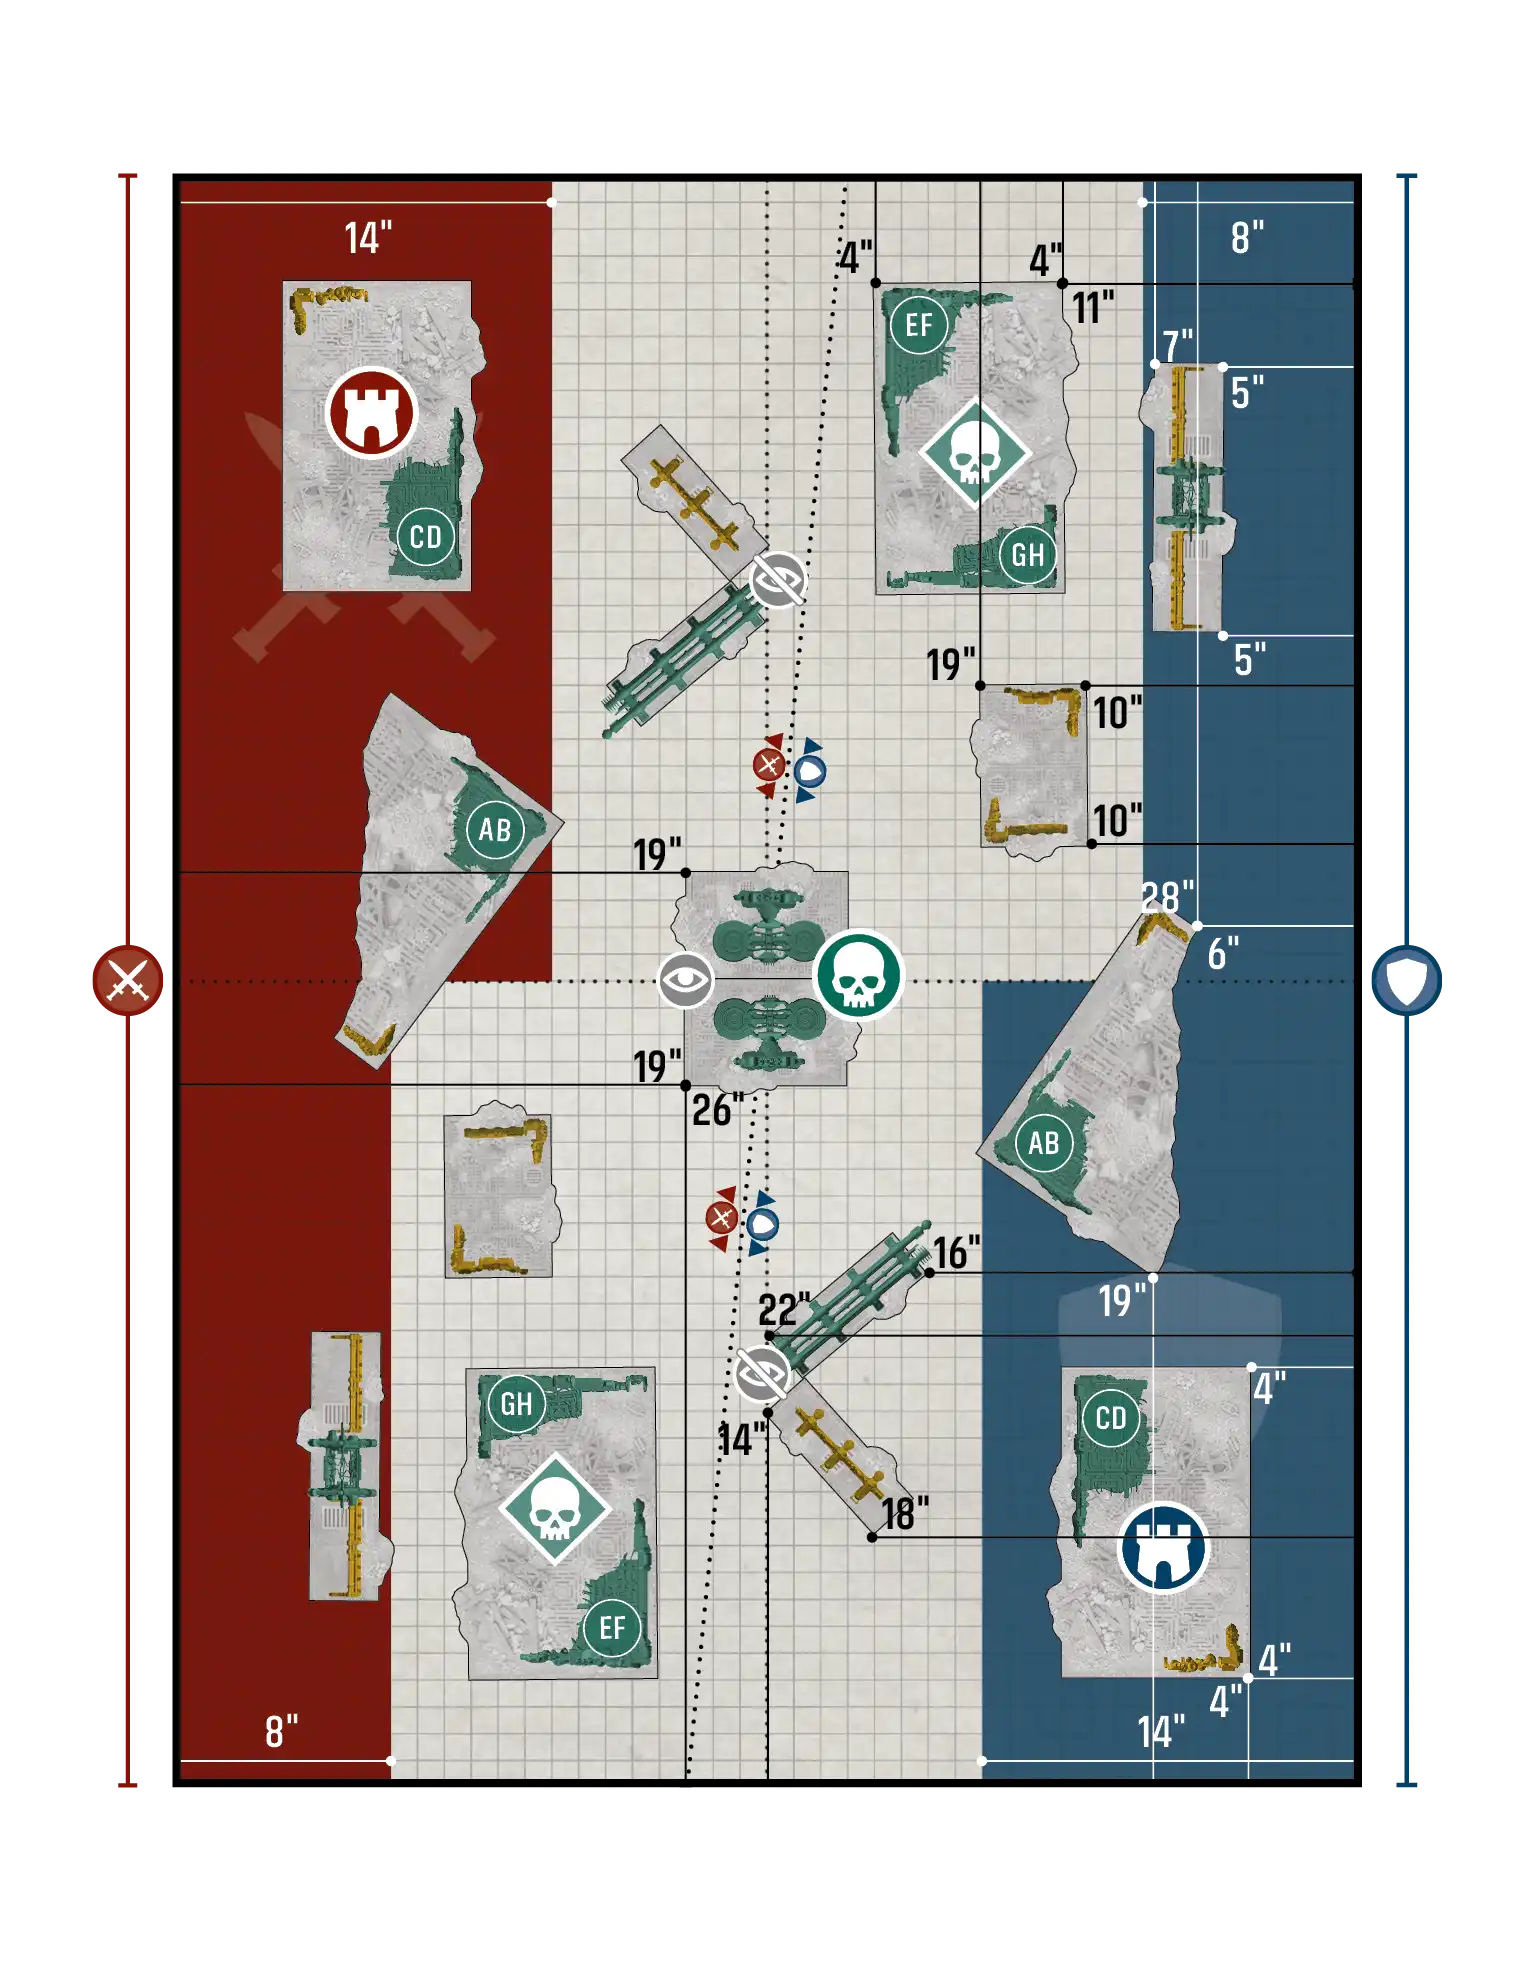
Priority Assets / Priority Assets - Layout B#
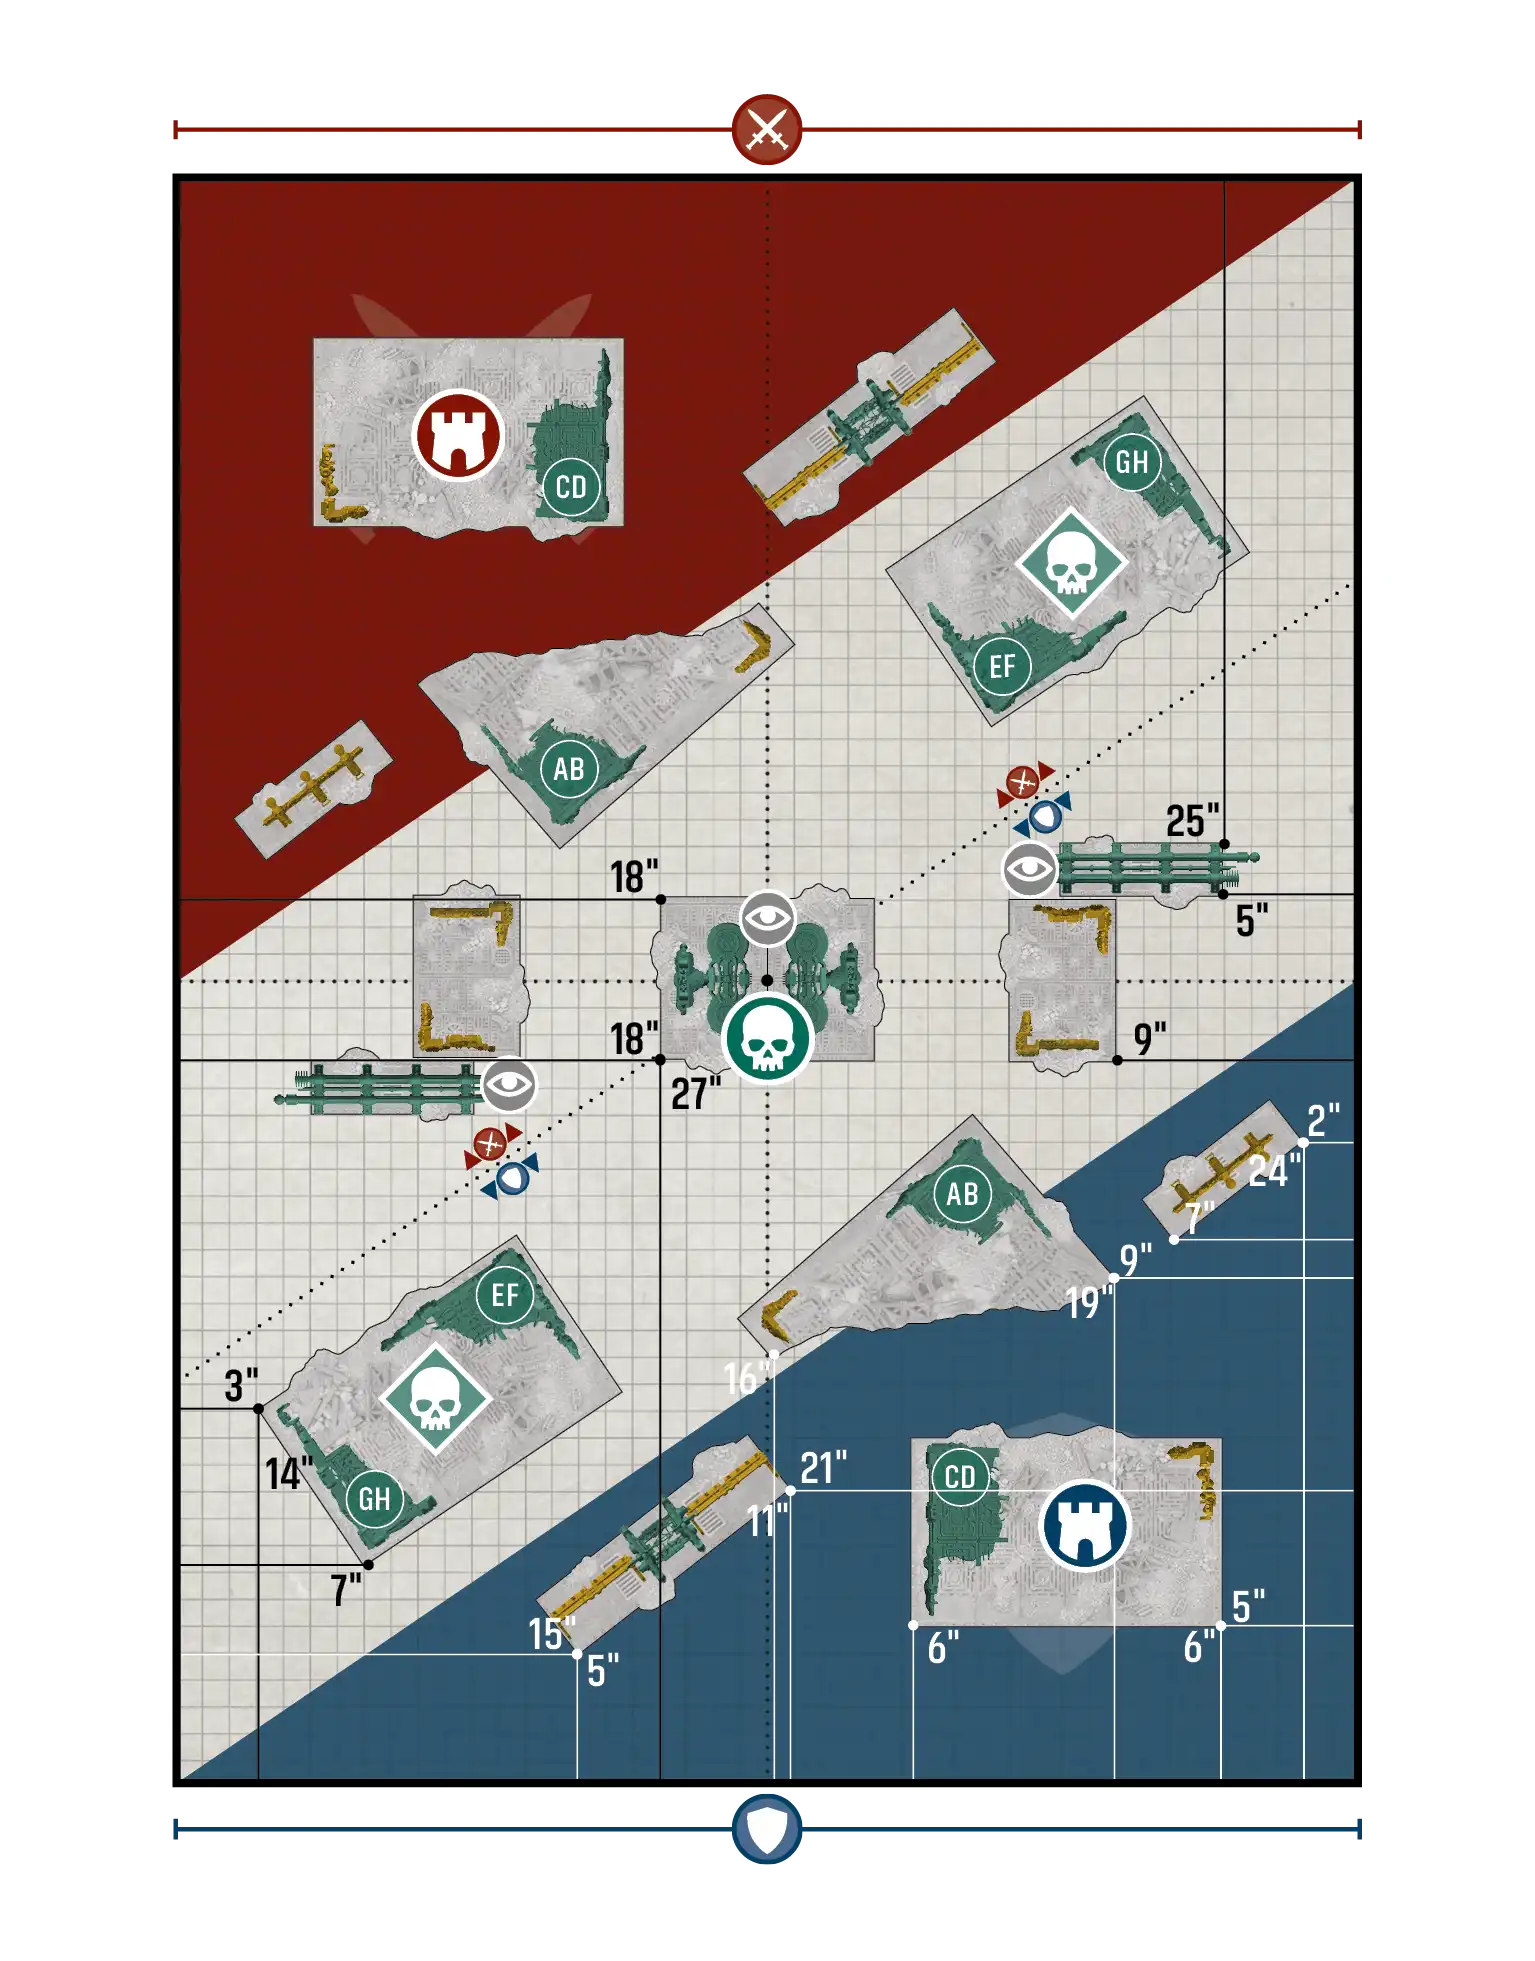
Priority Assets / Priority Assets - Layout C#
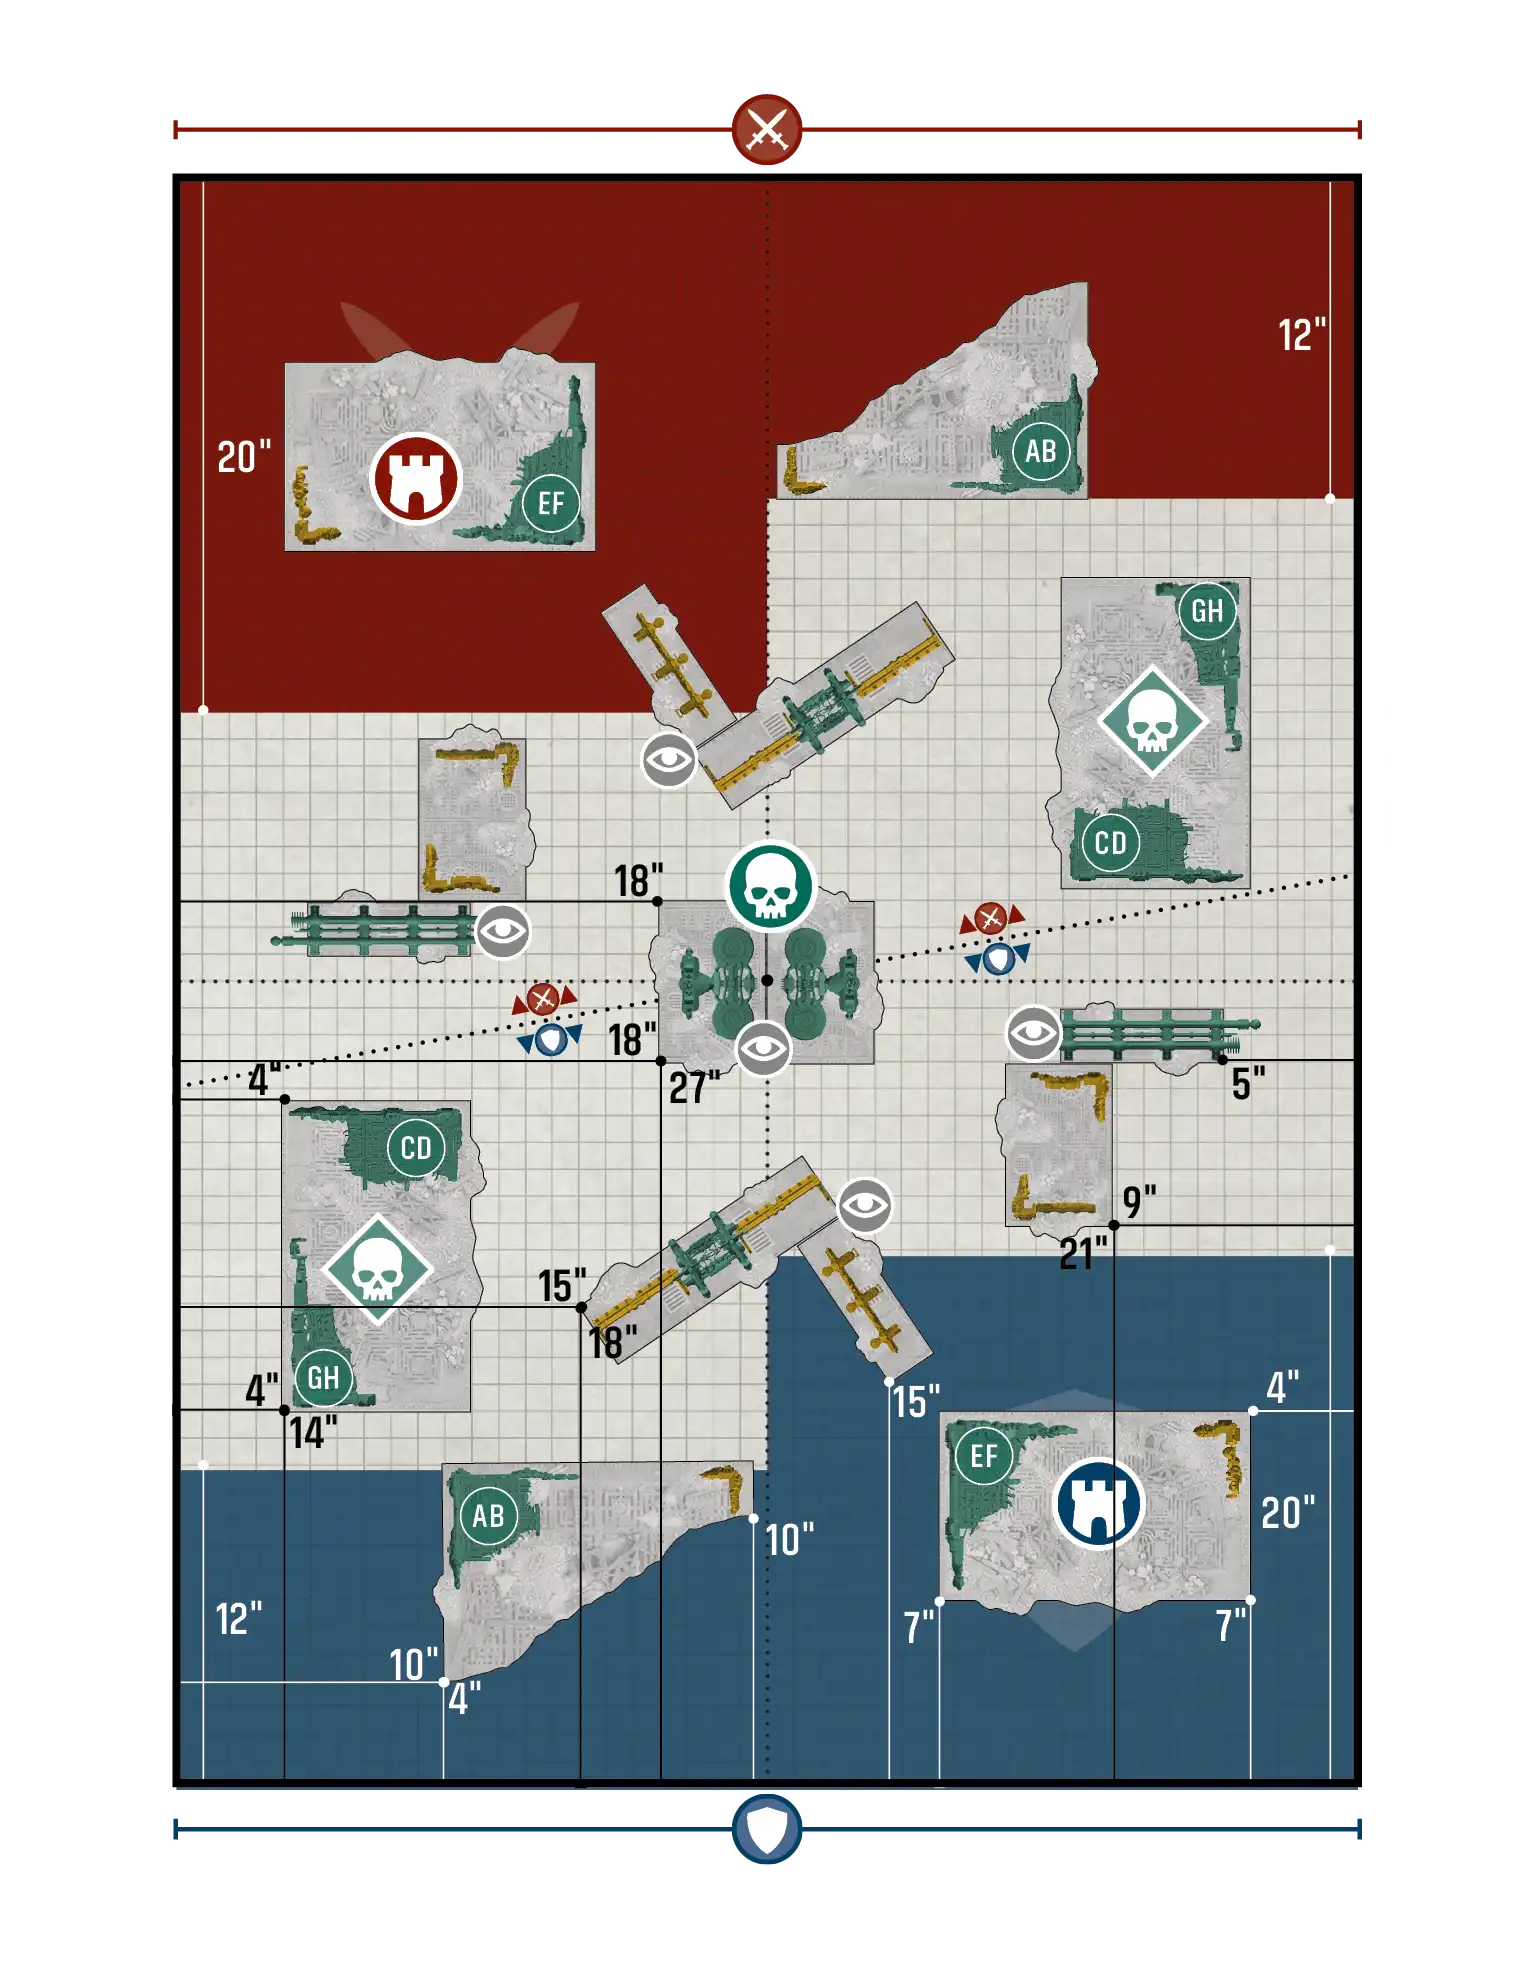
Purge the Foe / Disruption - Layout A#
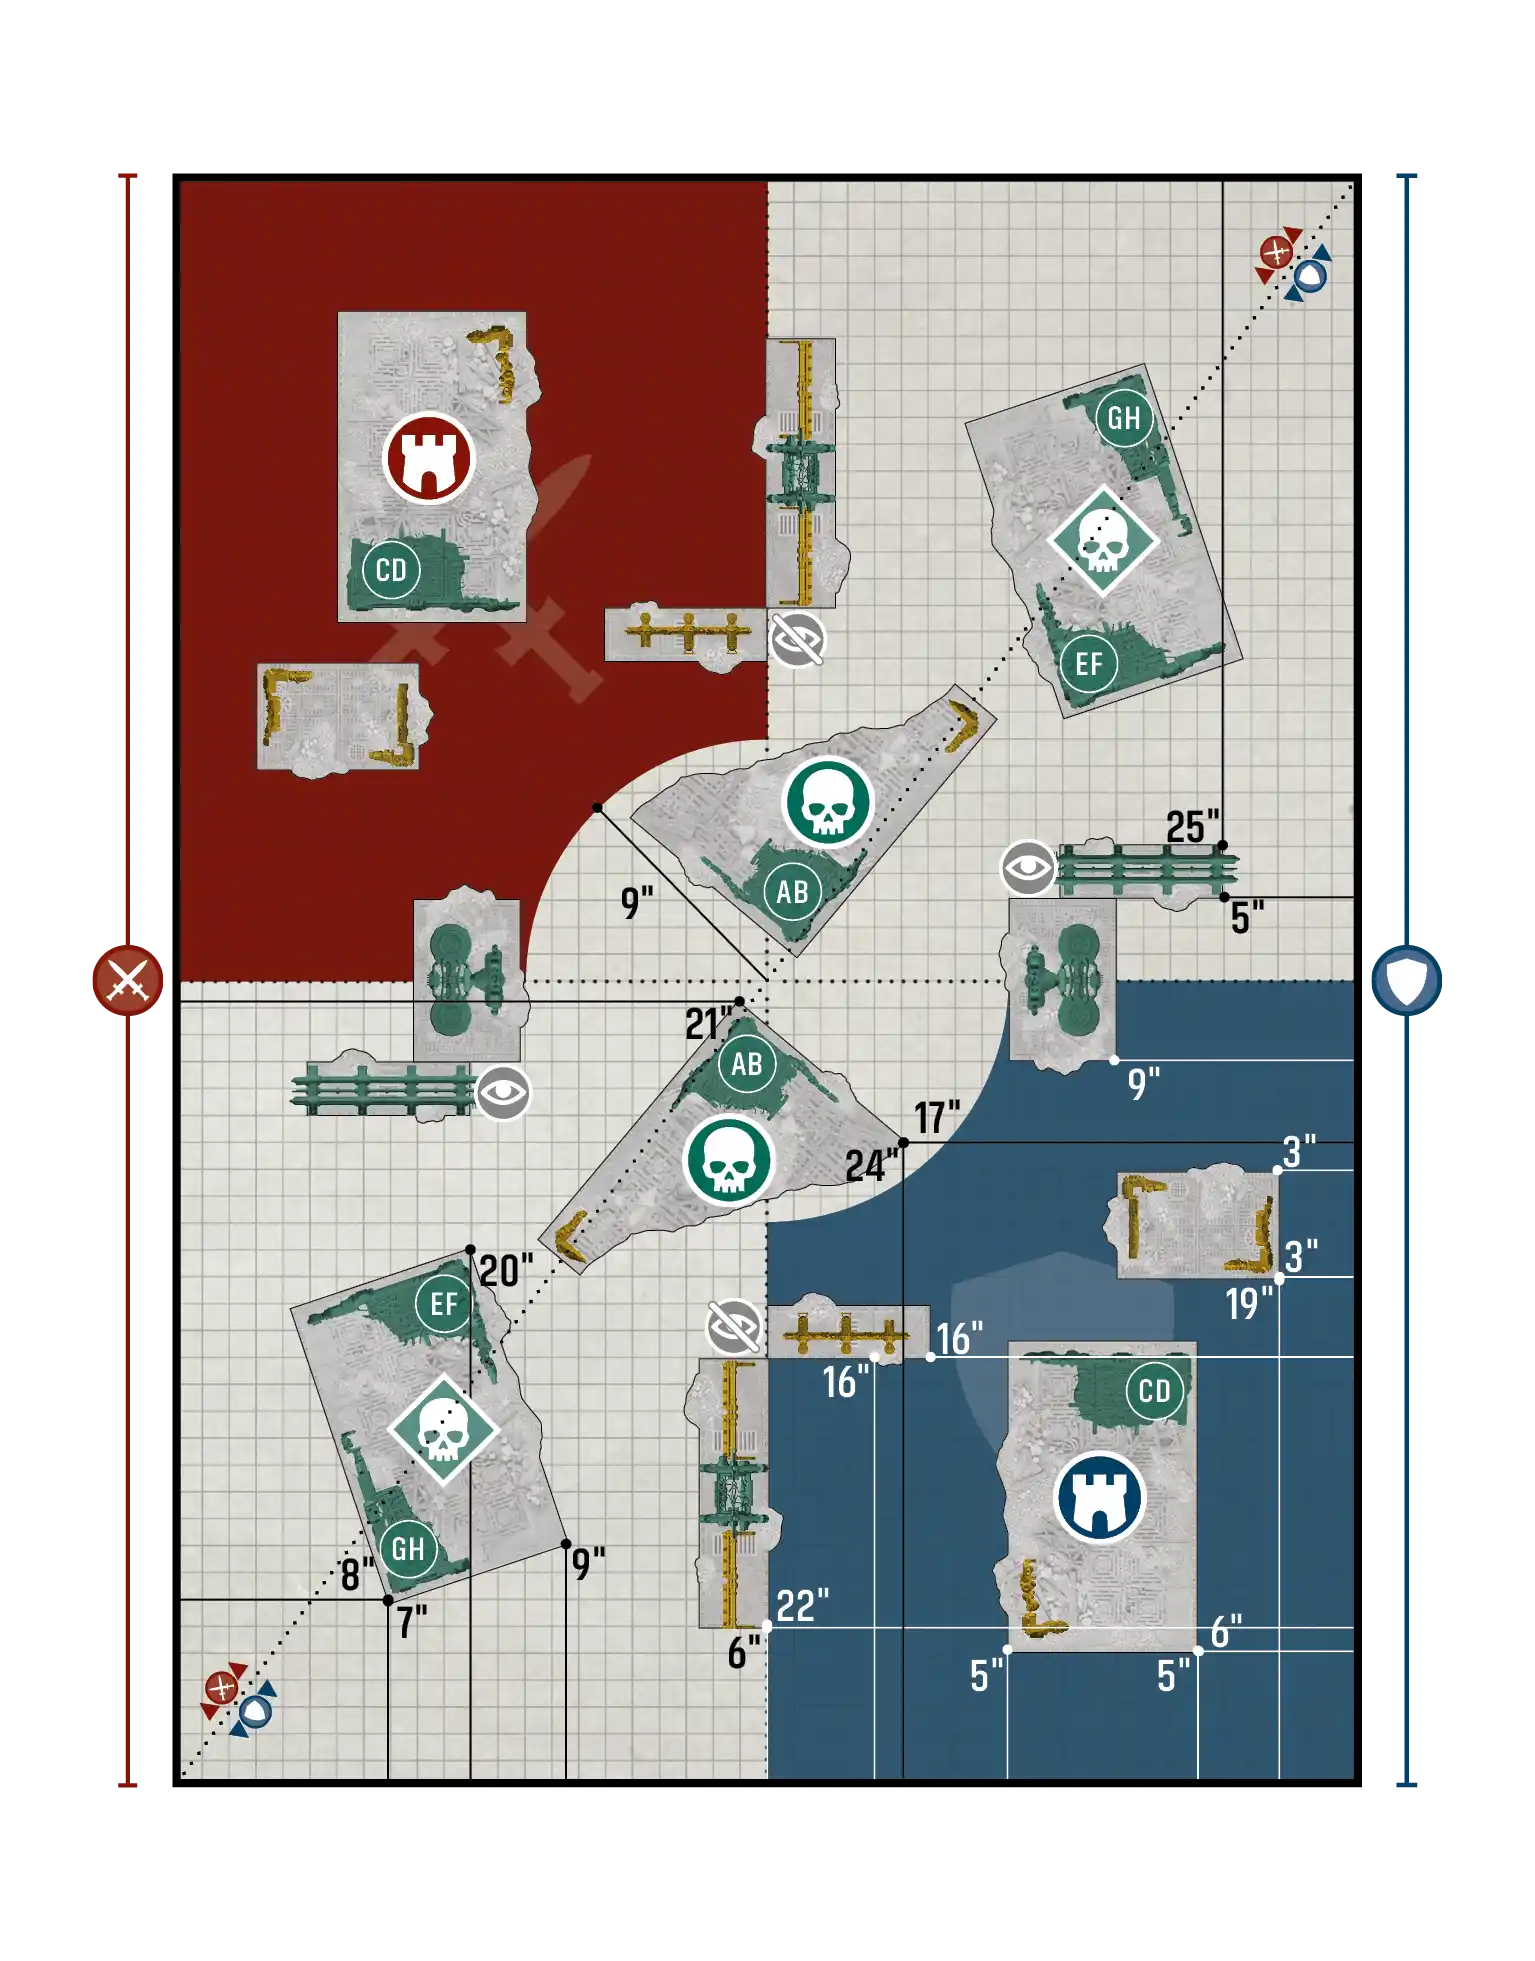
Purge the Foe / Disruption - Layout B#
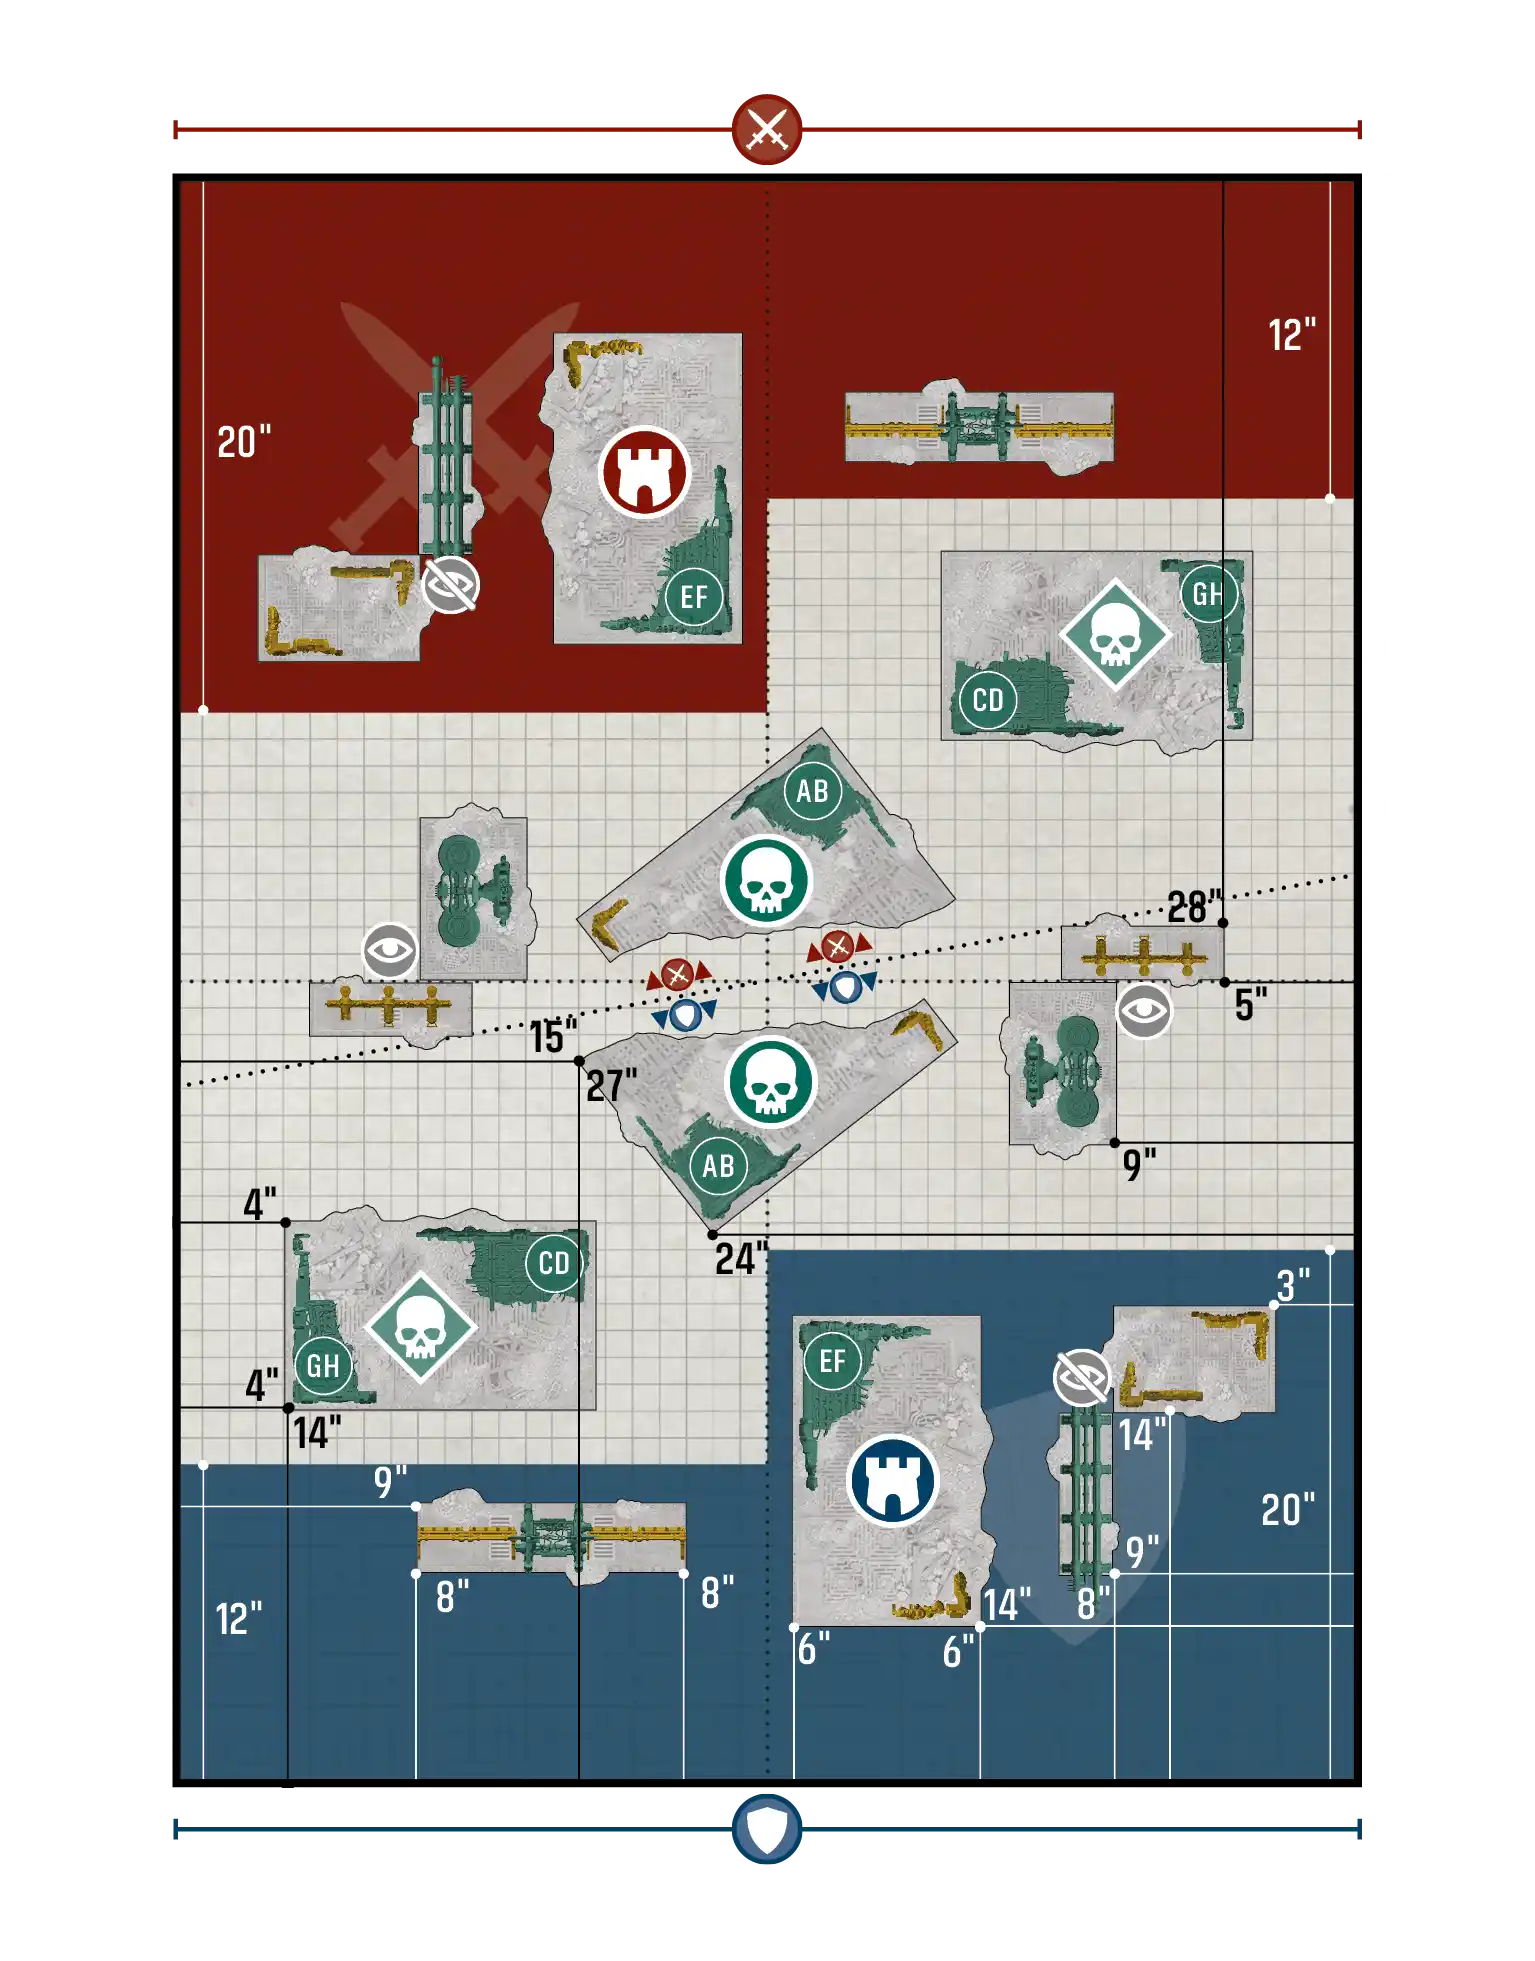
Purge the Foe / Disruption - Layout C#
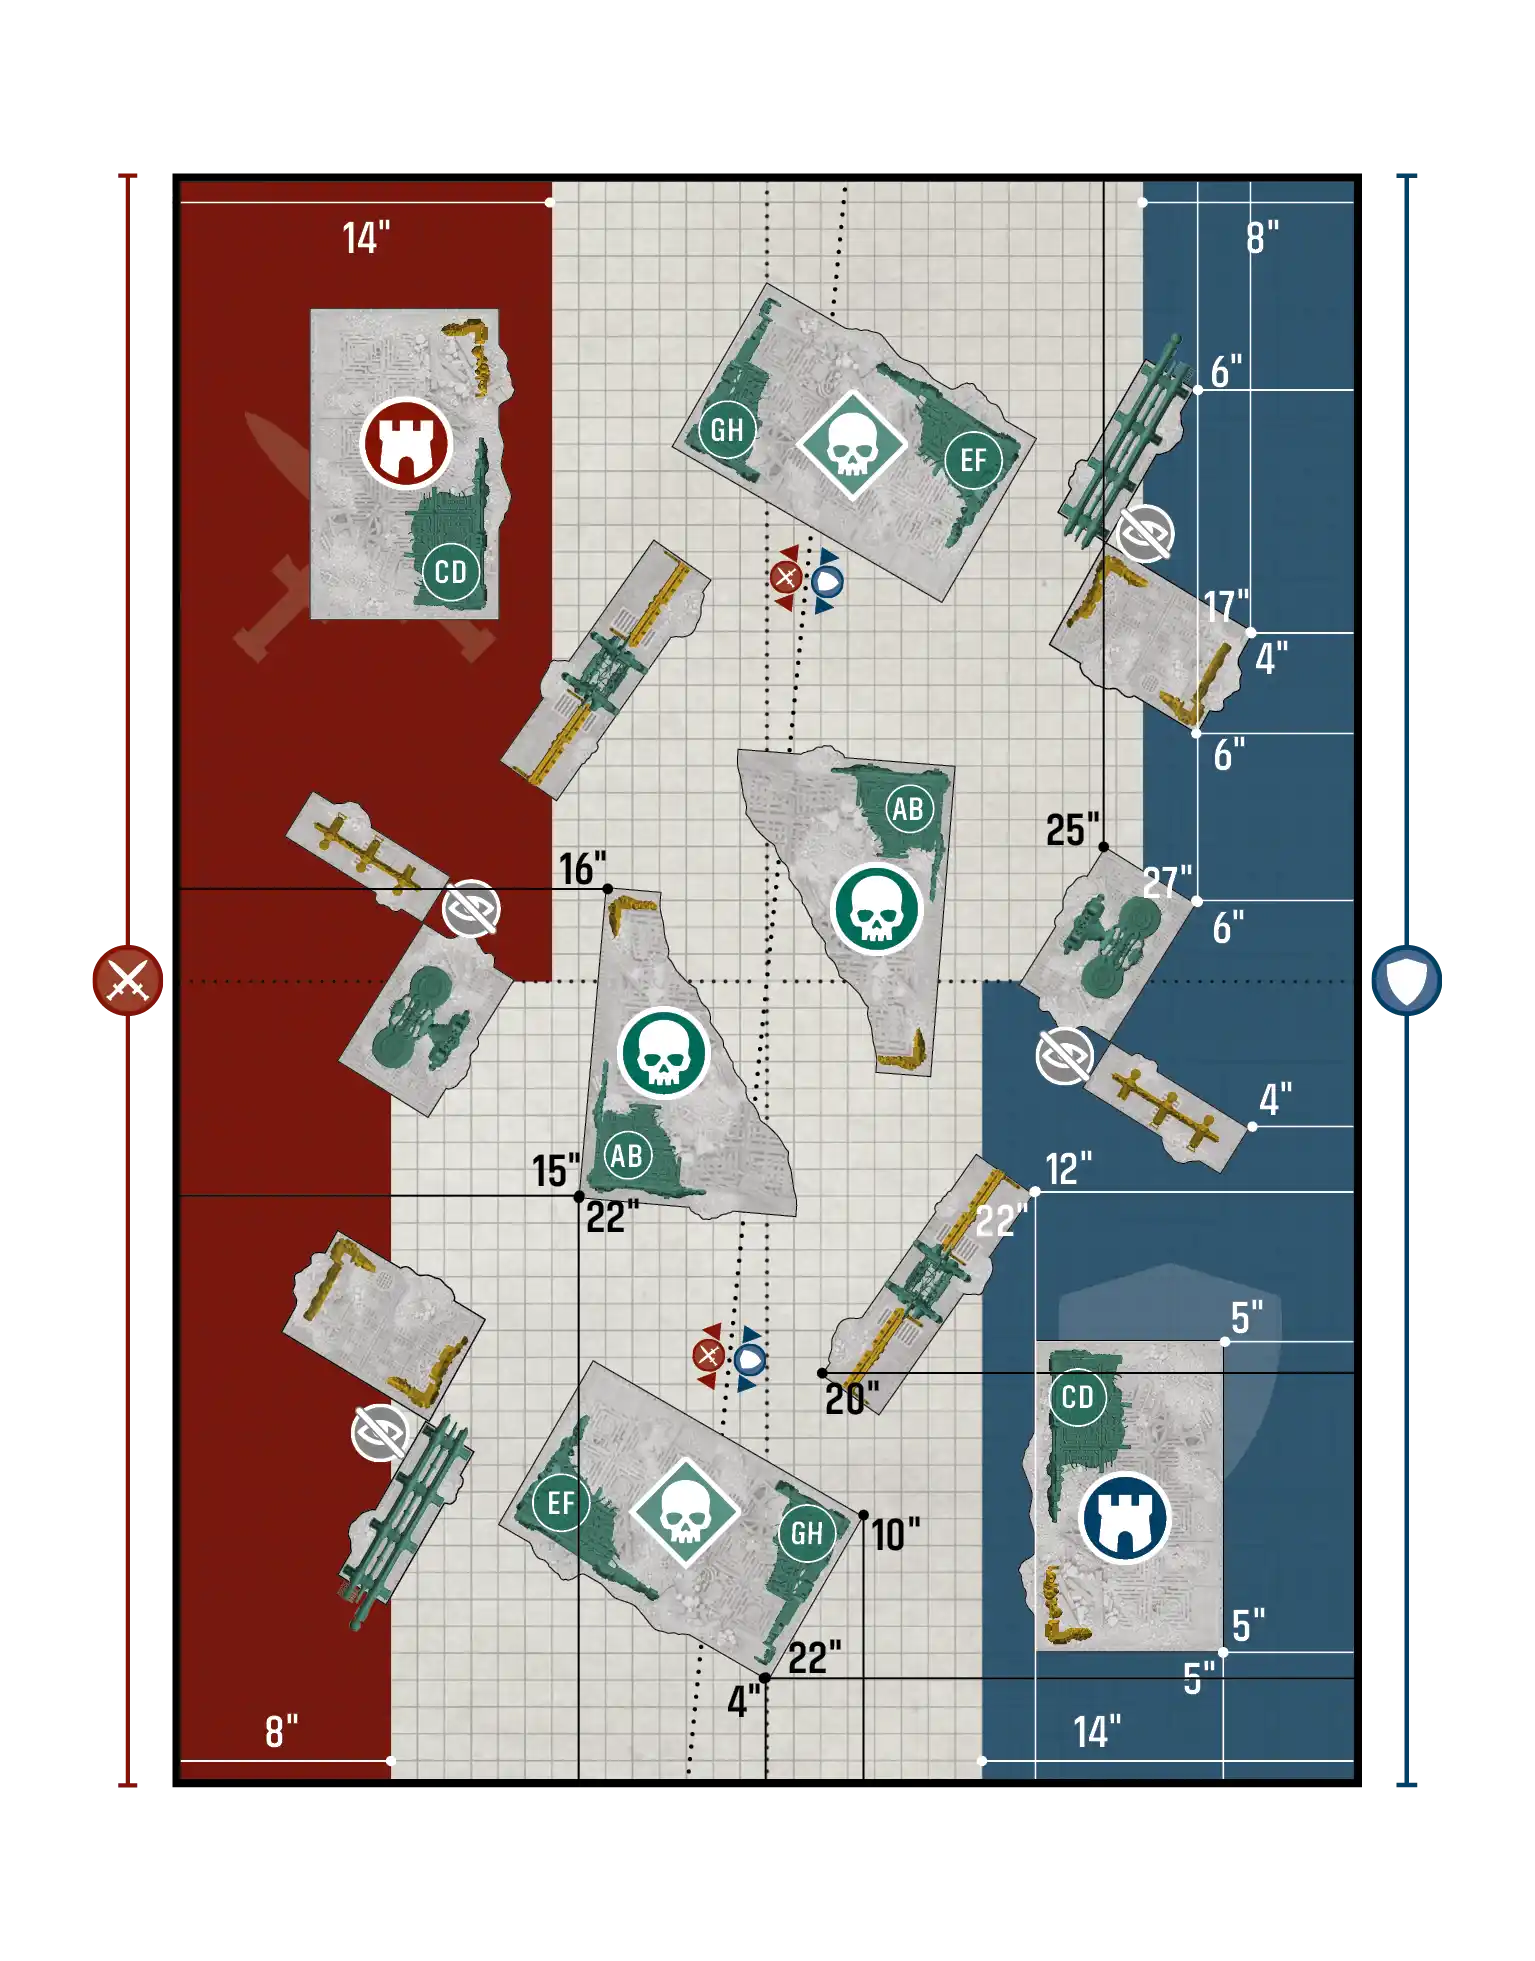
Purge the Foe / Priority Assets - Layout A#
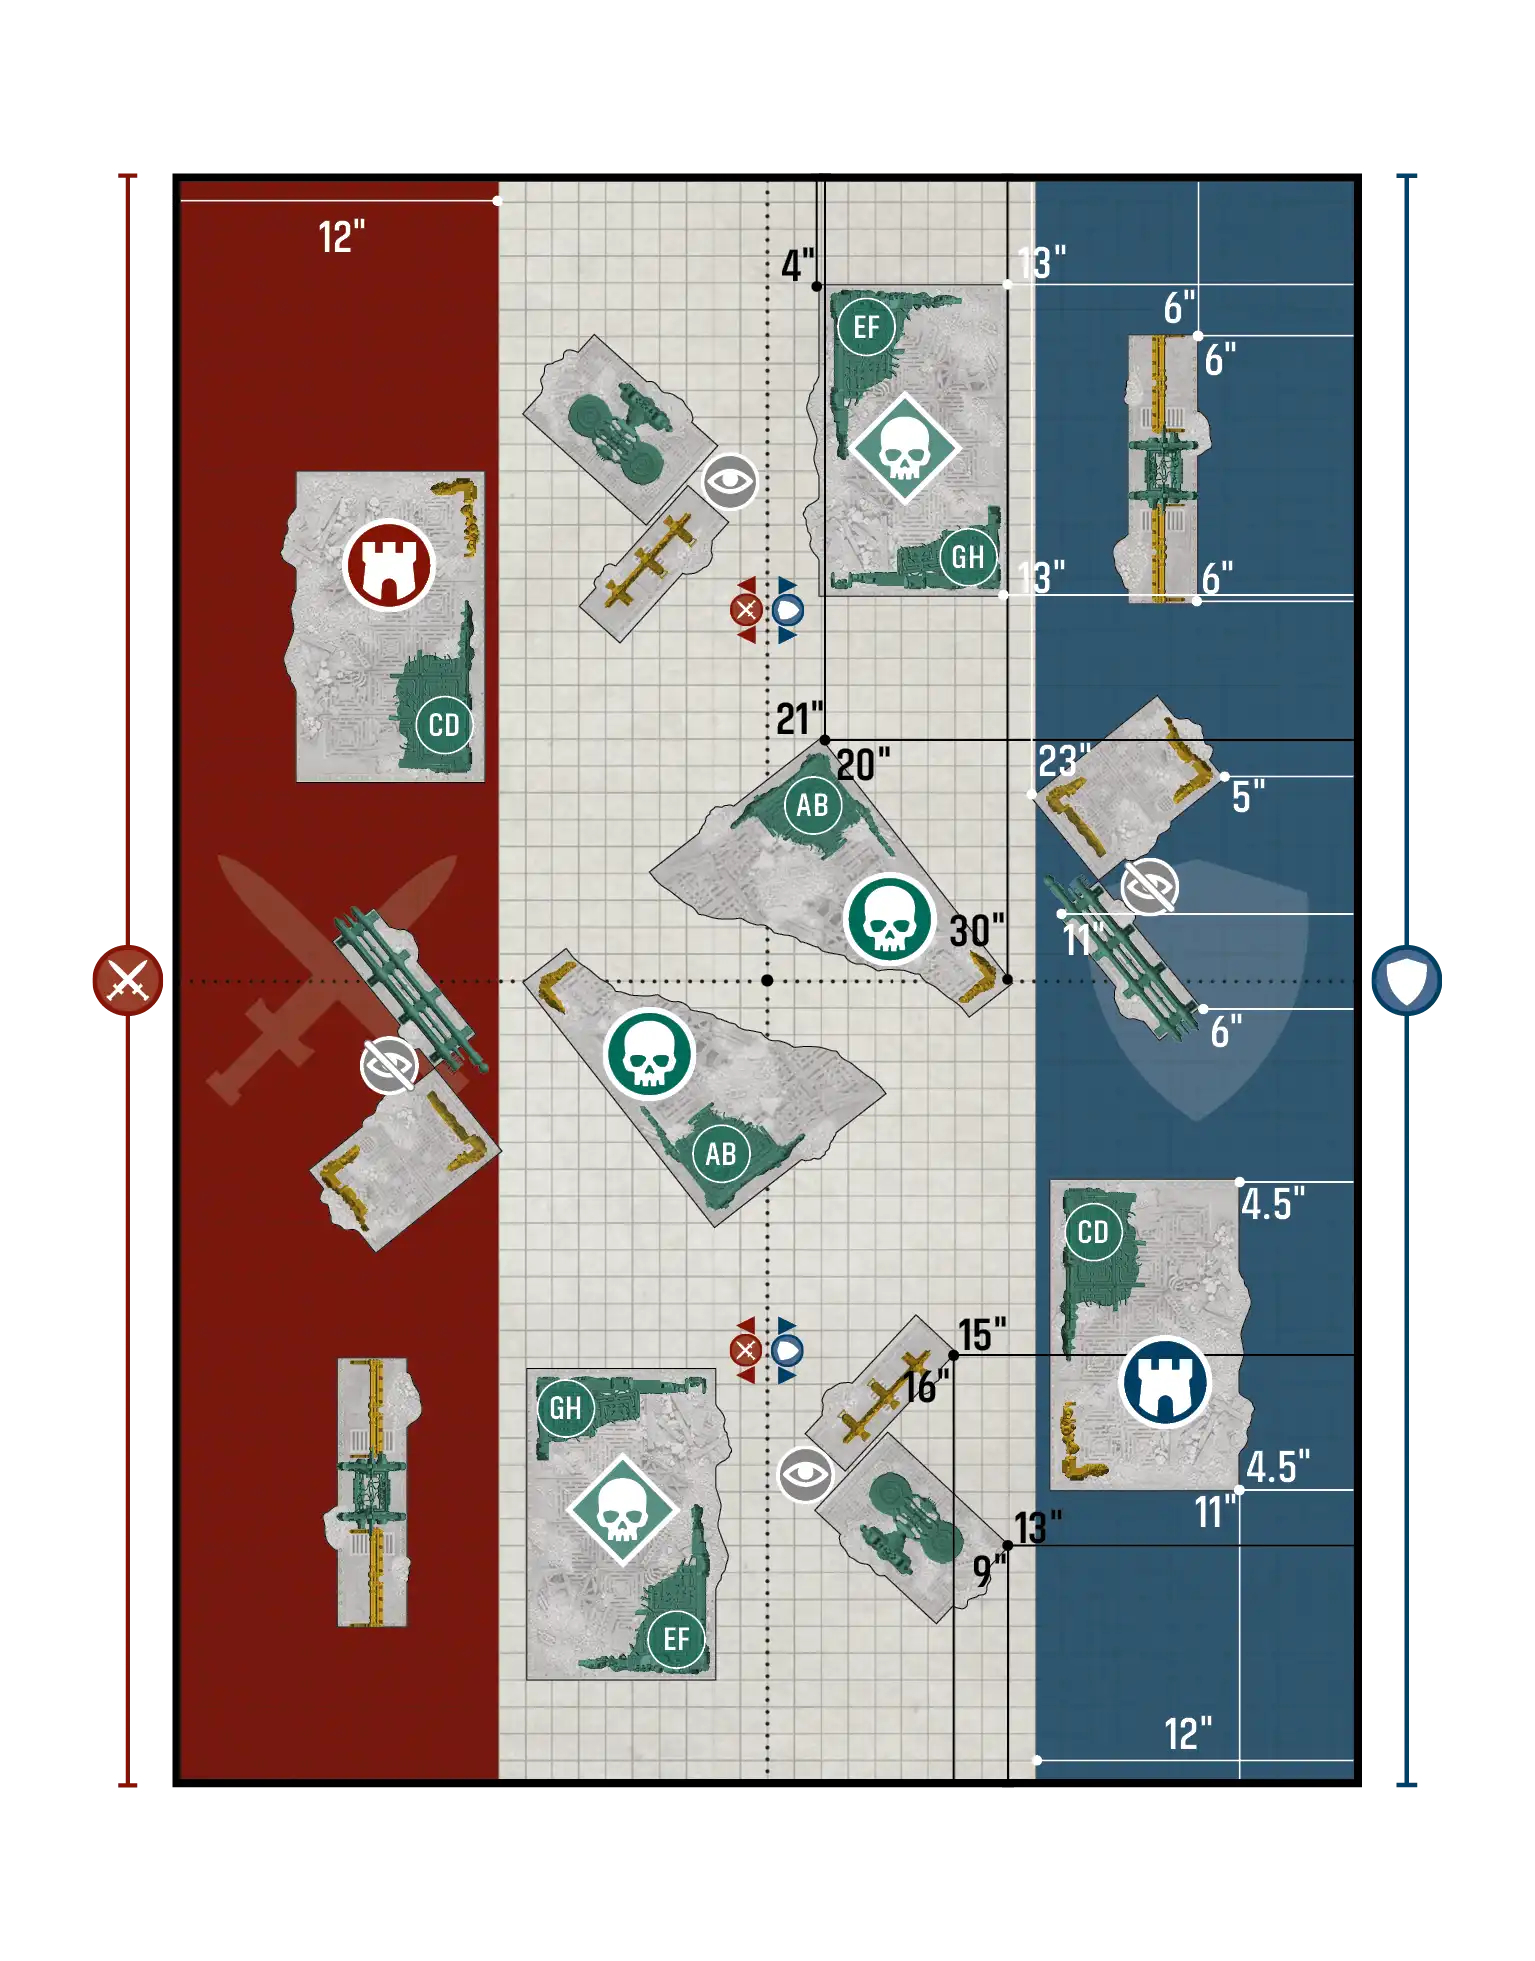
Purge the Foe / Priority Assets - Layout B#
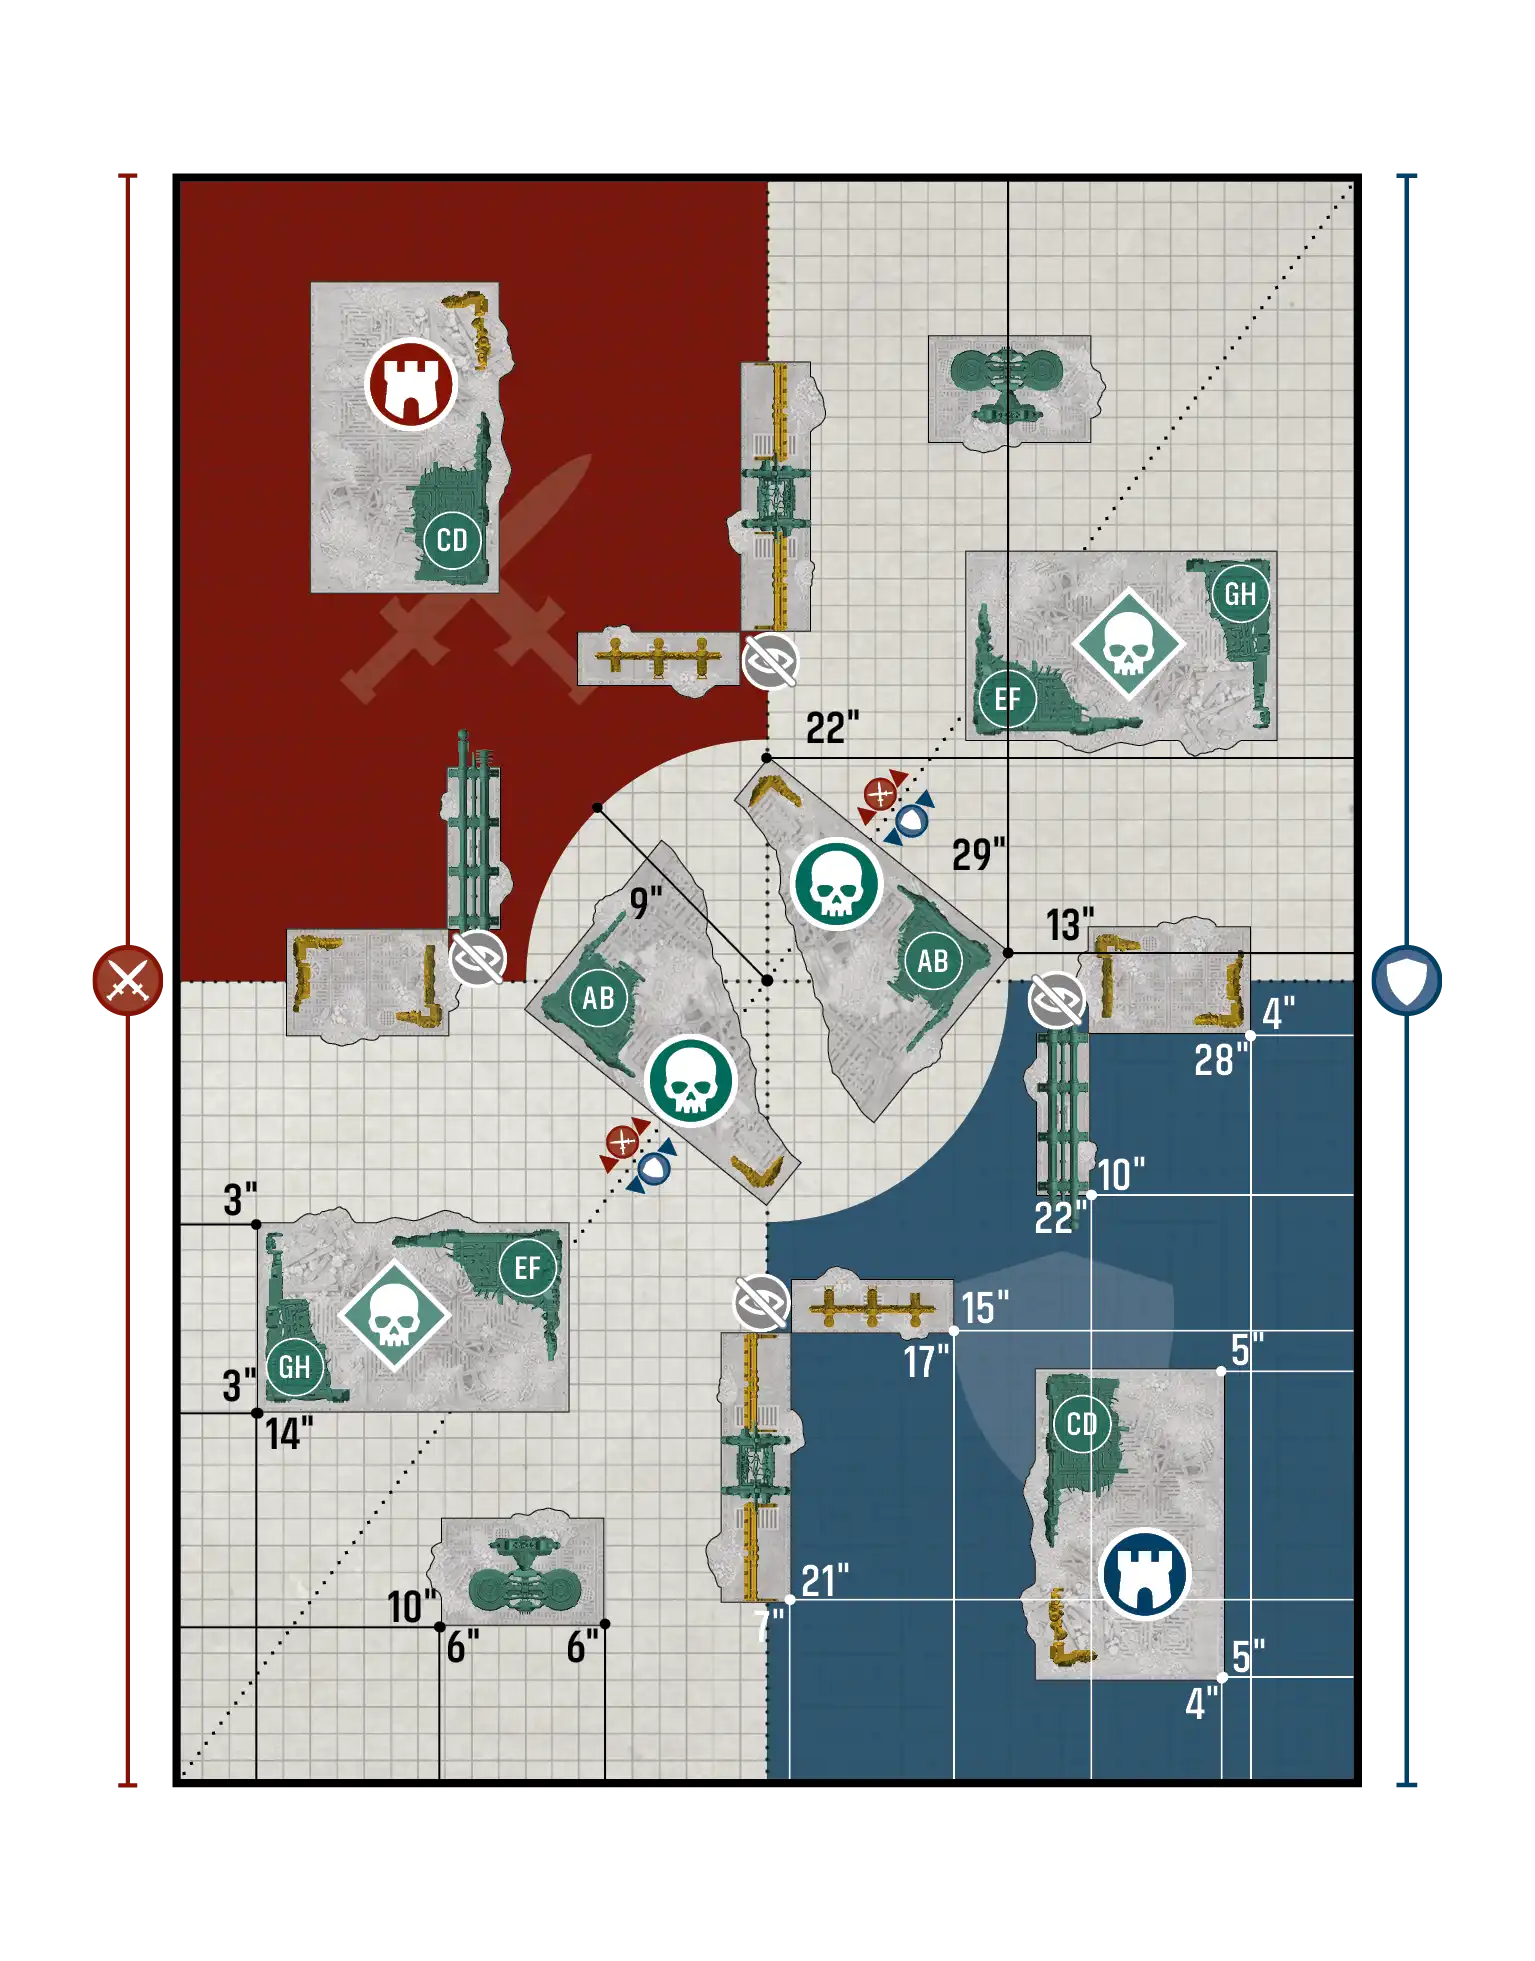
Purge the Foe / Priority Assets - Layout C#
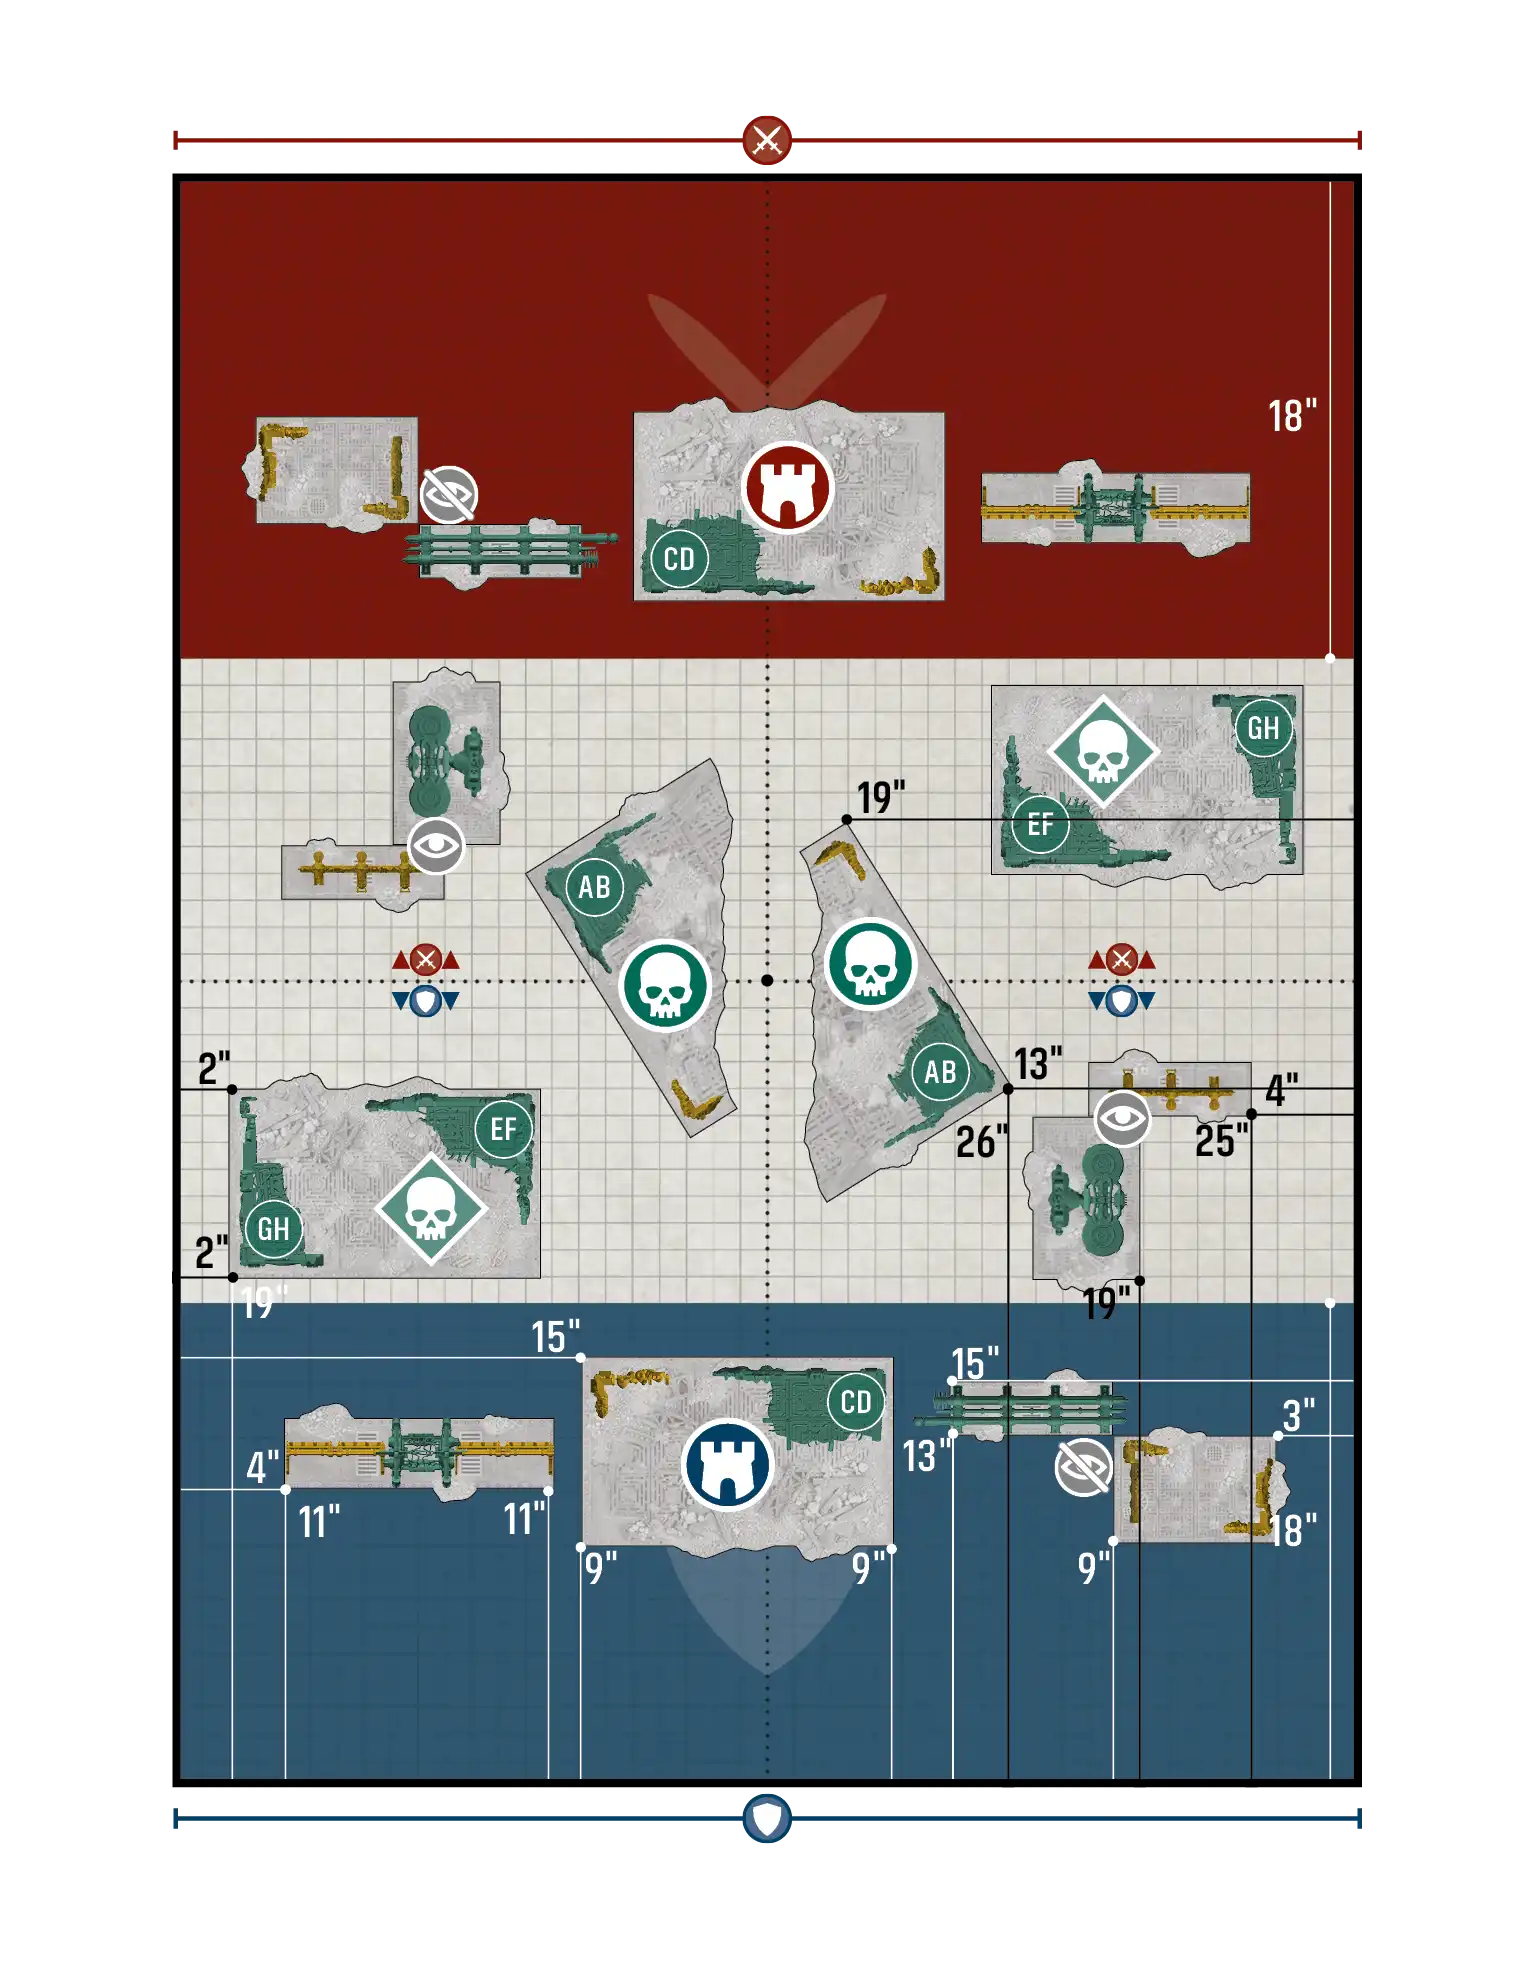
Purge the Foe / Purge the Foe - Layout A#
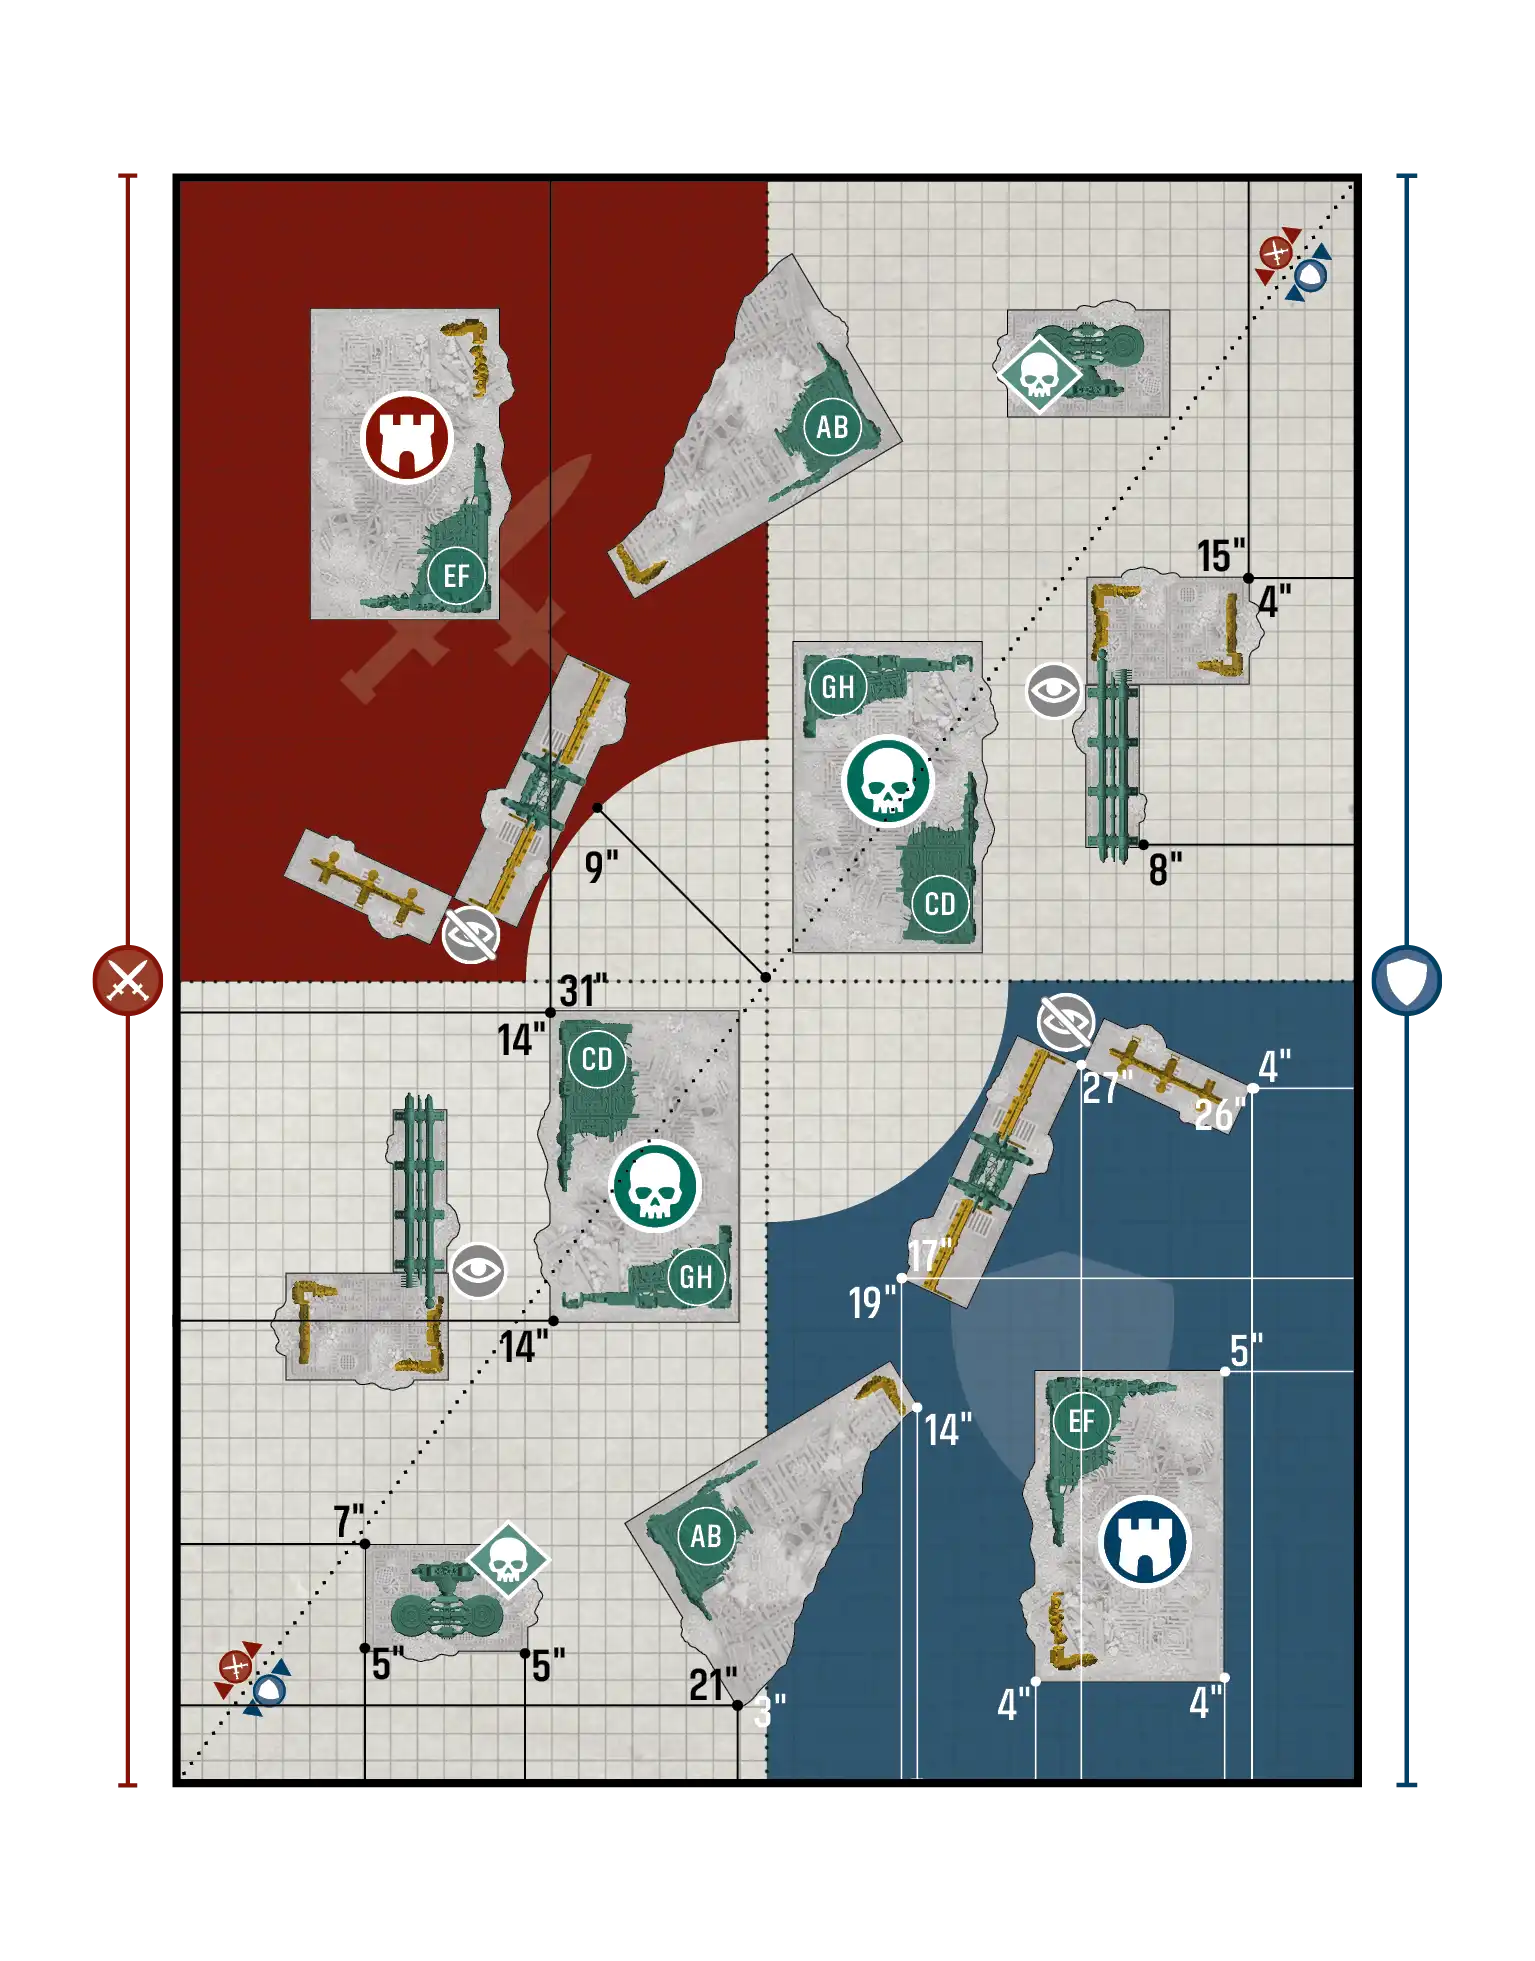
Purge the Foe / Purge the Foe - Layout B#
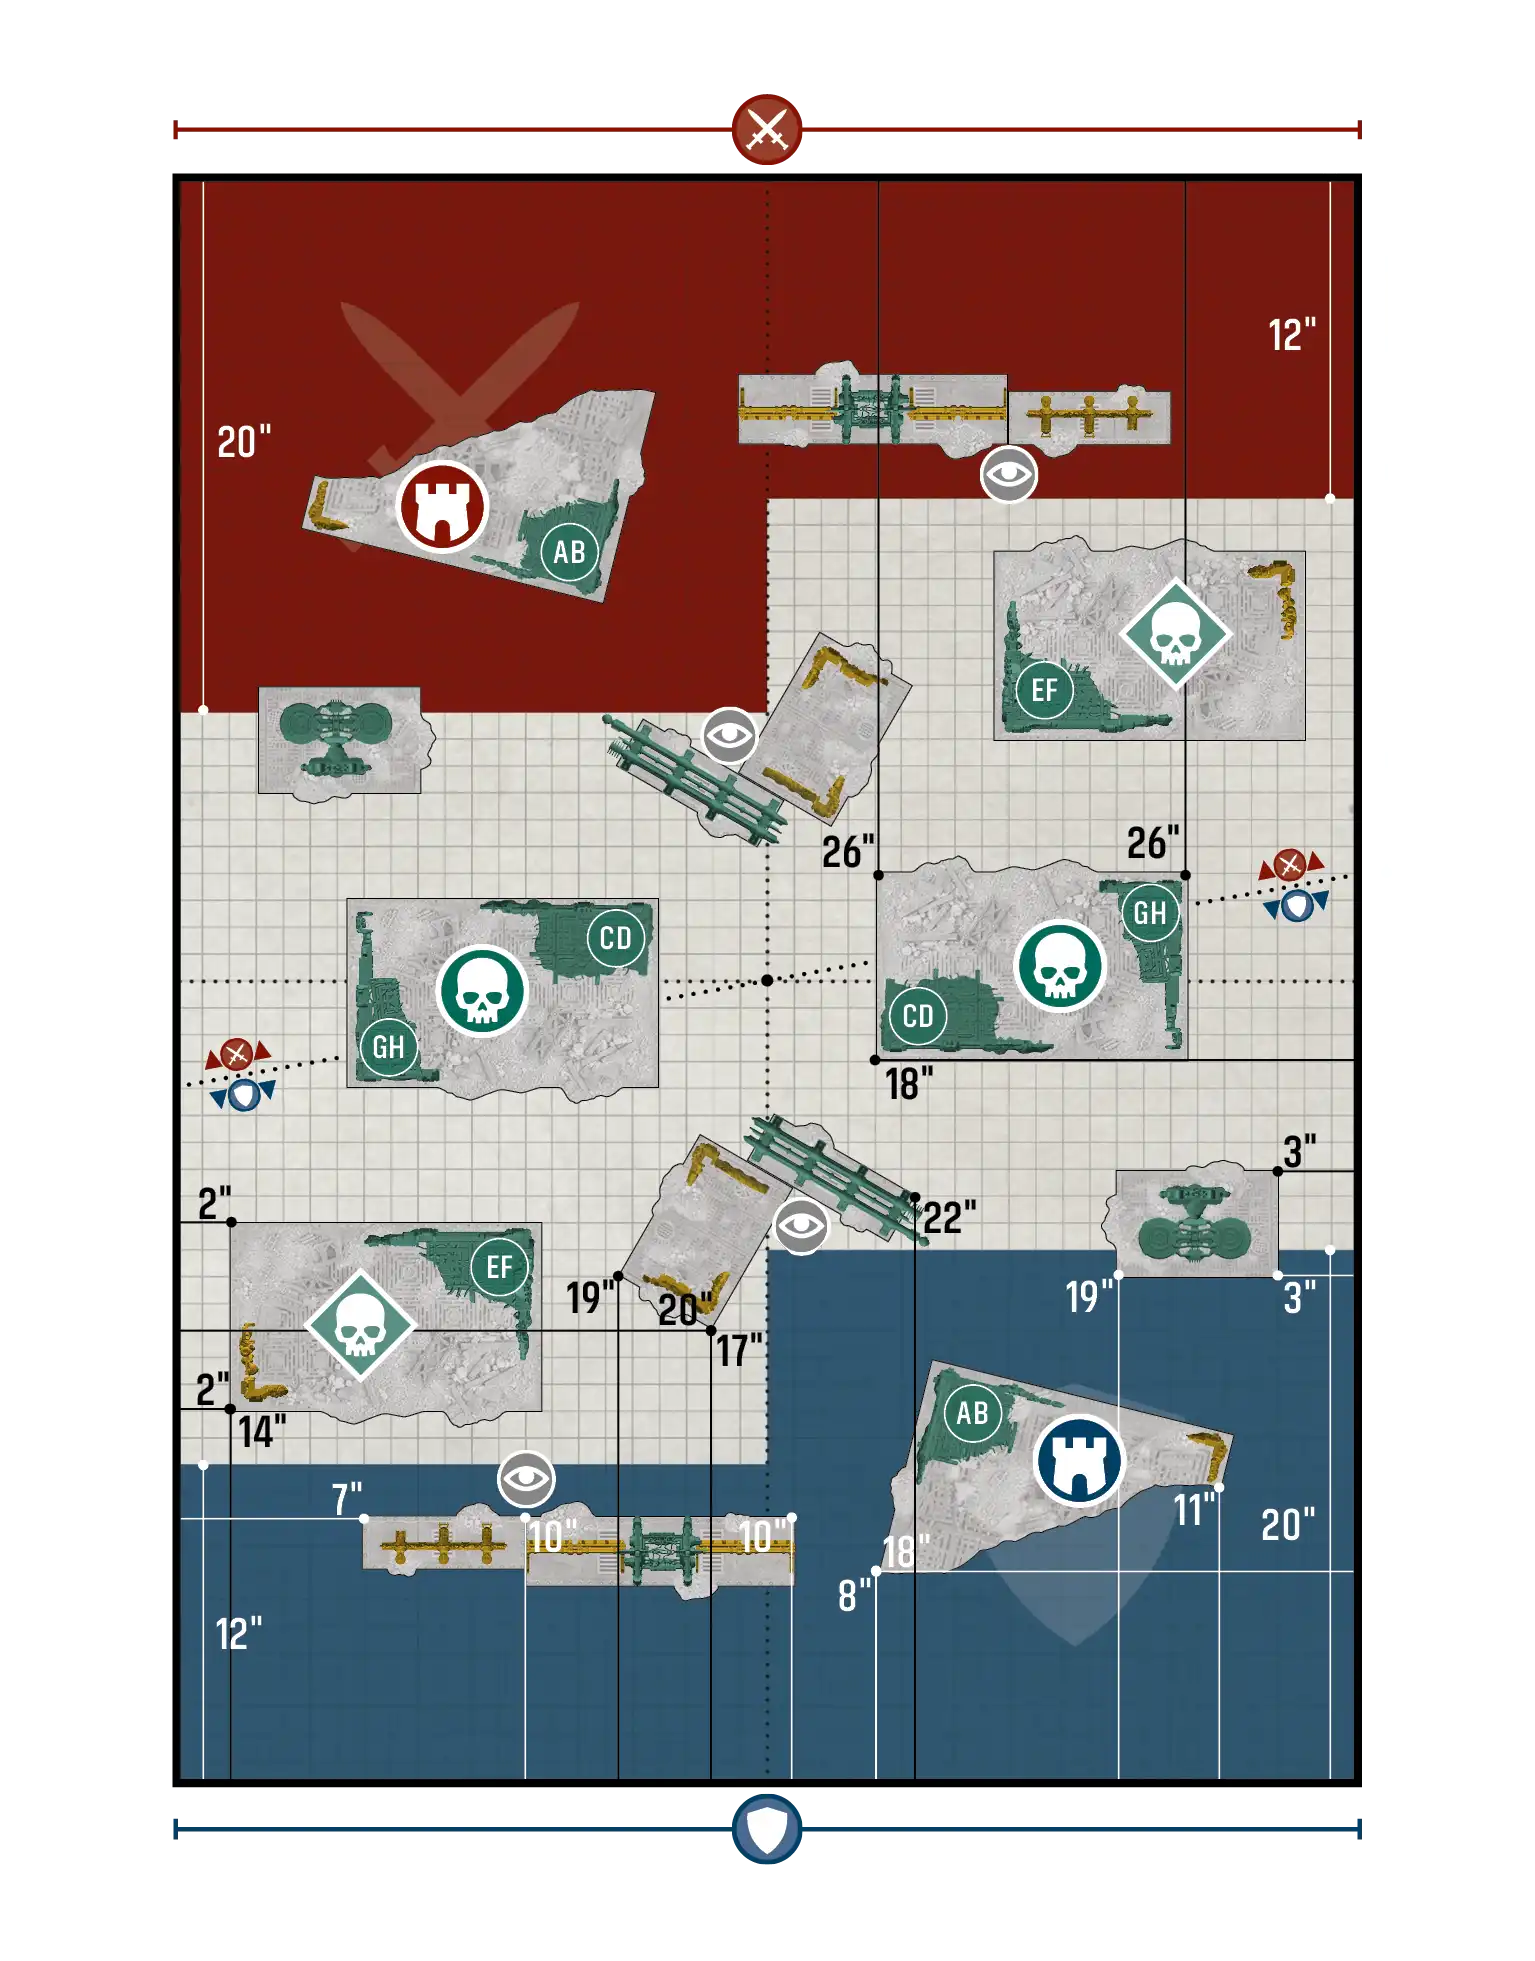
Purge the Foe / Purge the Foe - Layout C#
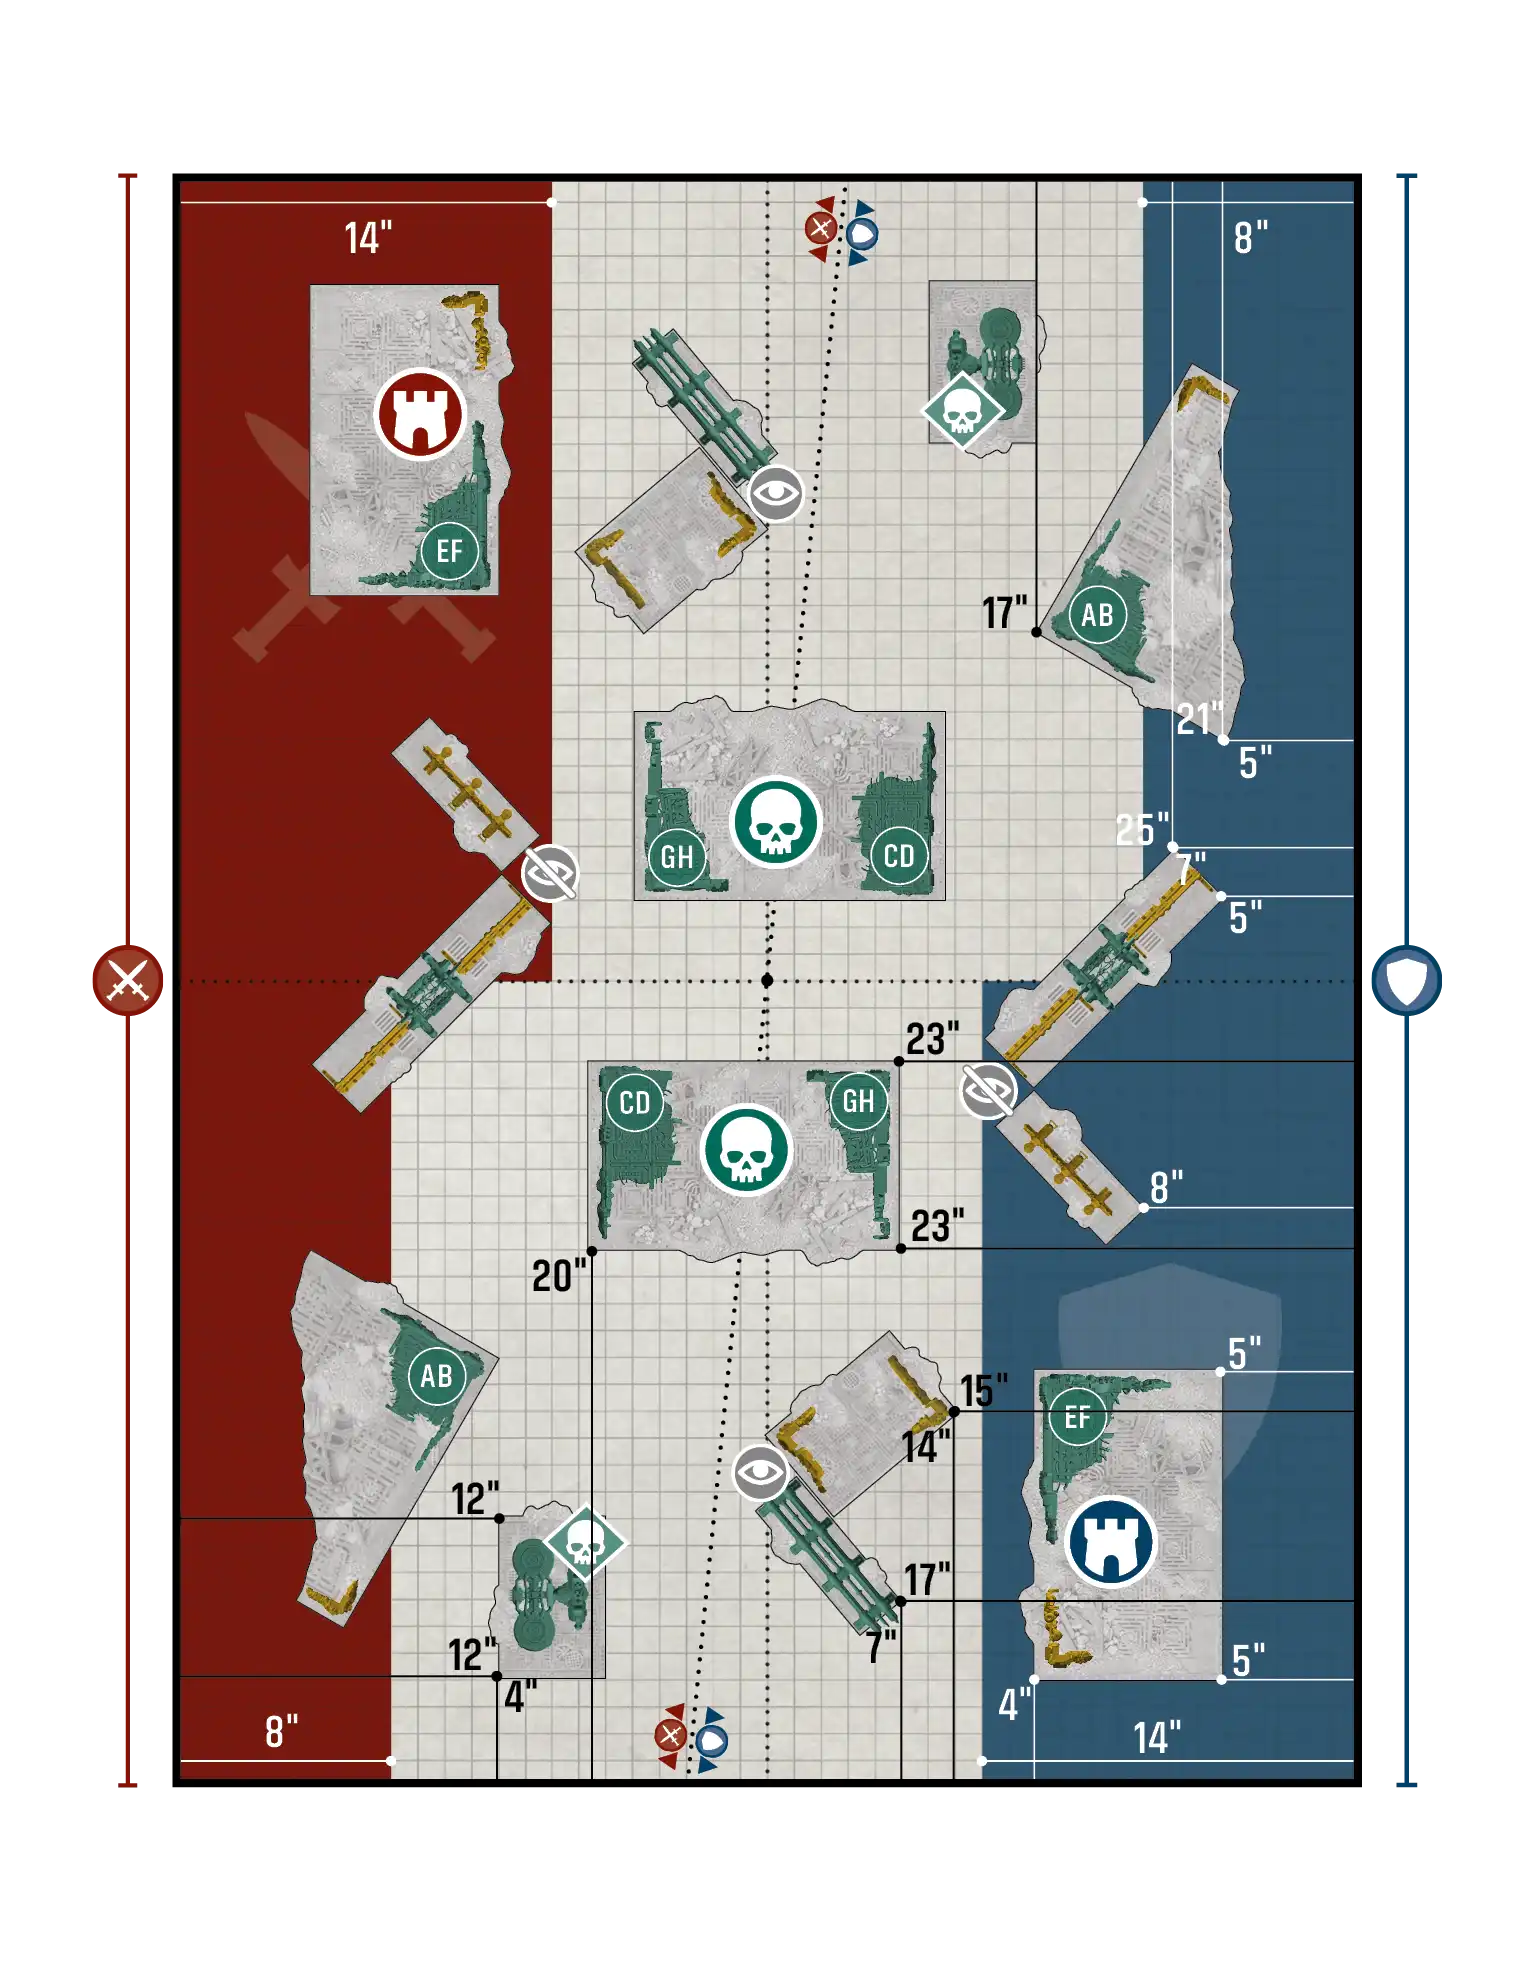
Purge the Foe / Reconnaissance - Layout A#
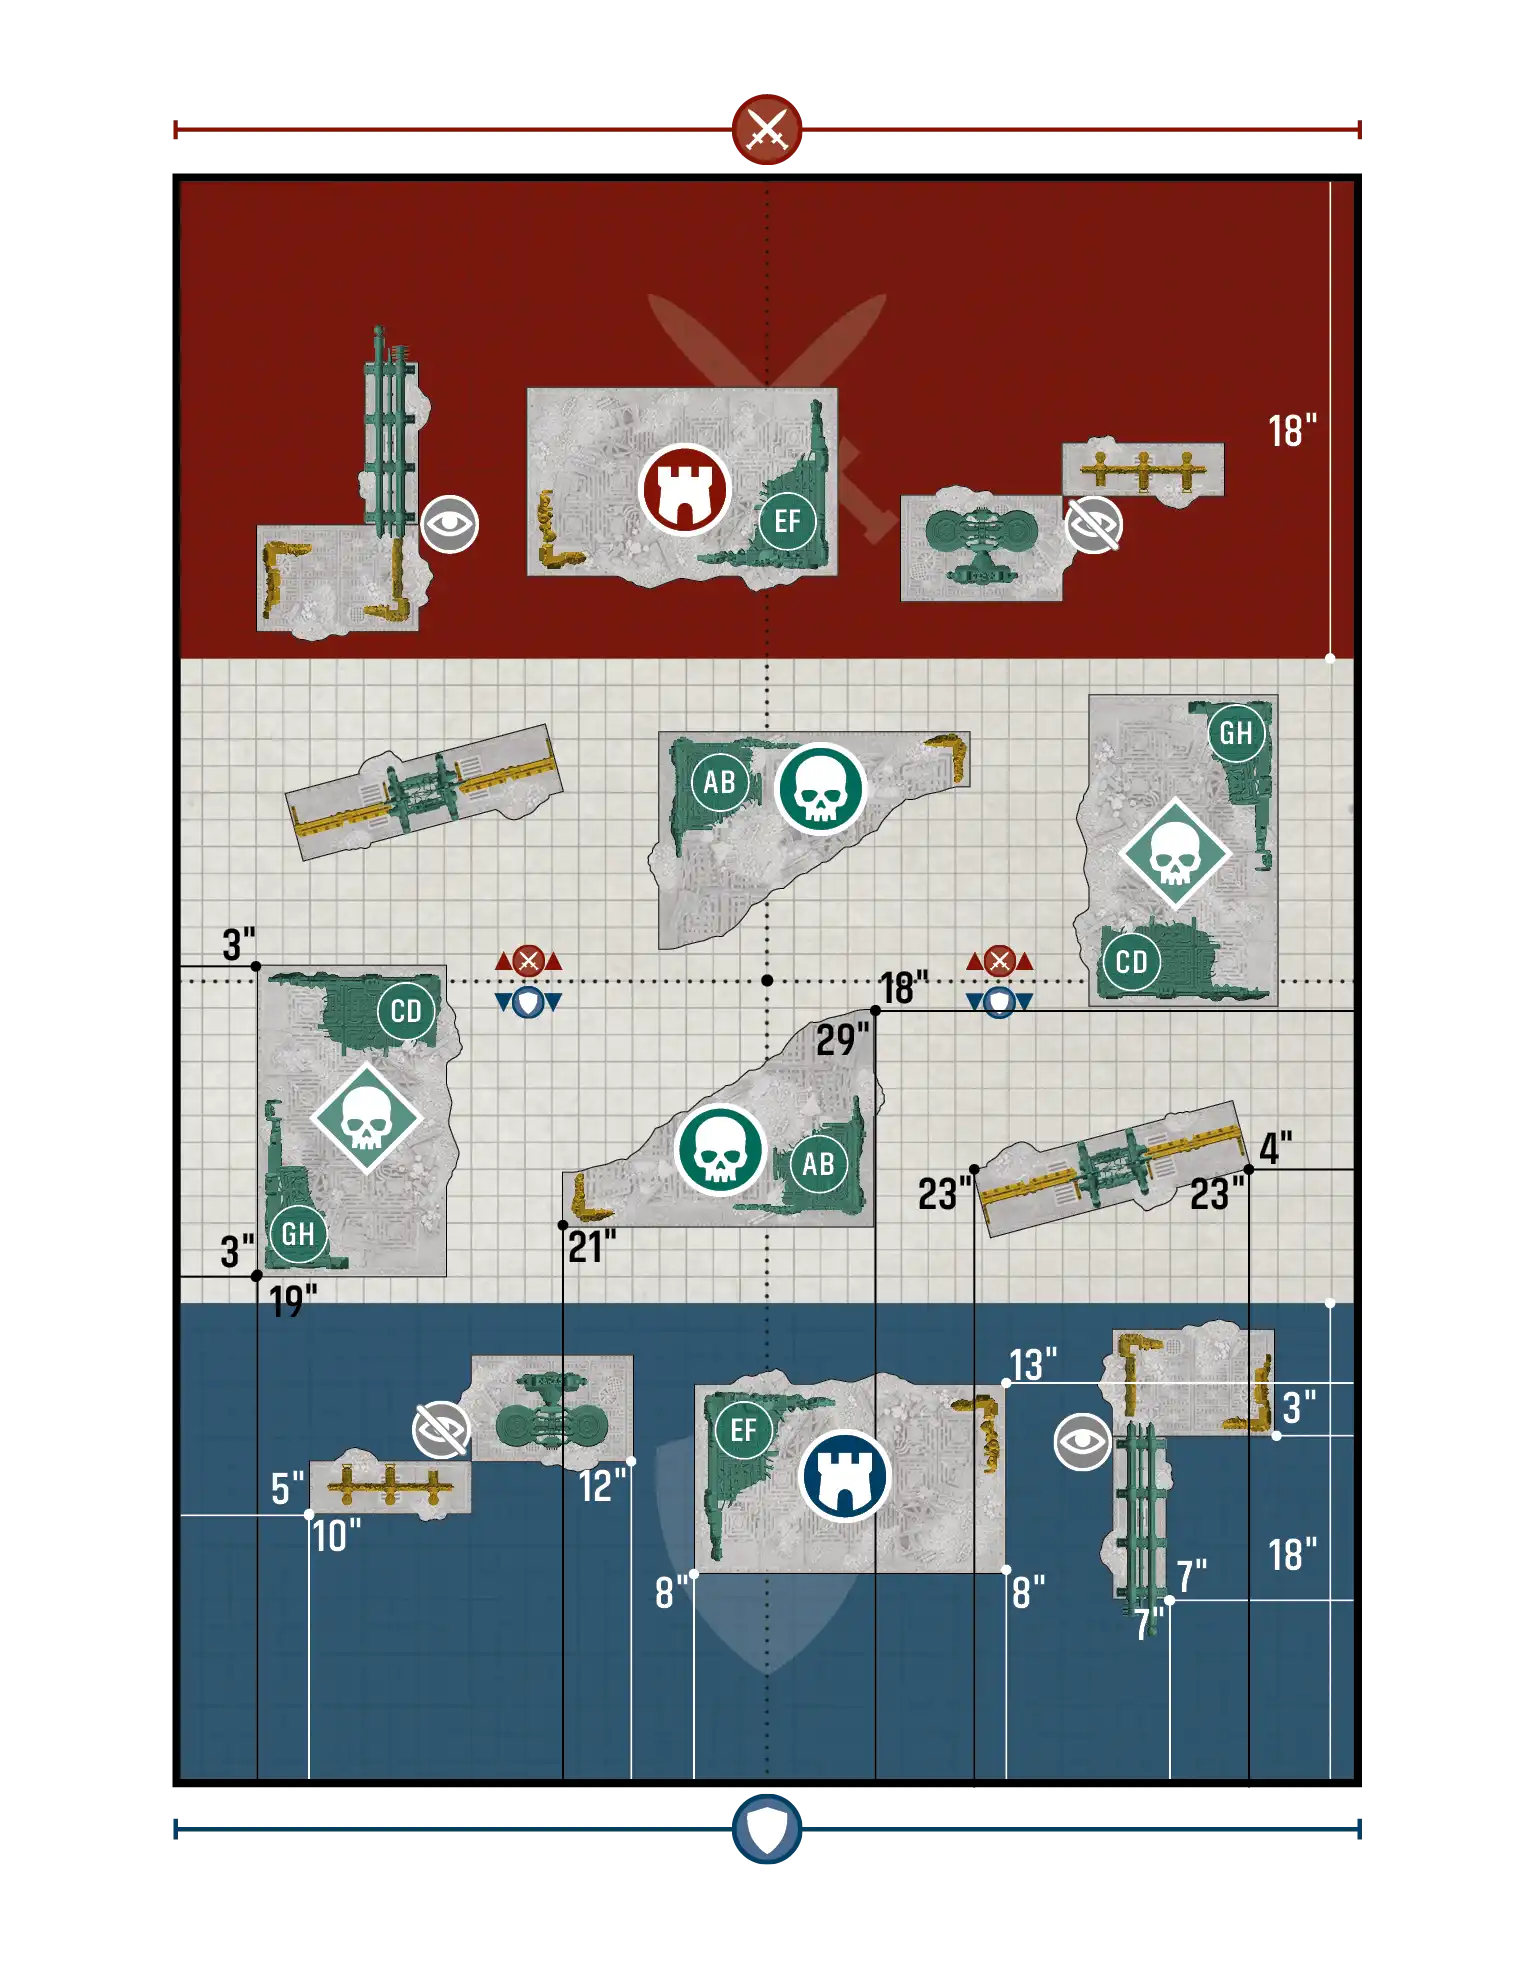
Purge the Foe / Reconnaissance - Layout B#
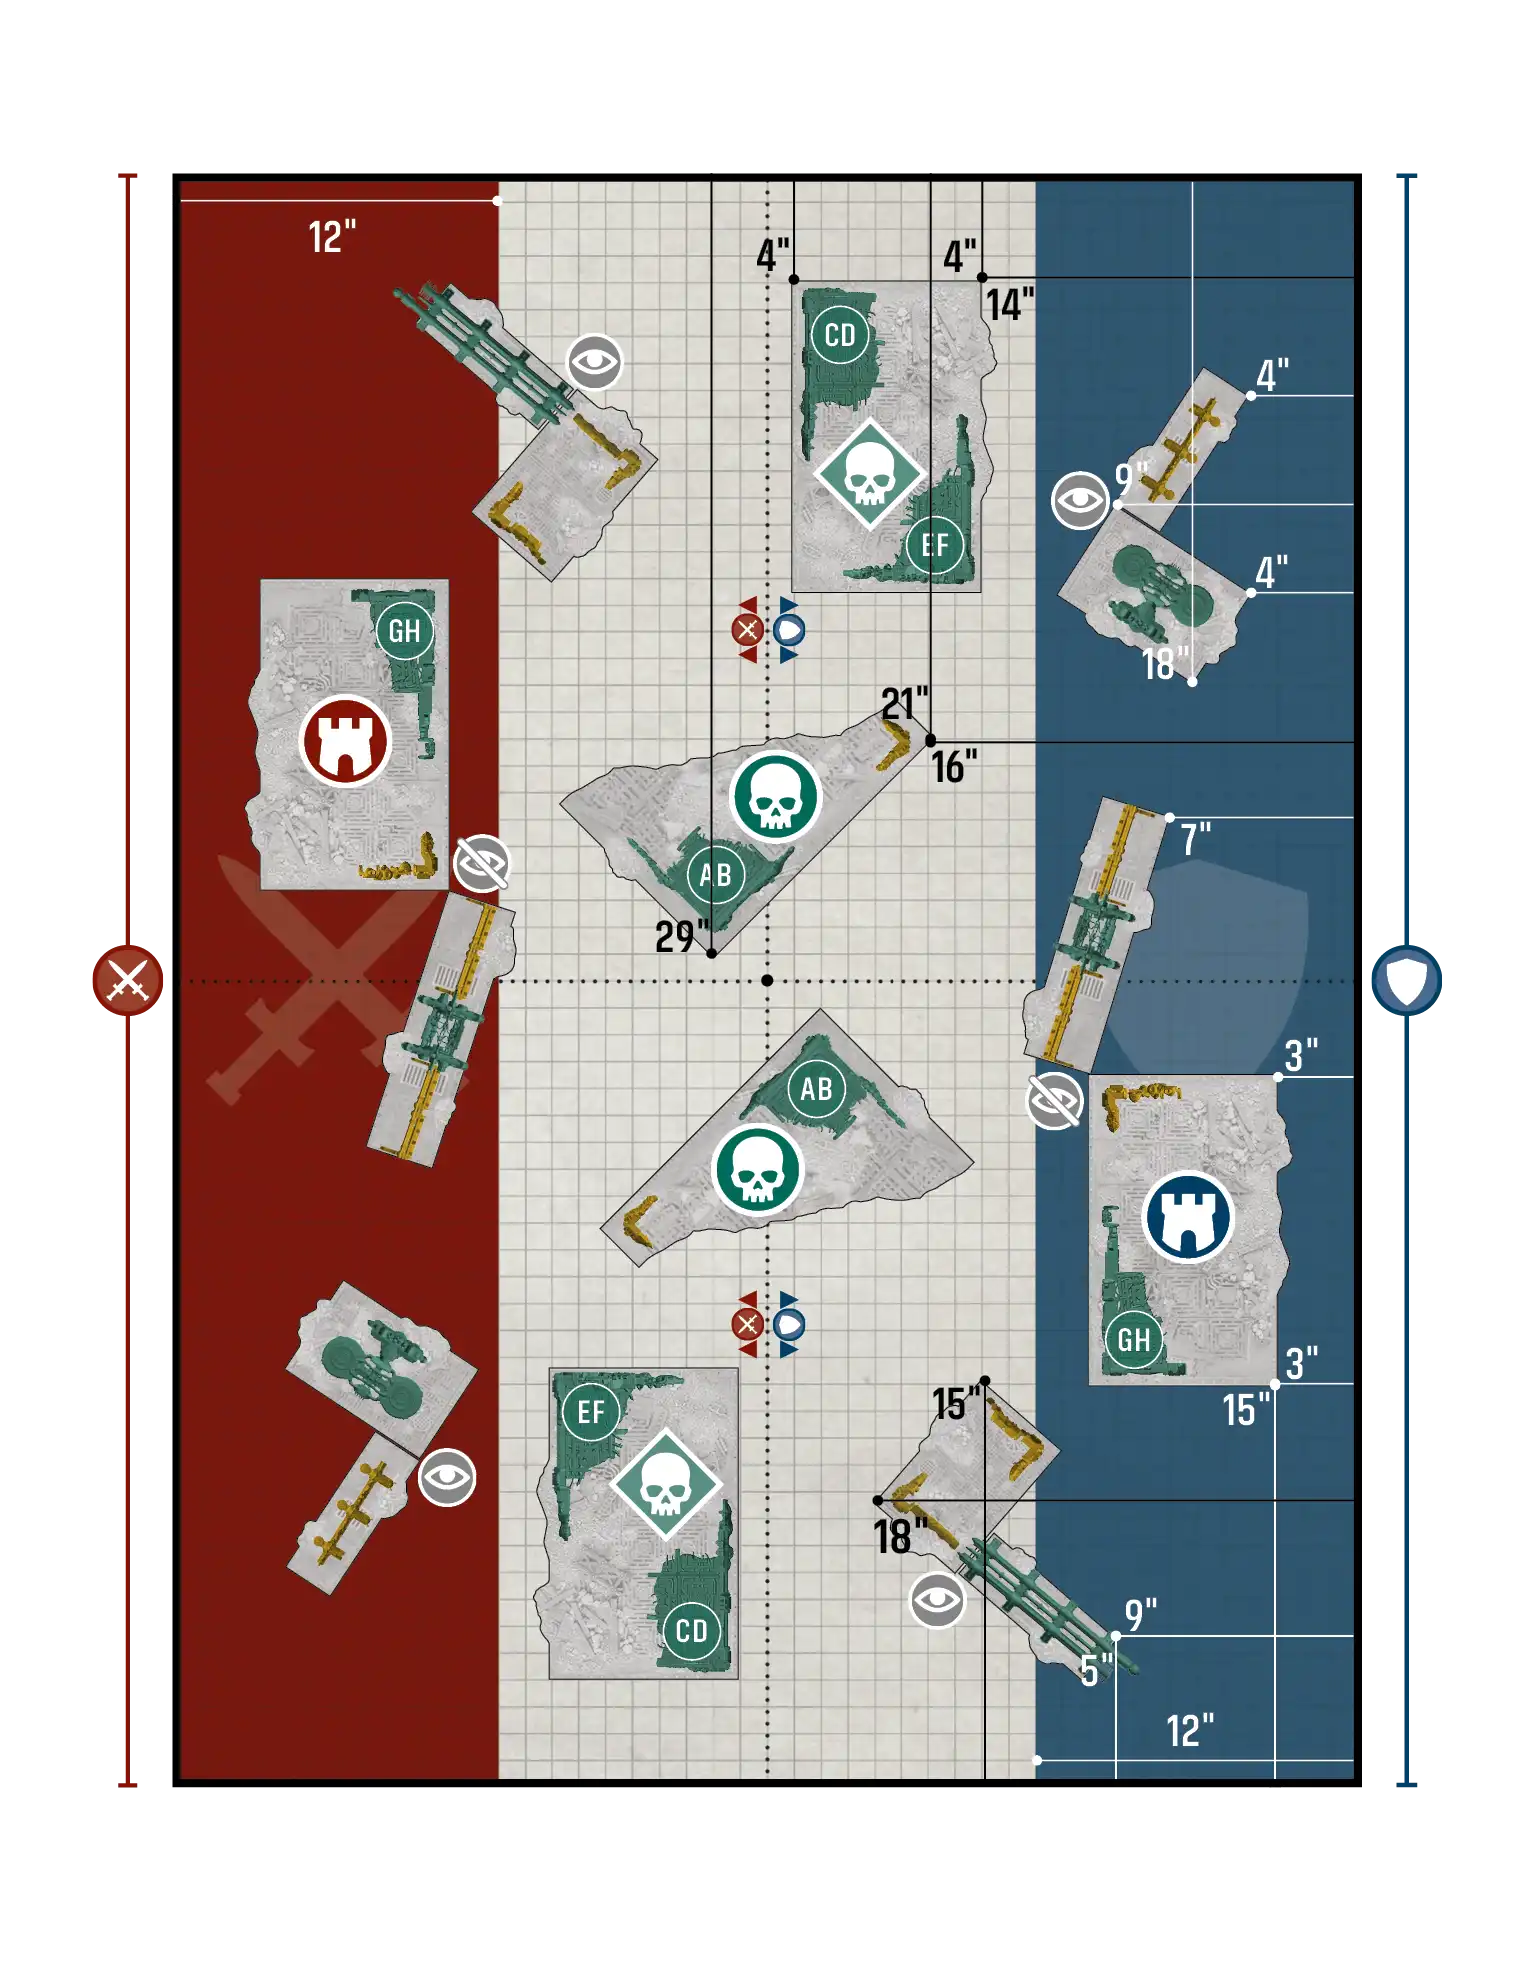
Purge the Foe / Reconnaissance - Layout C#
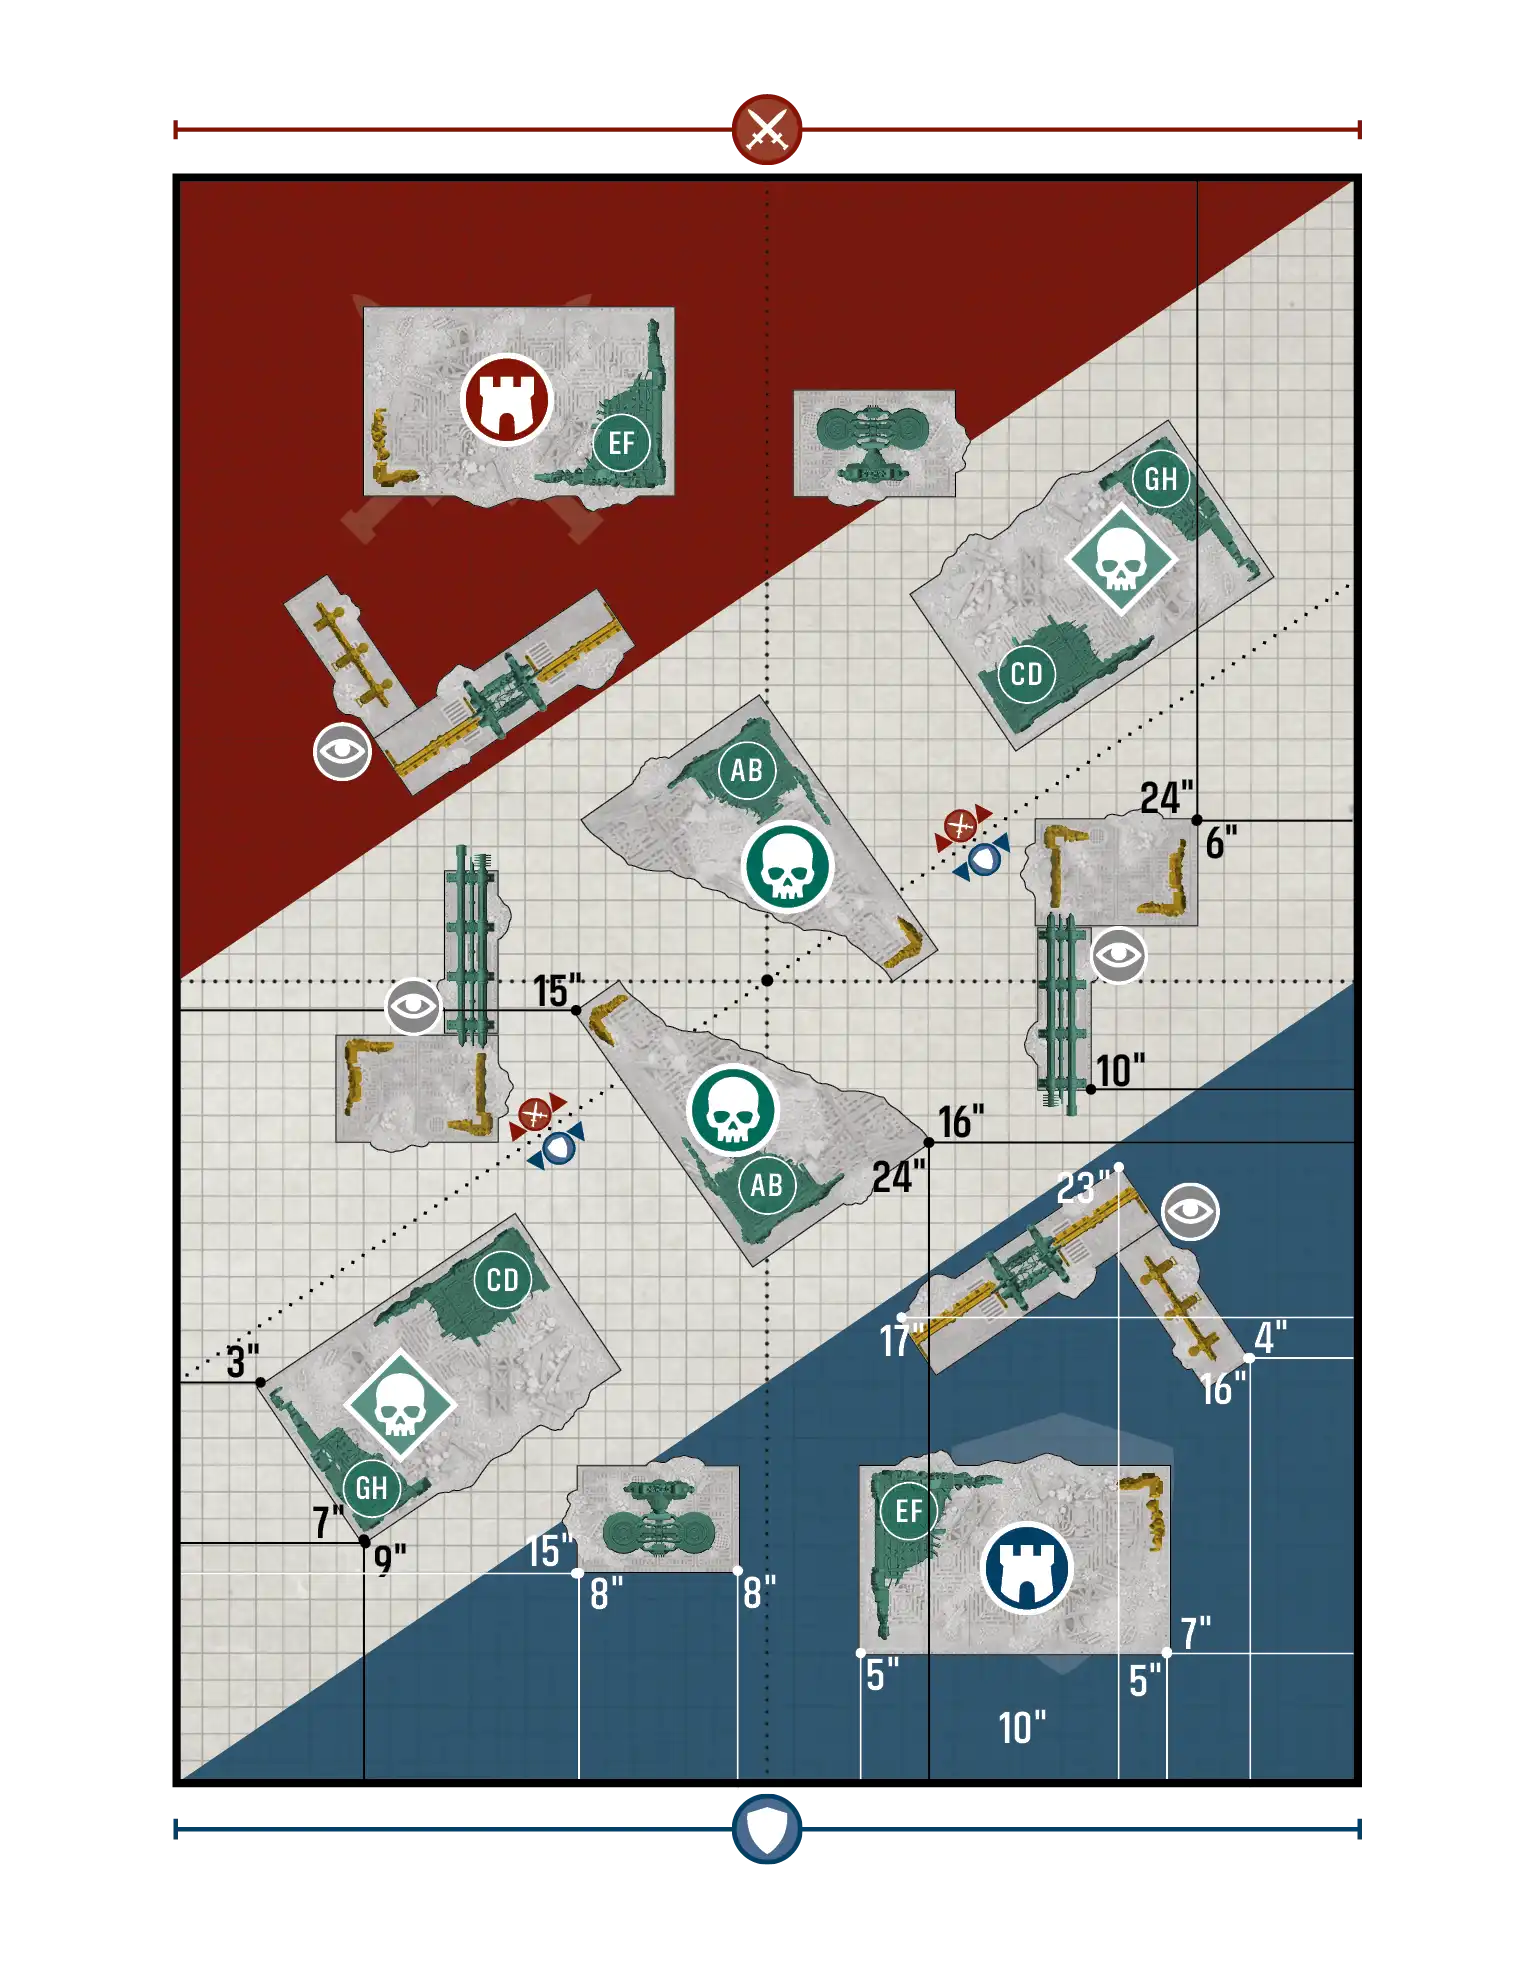
Reconnaissance / Priority Assets - Layout A#
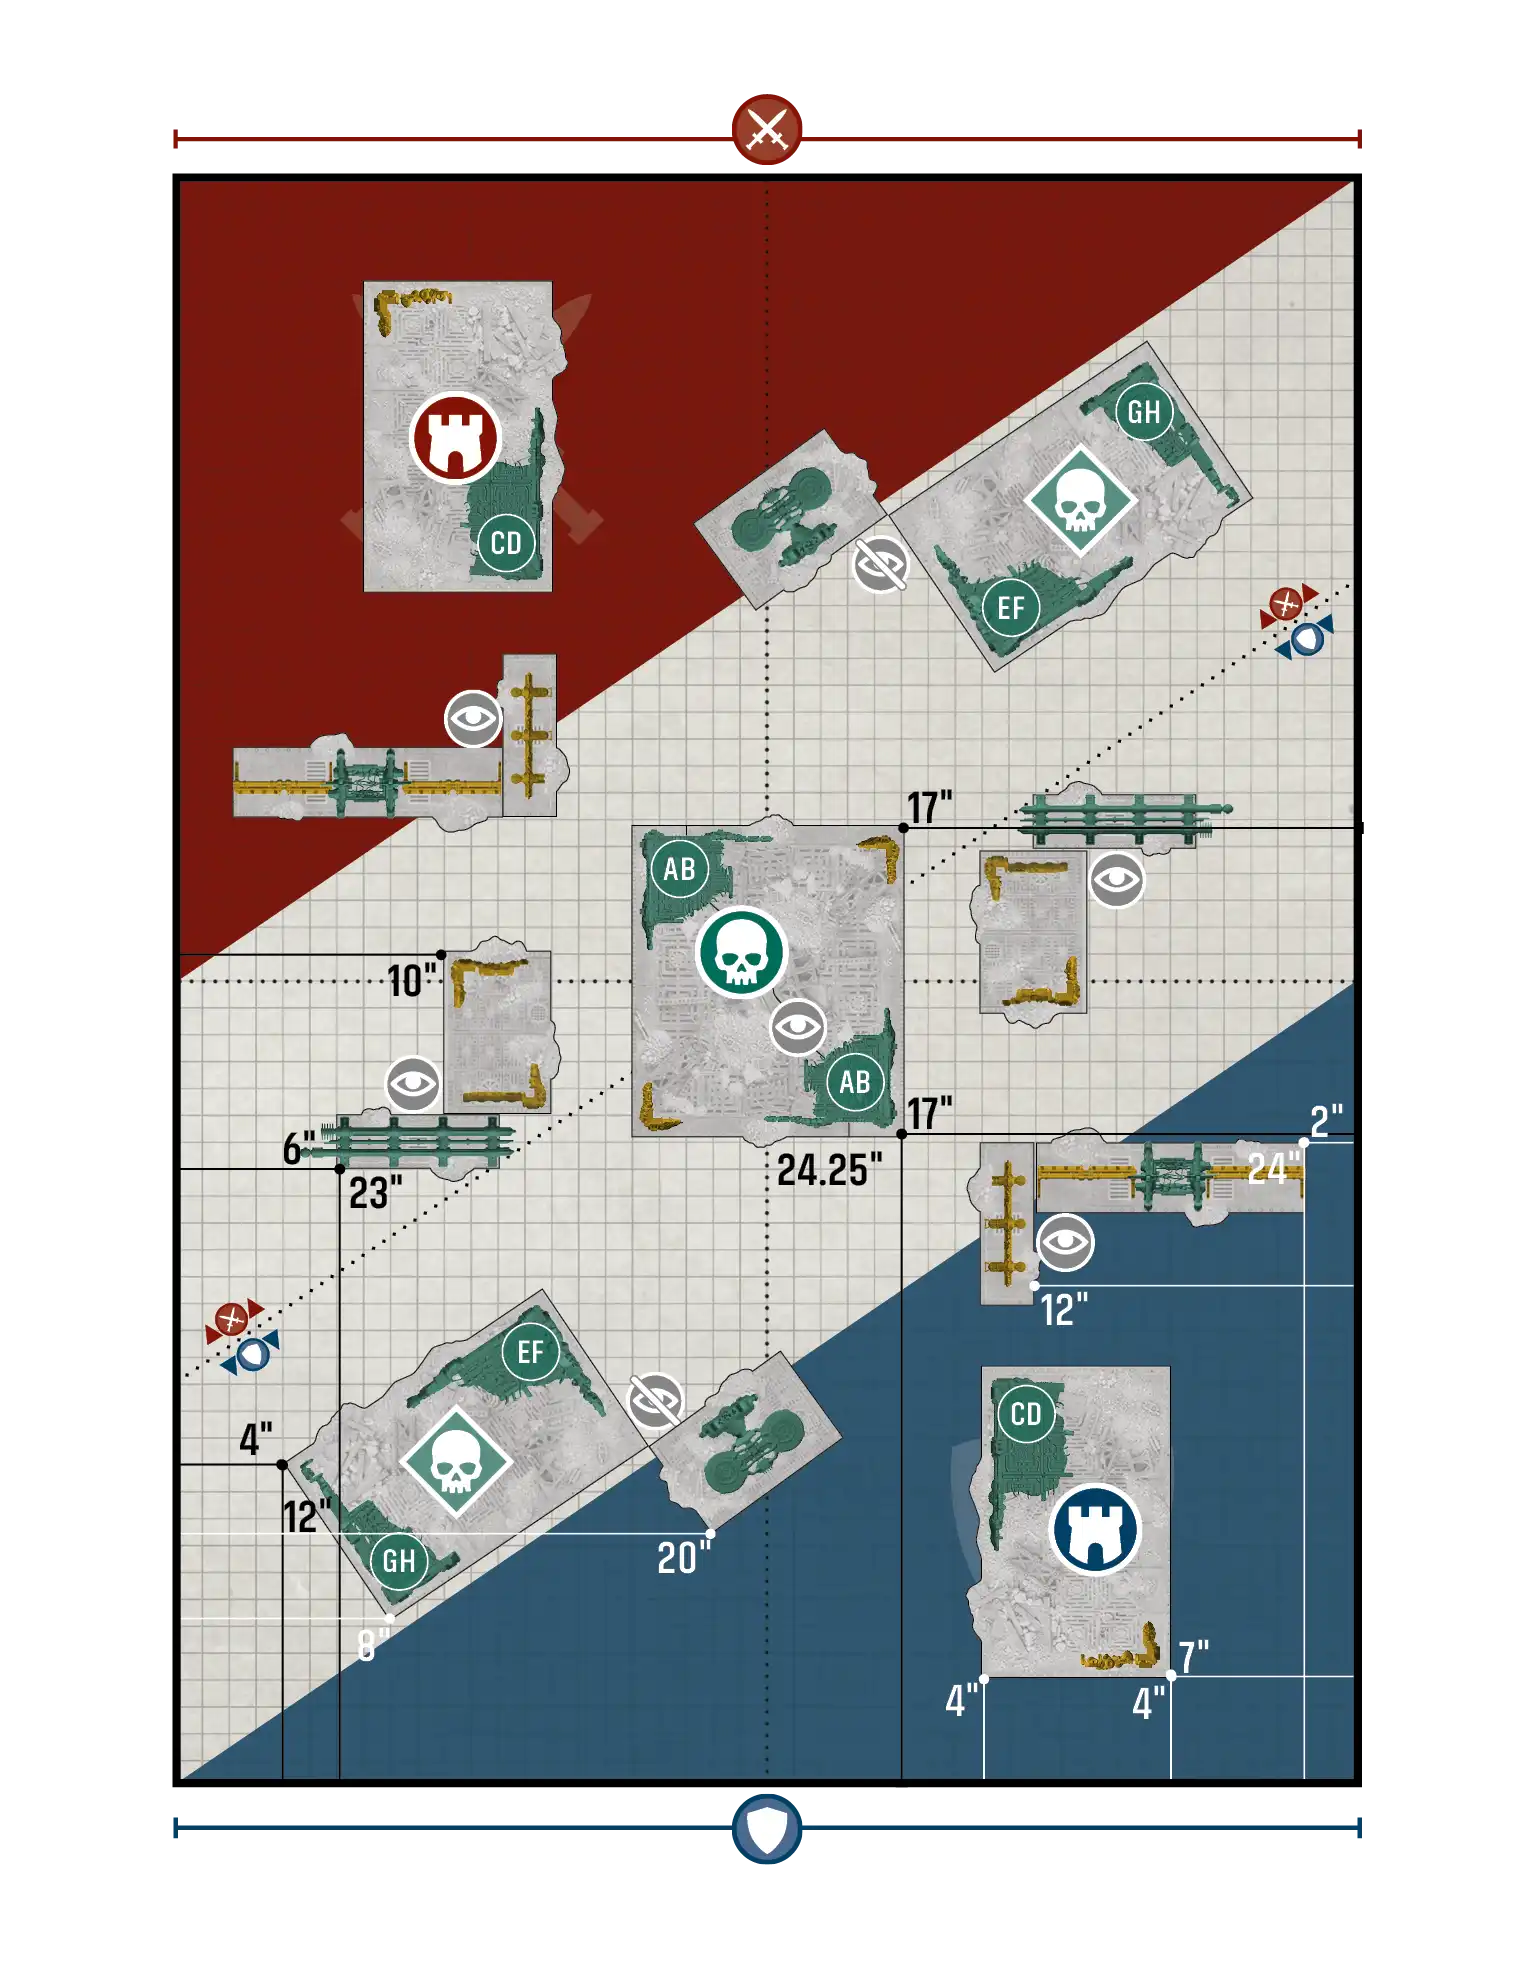
Reconnaissance / Priority Assets - Layout B#
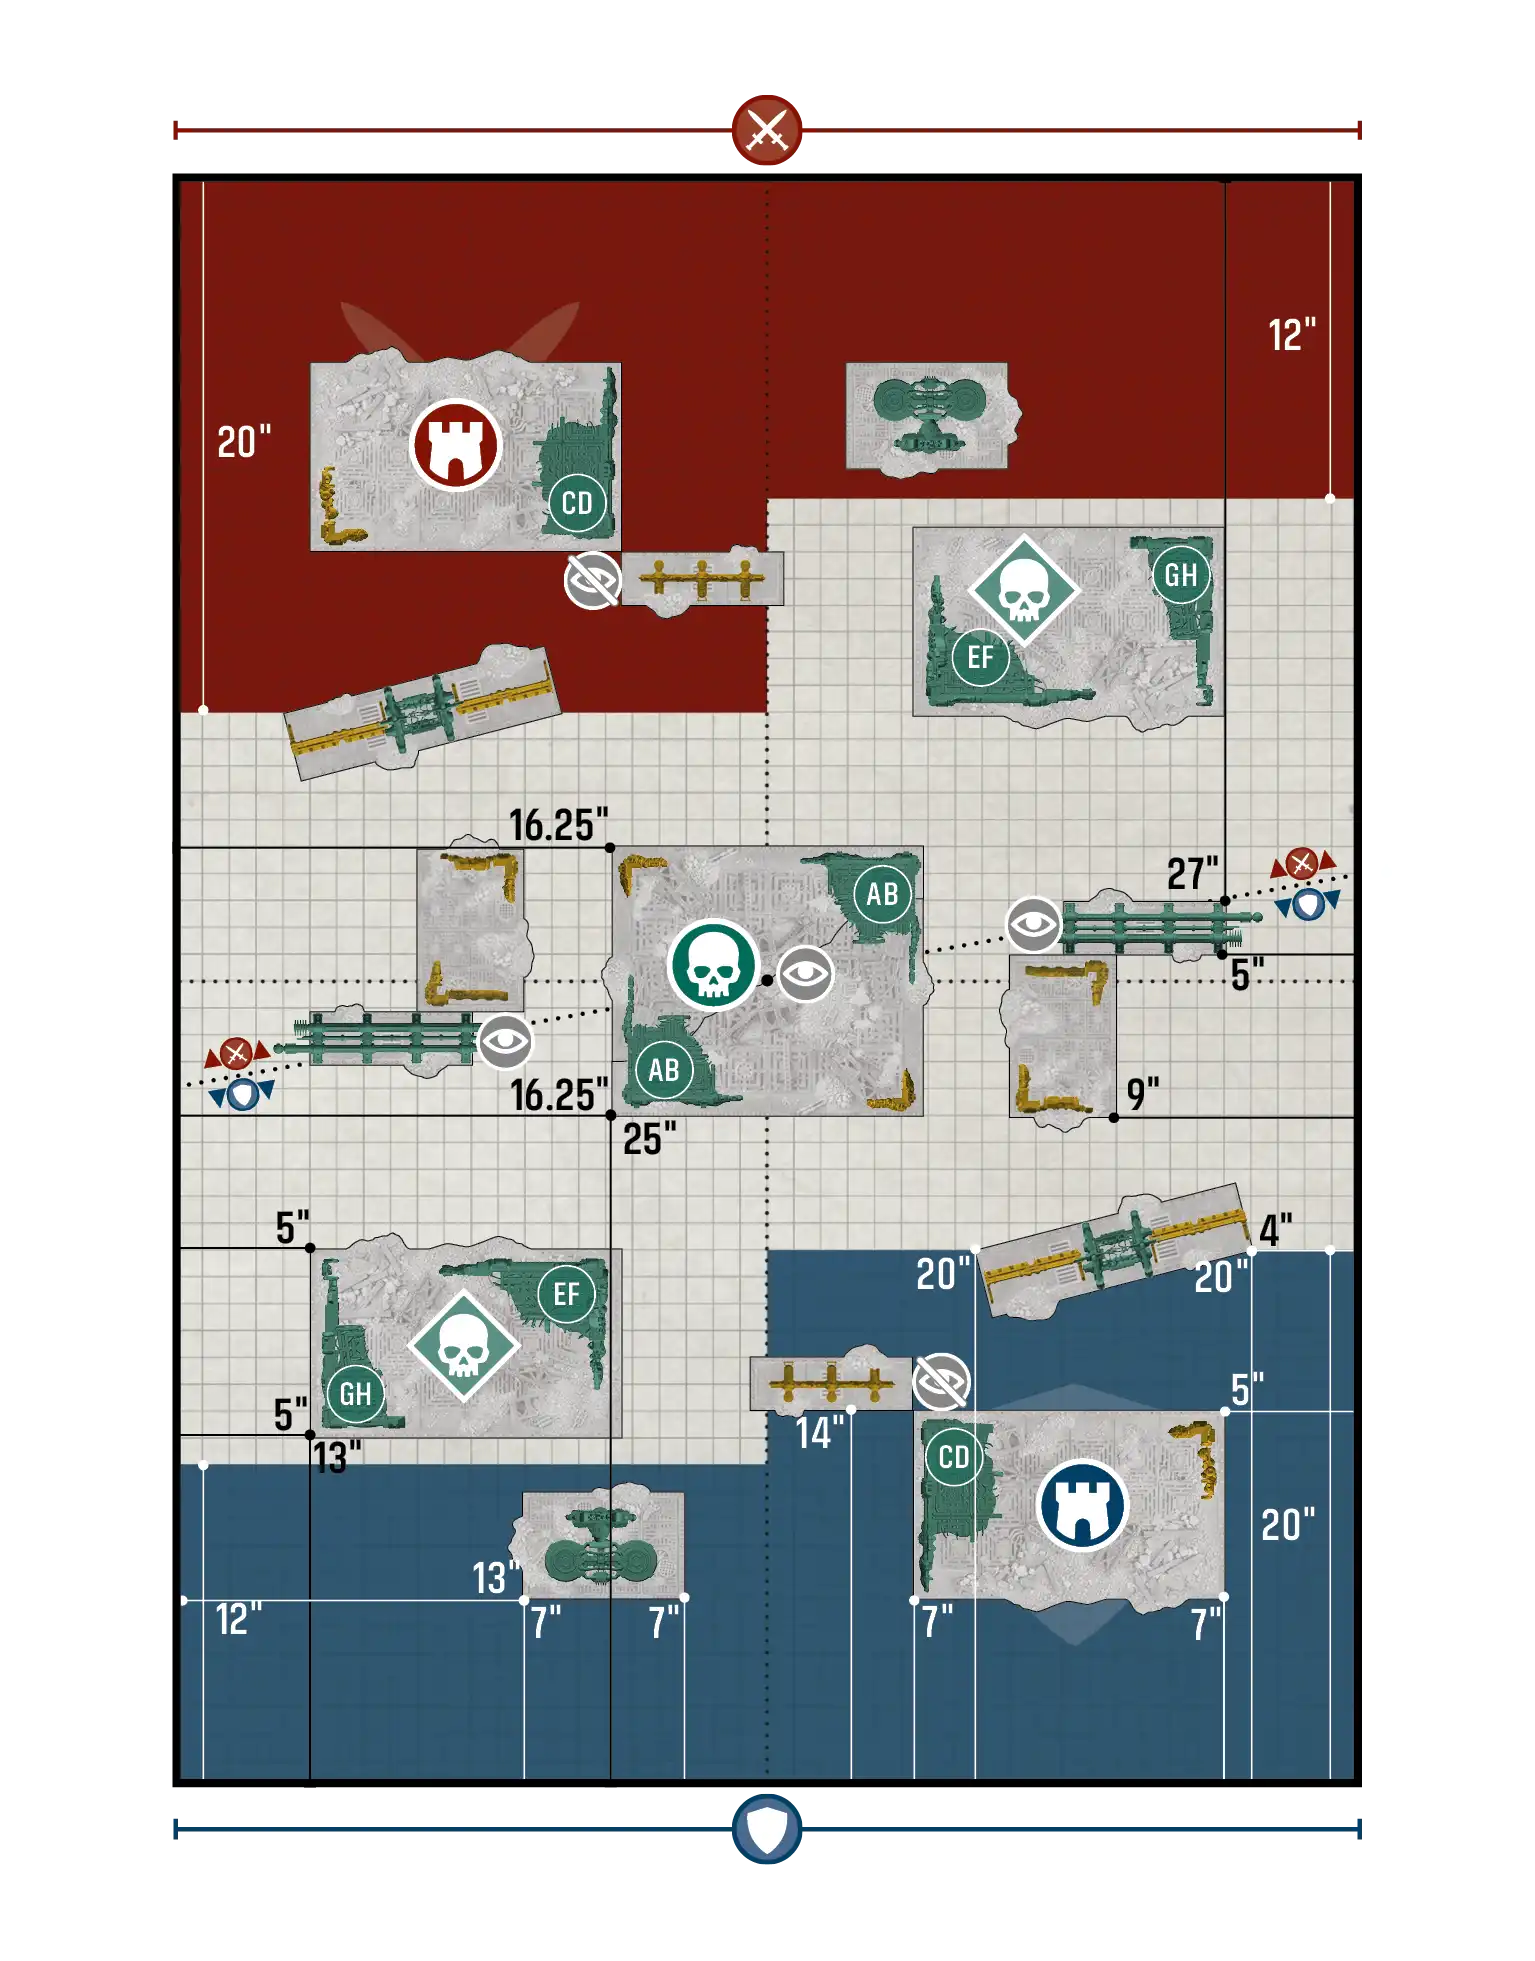
Reconnaissance / Priority Assets - Layout C#
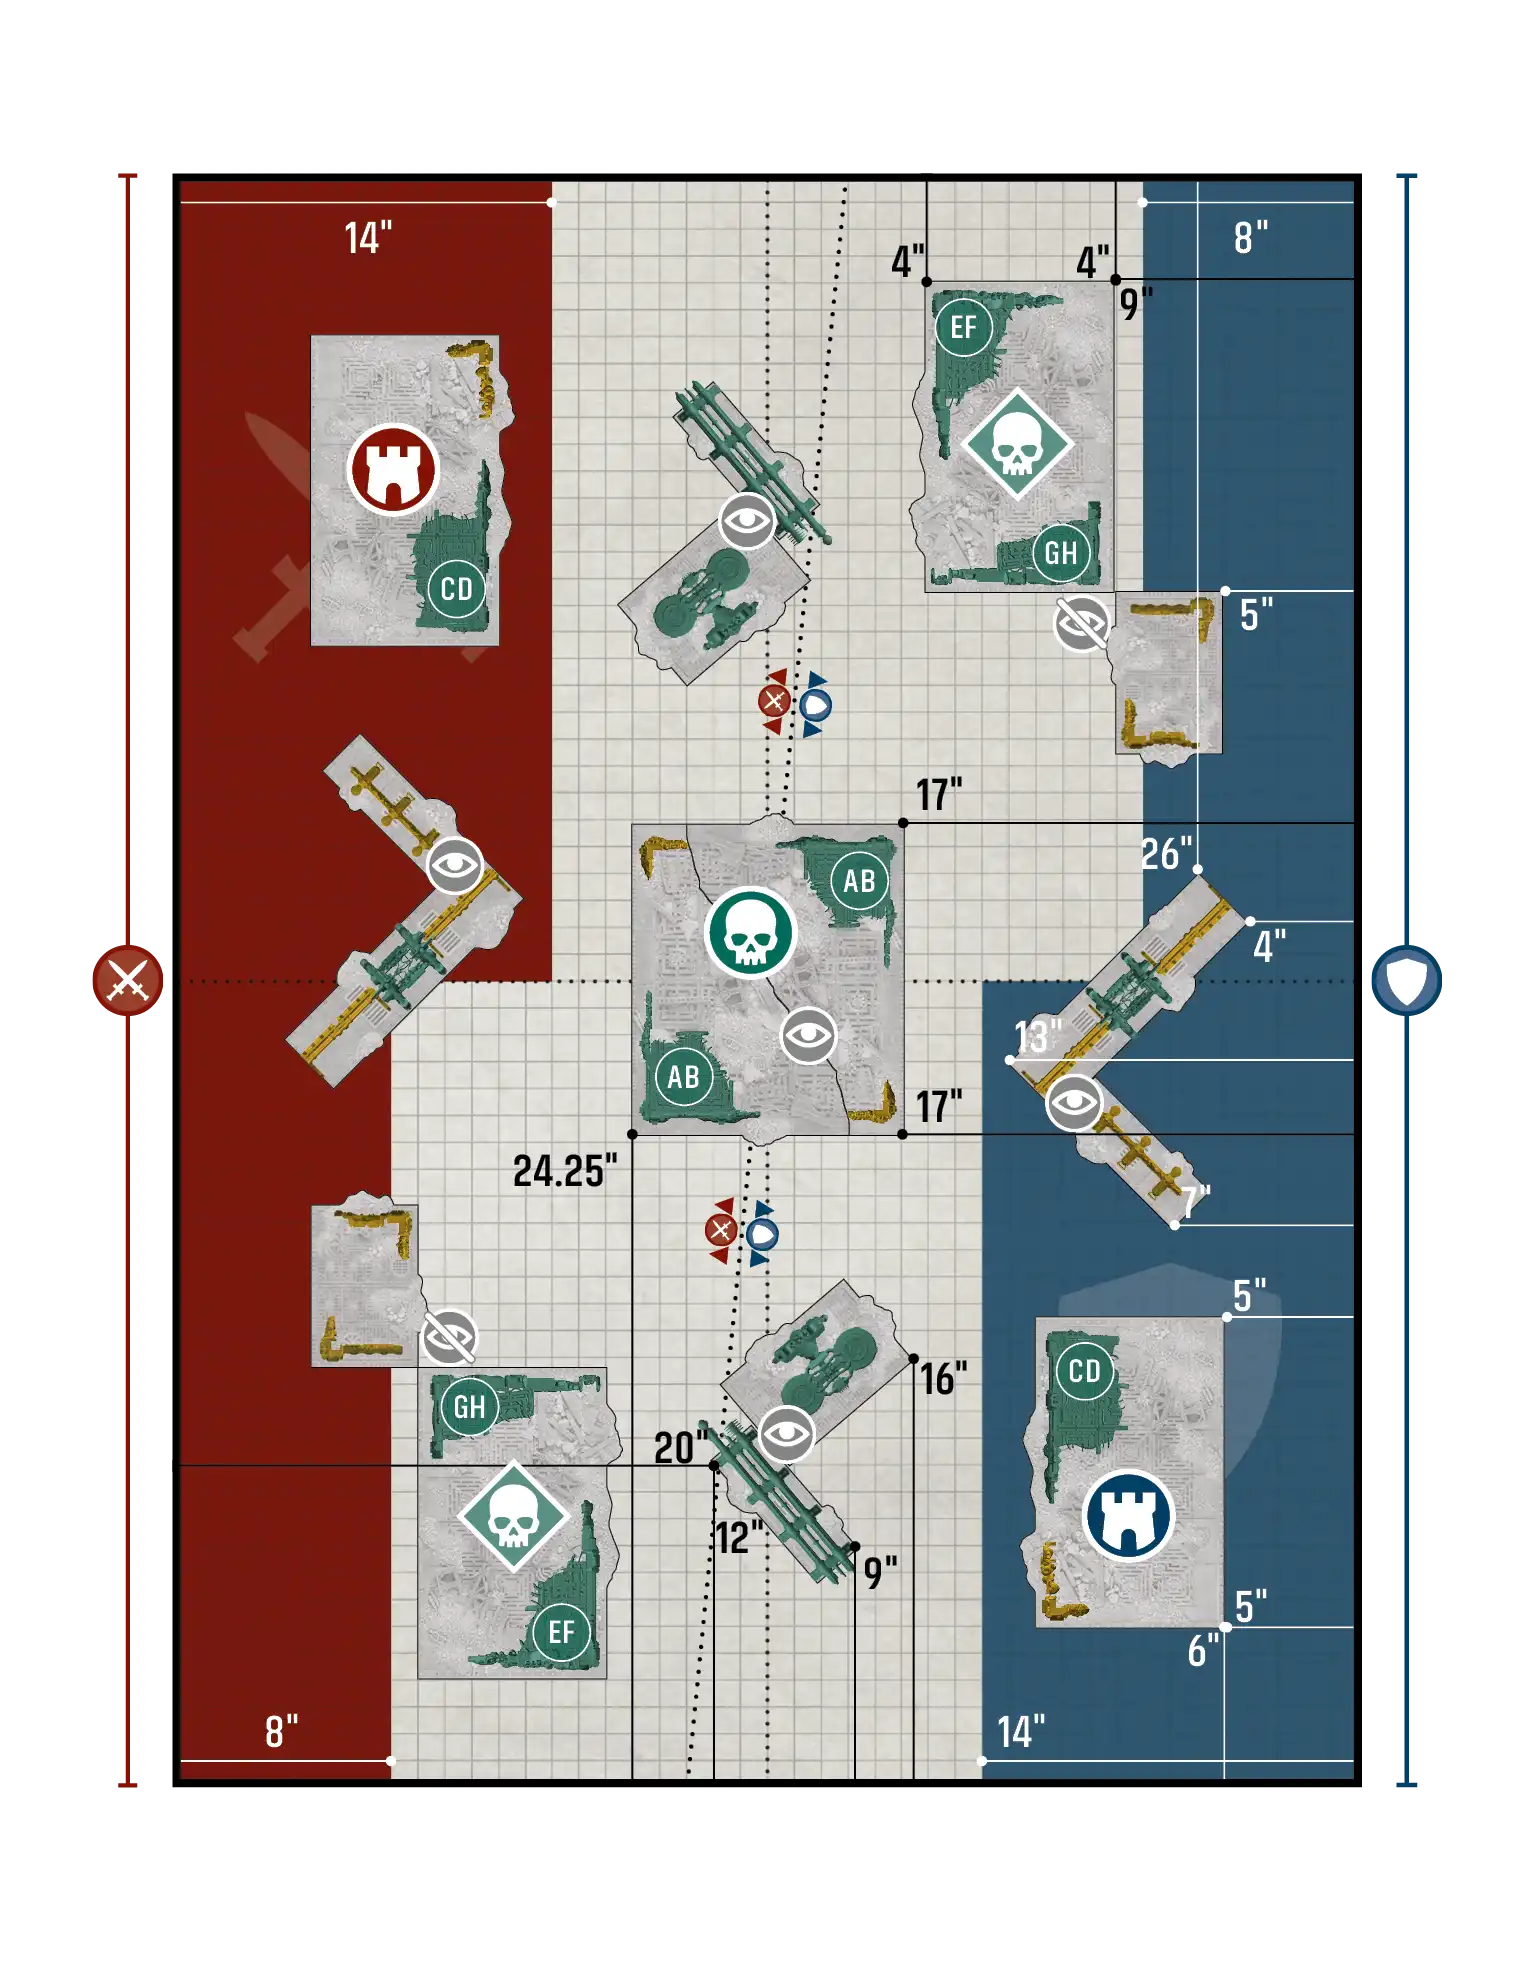
Reconnaissance / Reconnaissance - Layout A#
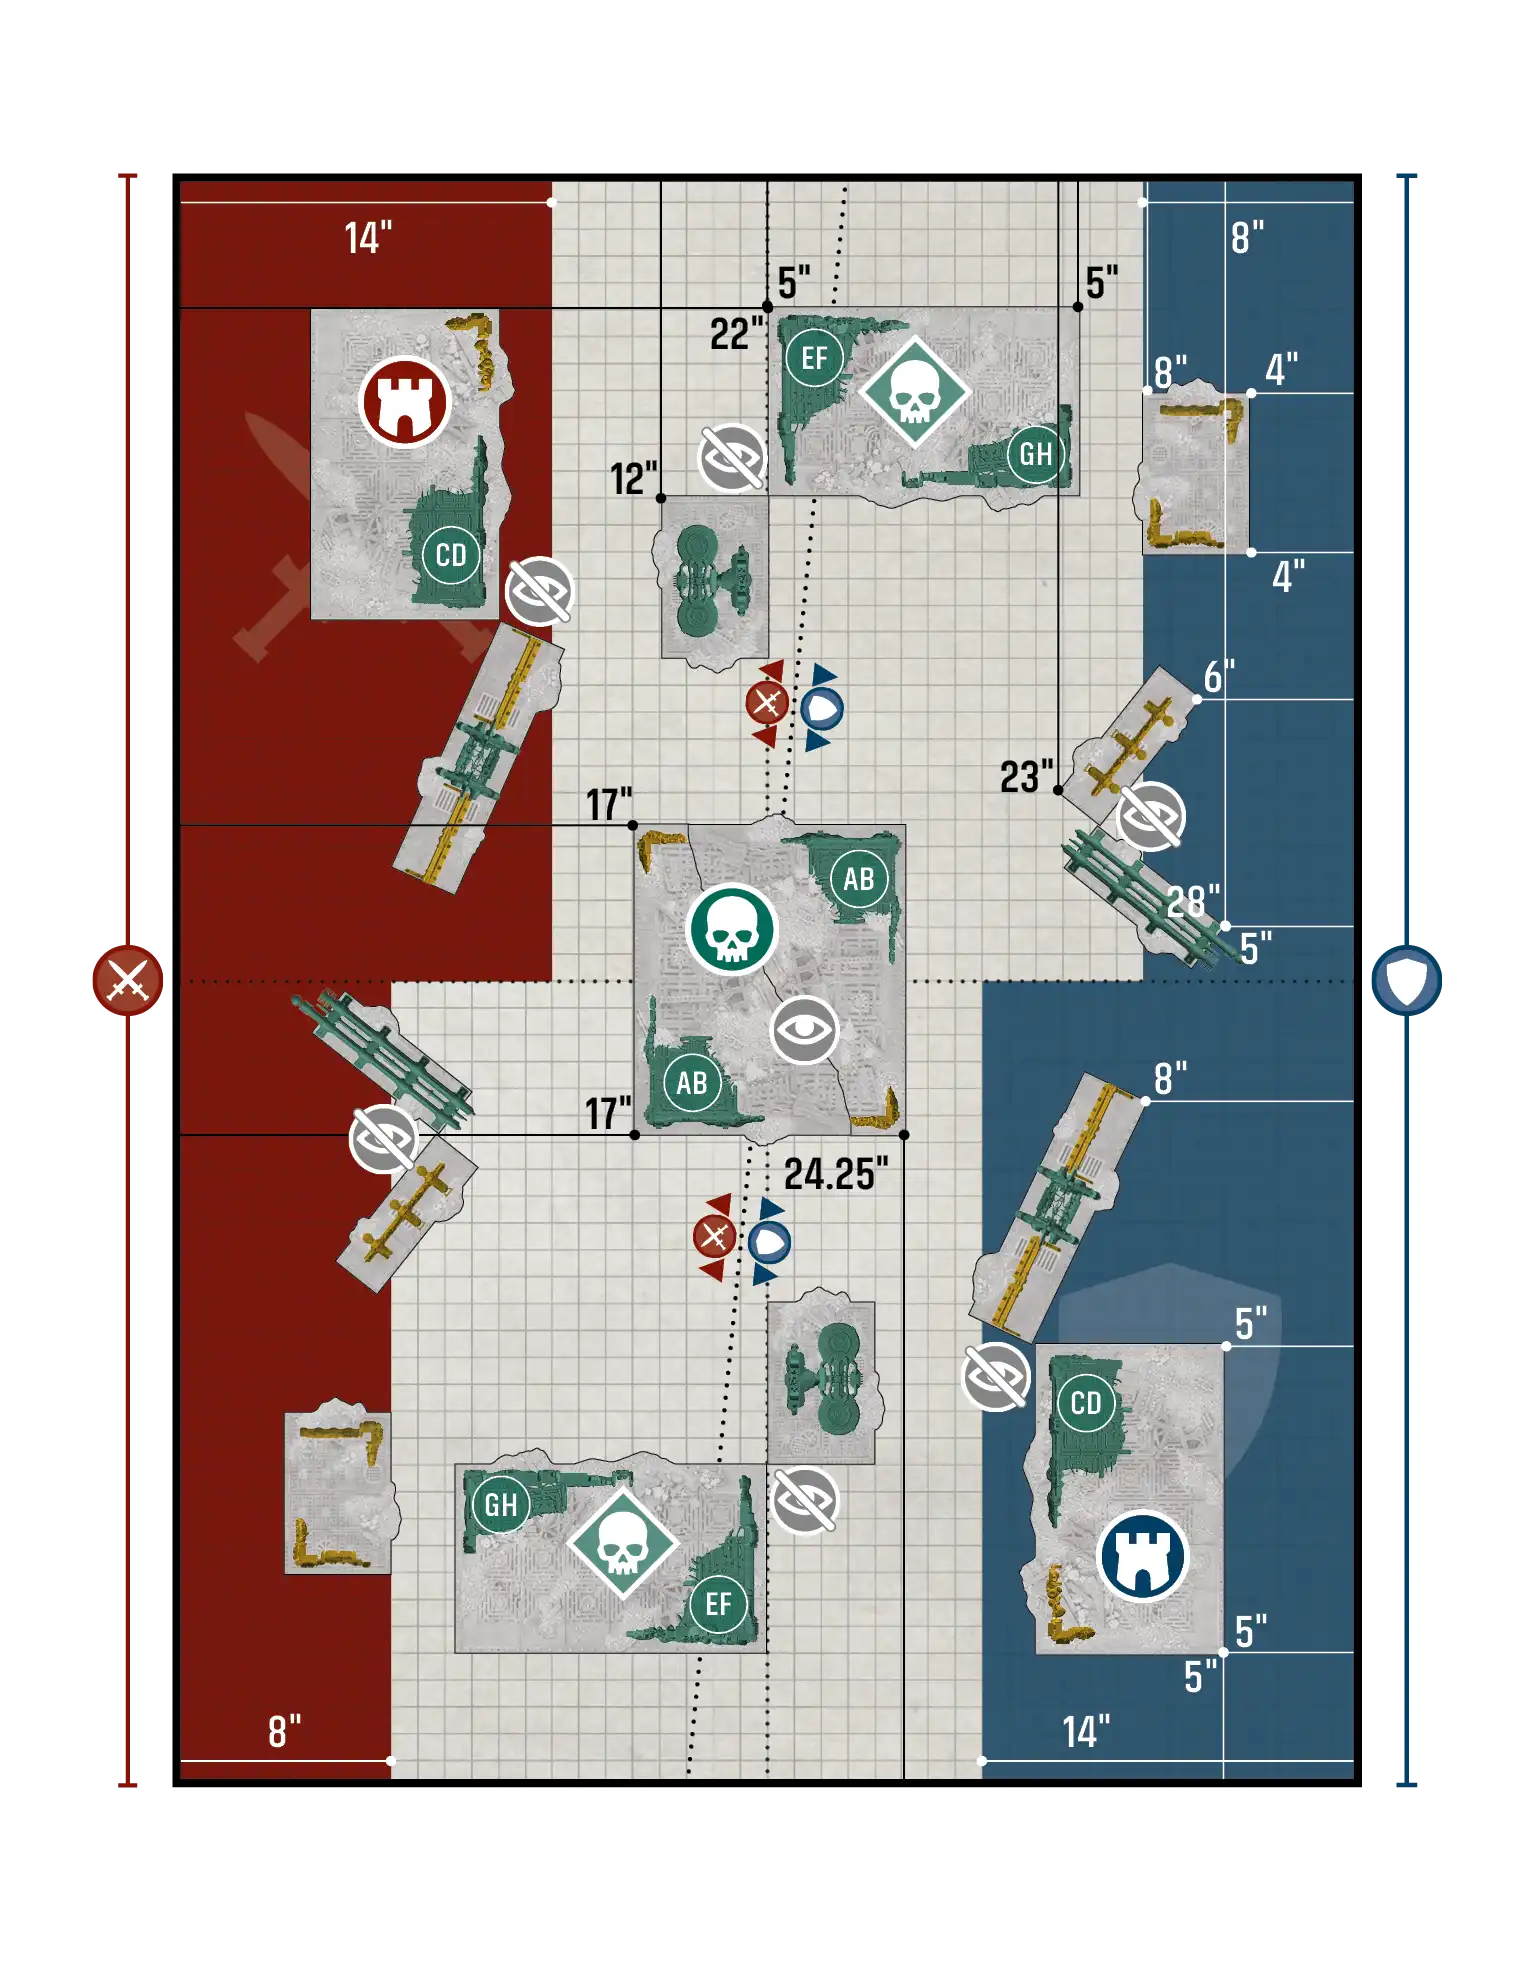
Reconnaissance / Reconnaissance - Layout B#
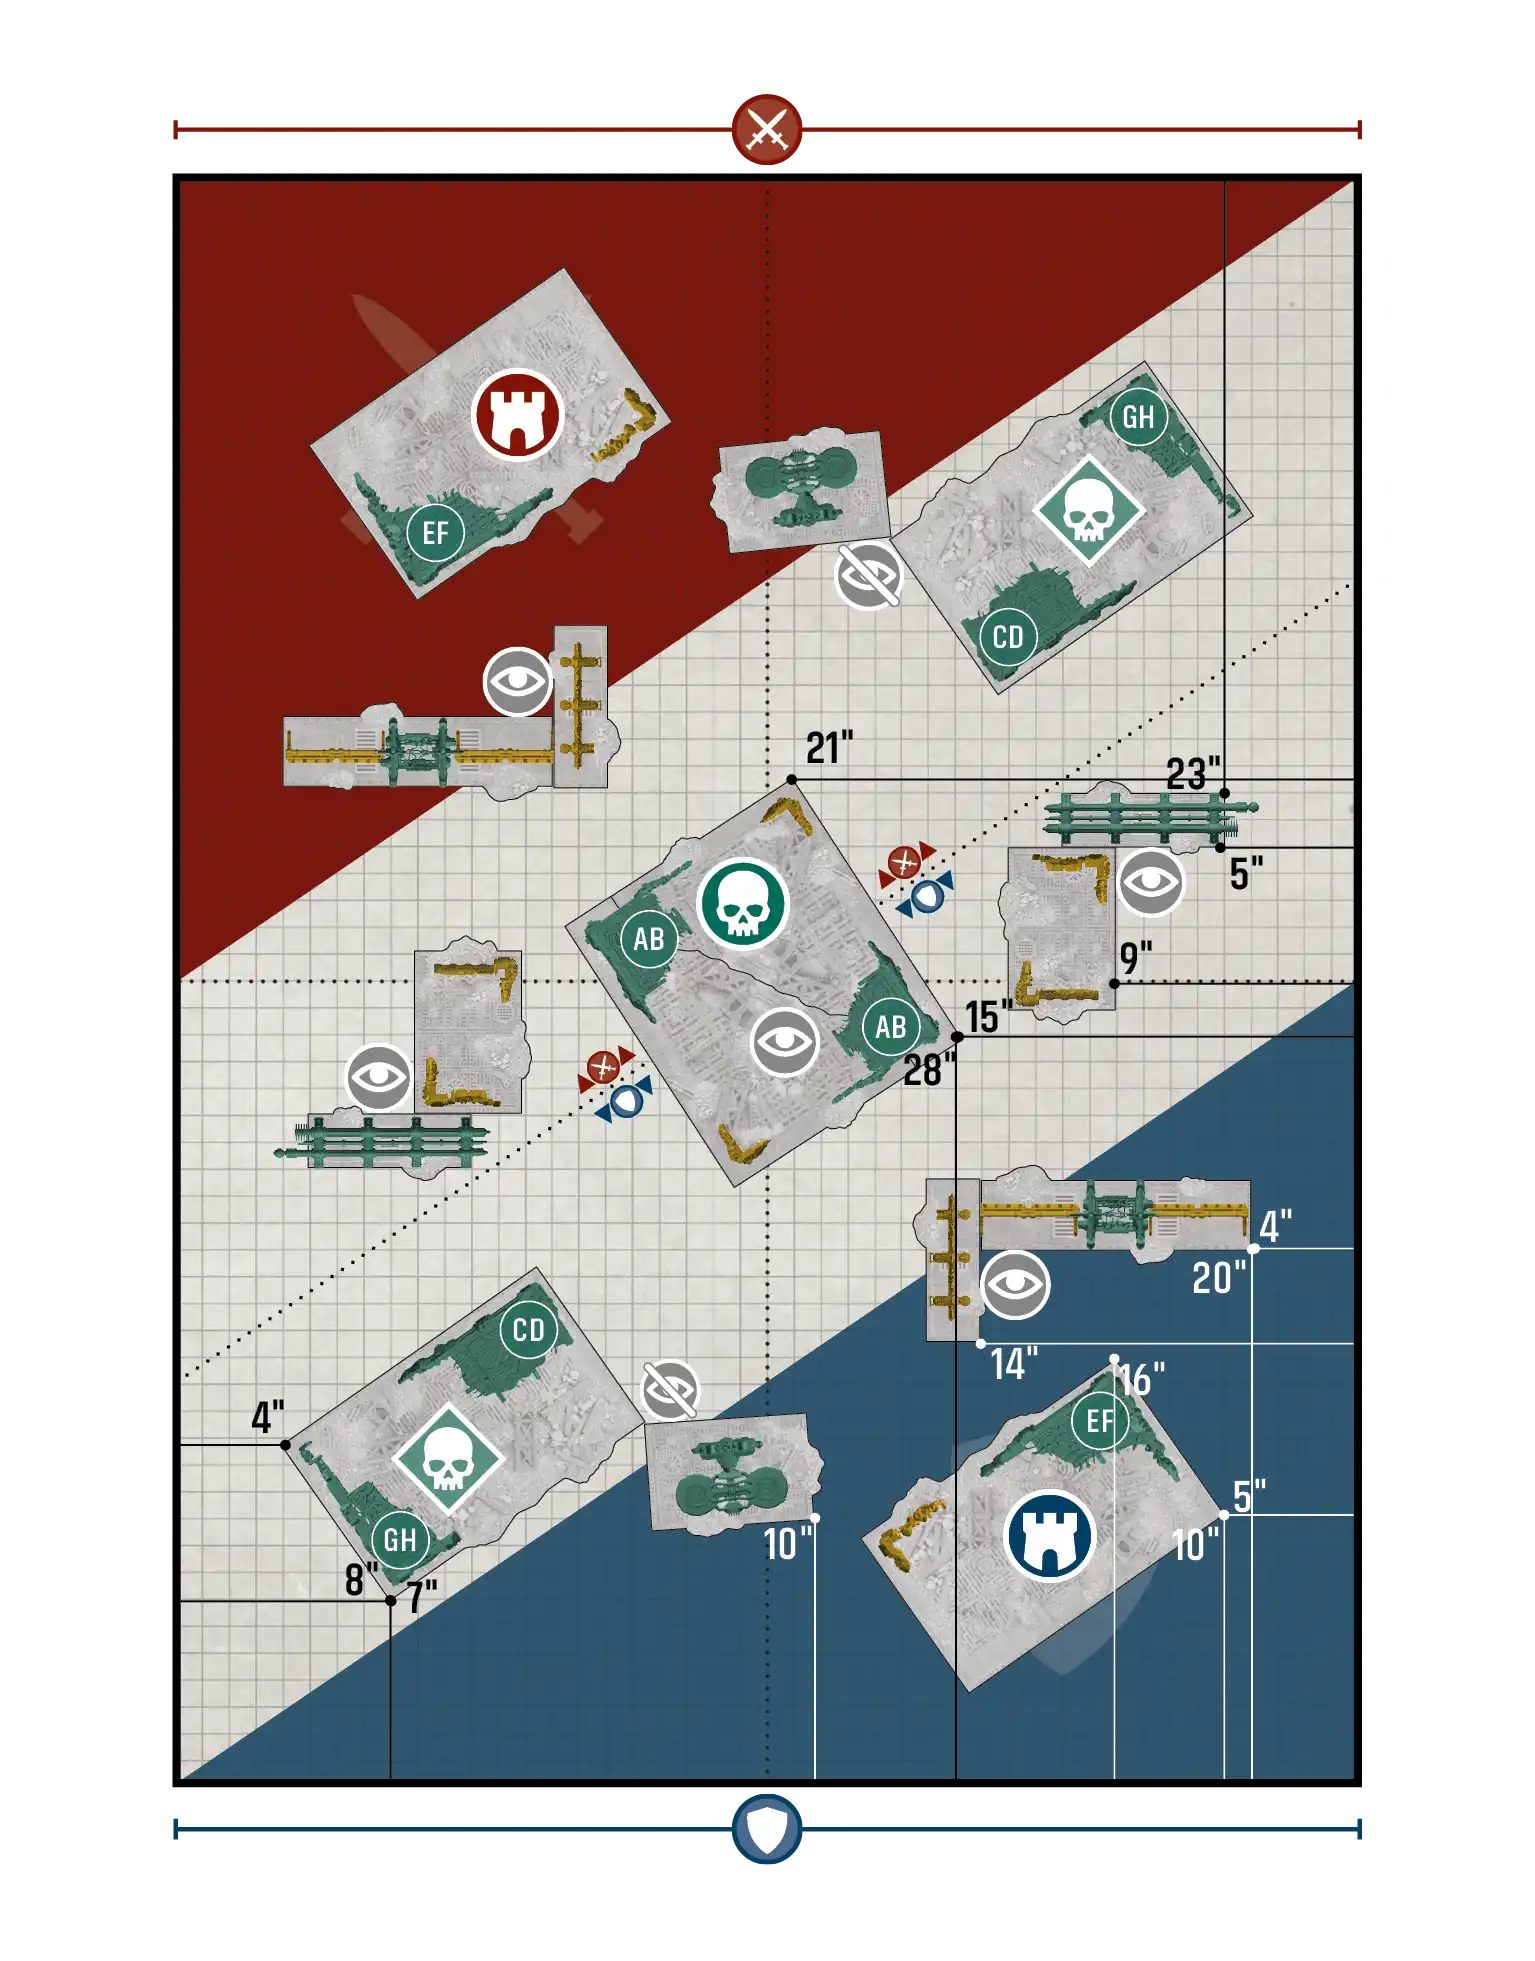
Reconnaissance / Reconnaissance - Layout C#
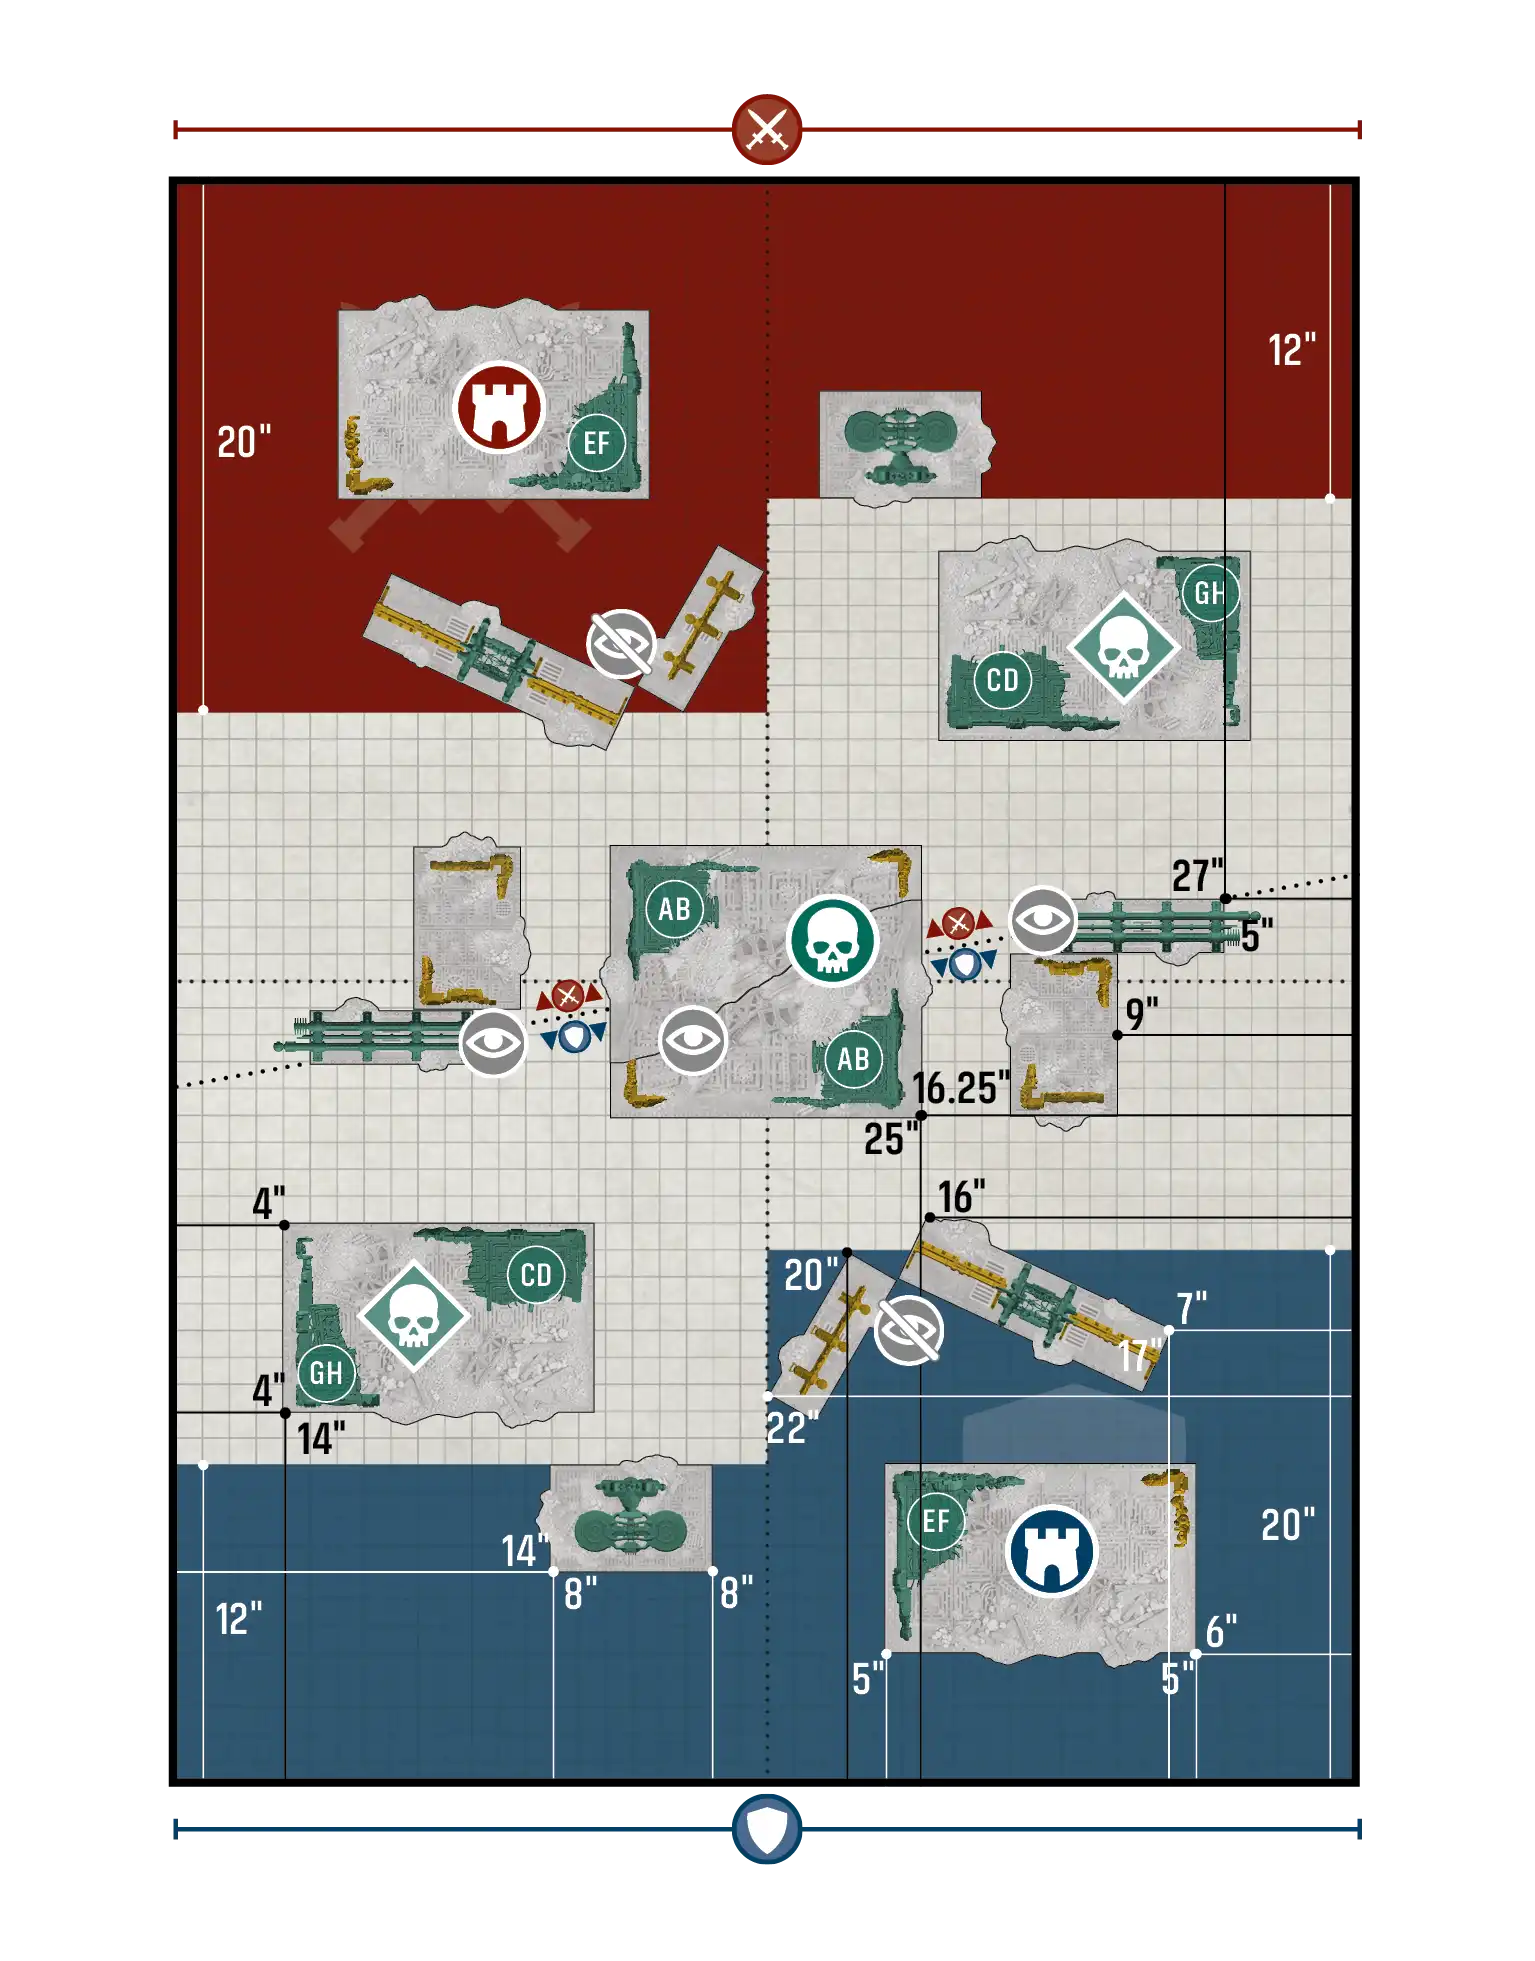
Take and Hold / Disruption - Layout A#
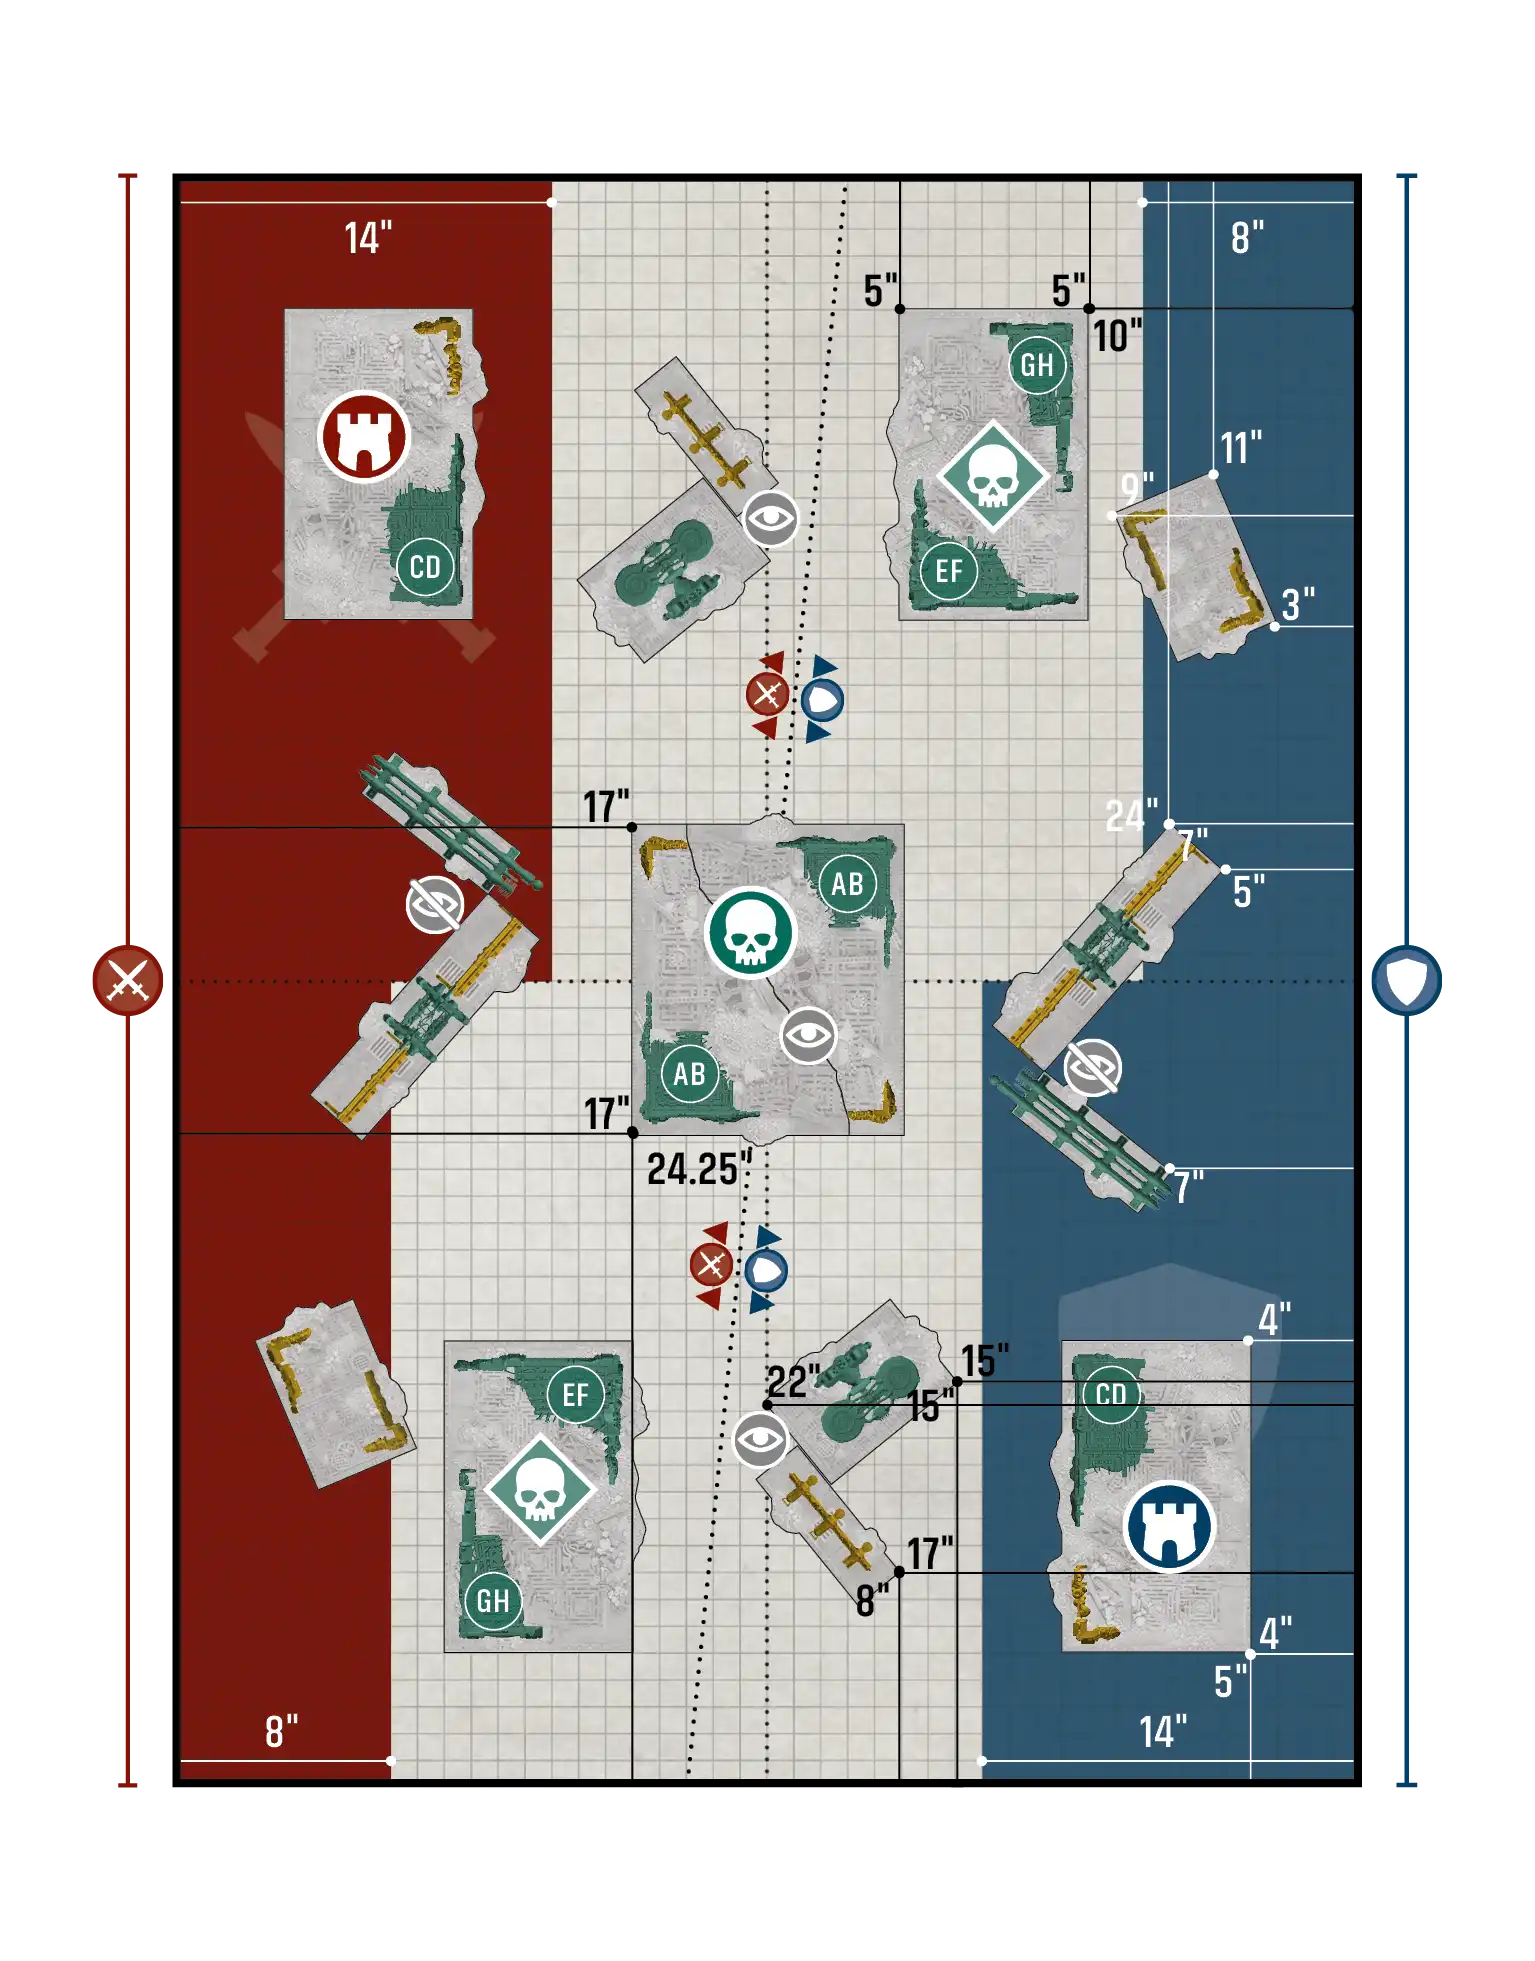
Take and Hold / Disruption - Layout B#
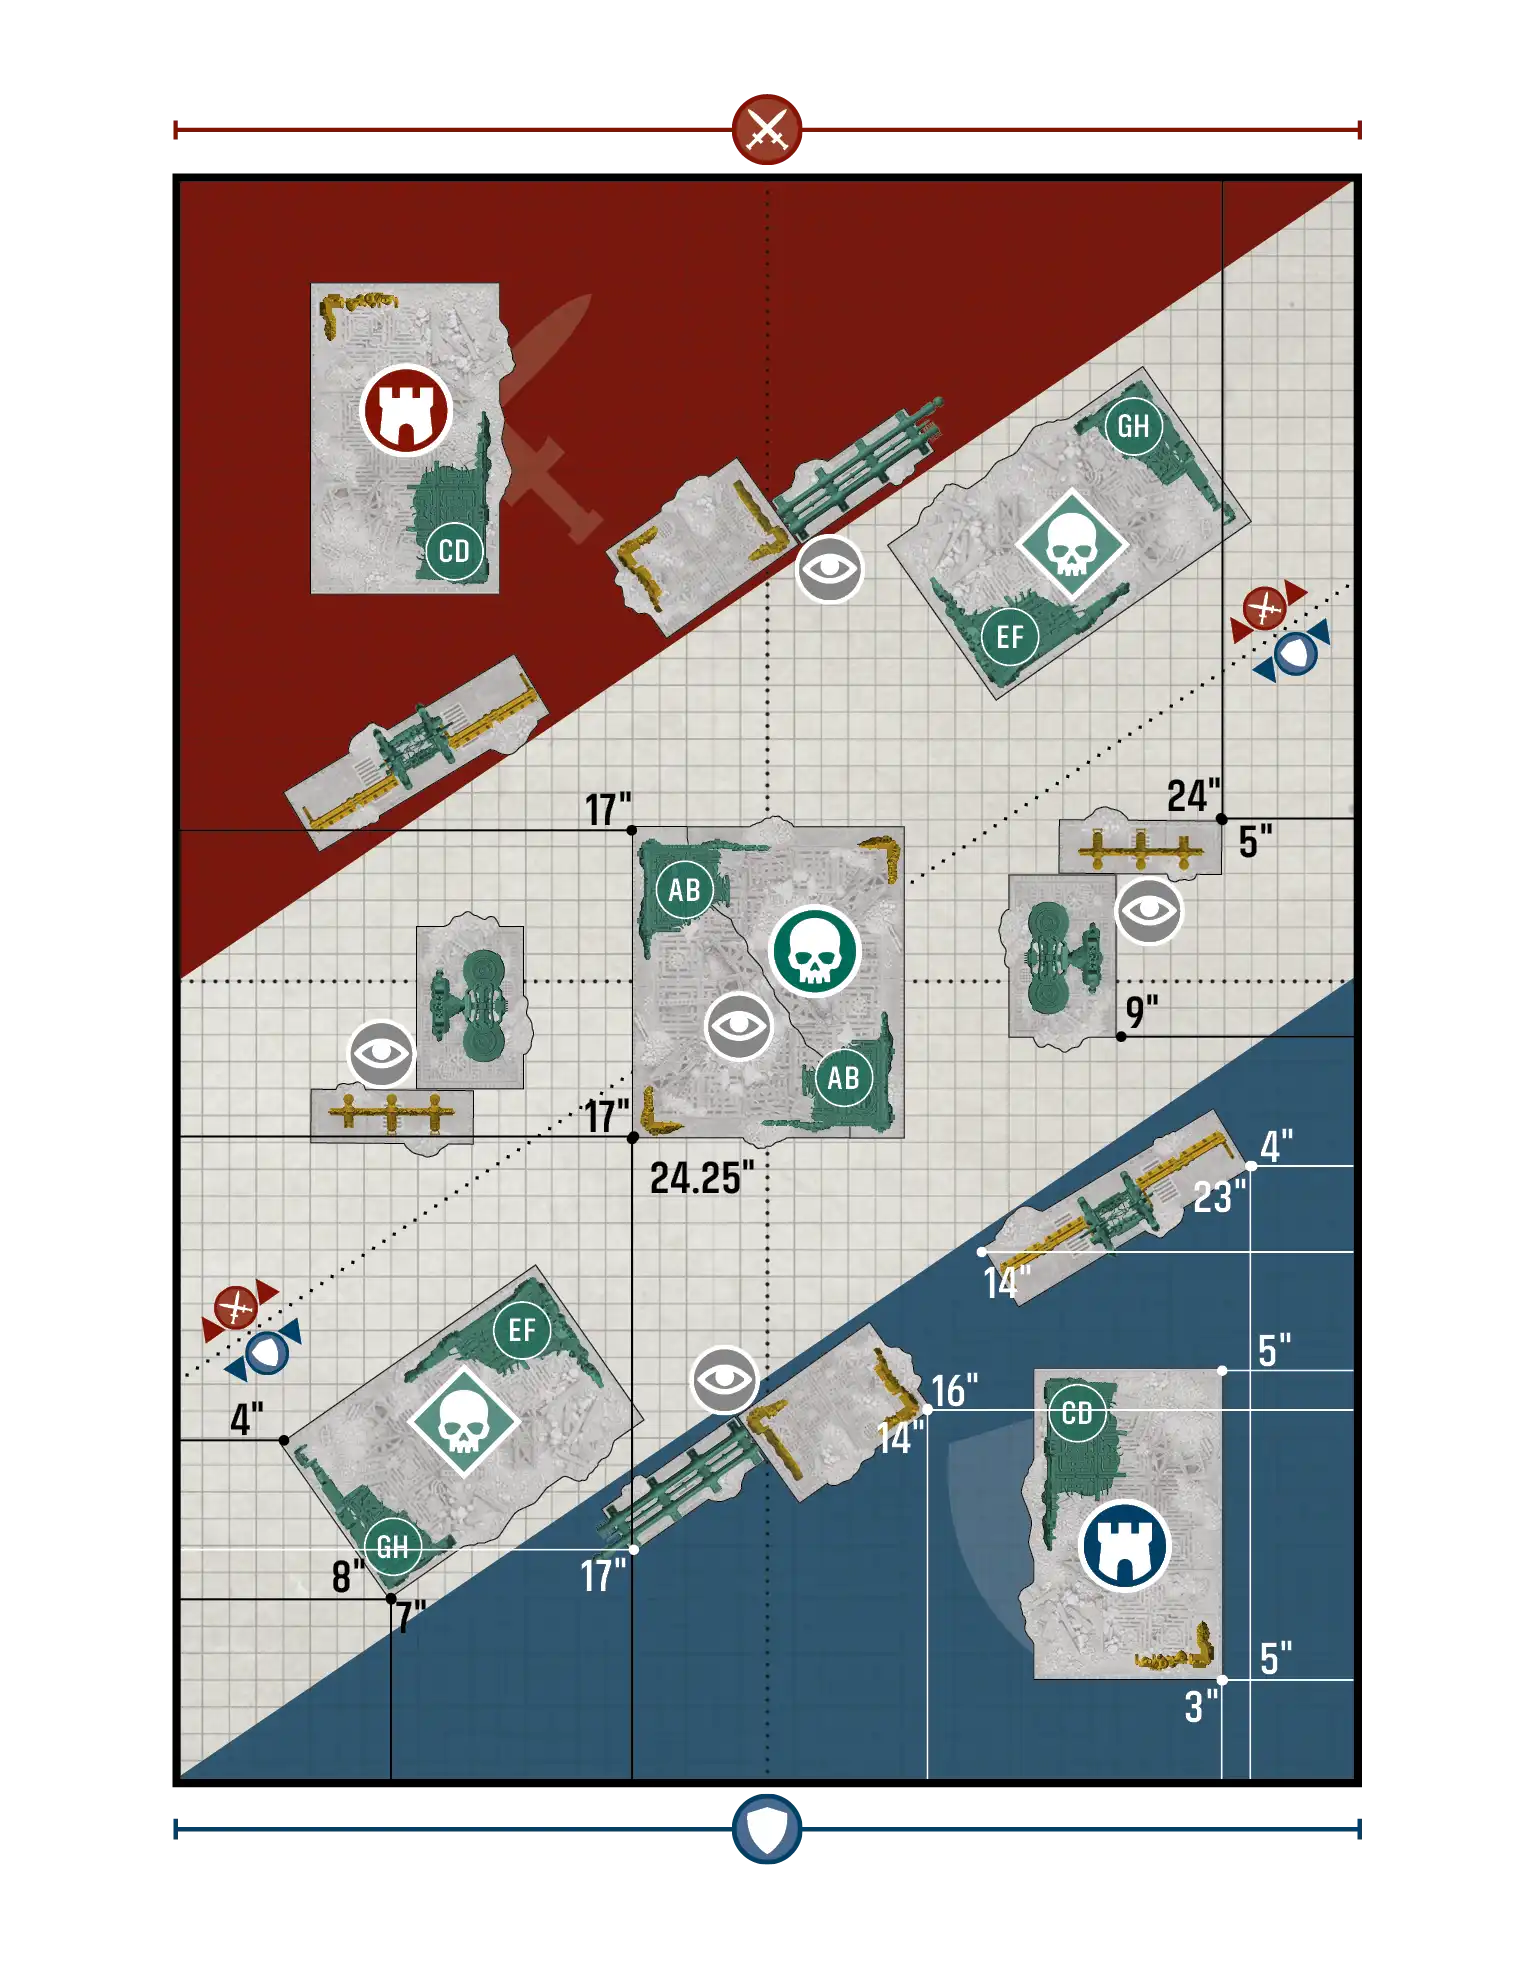
Take and Hold / Disruption - Layout C#
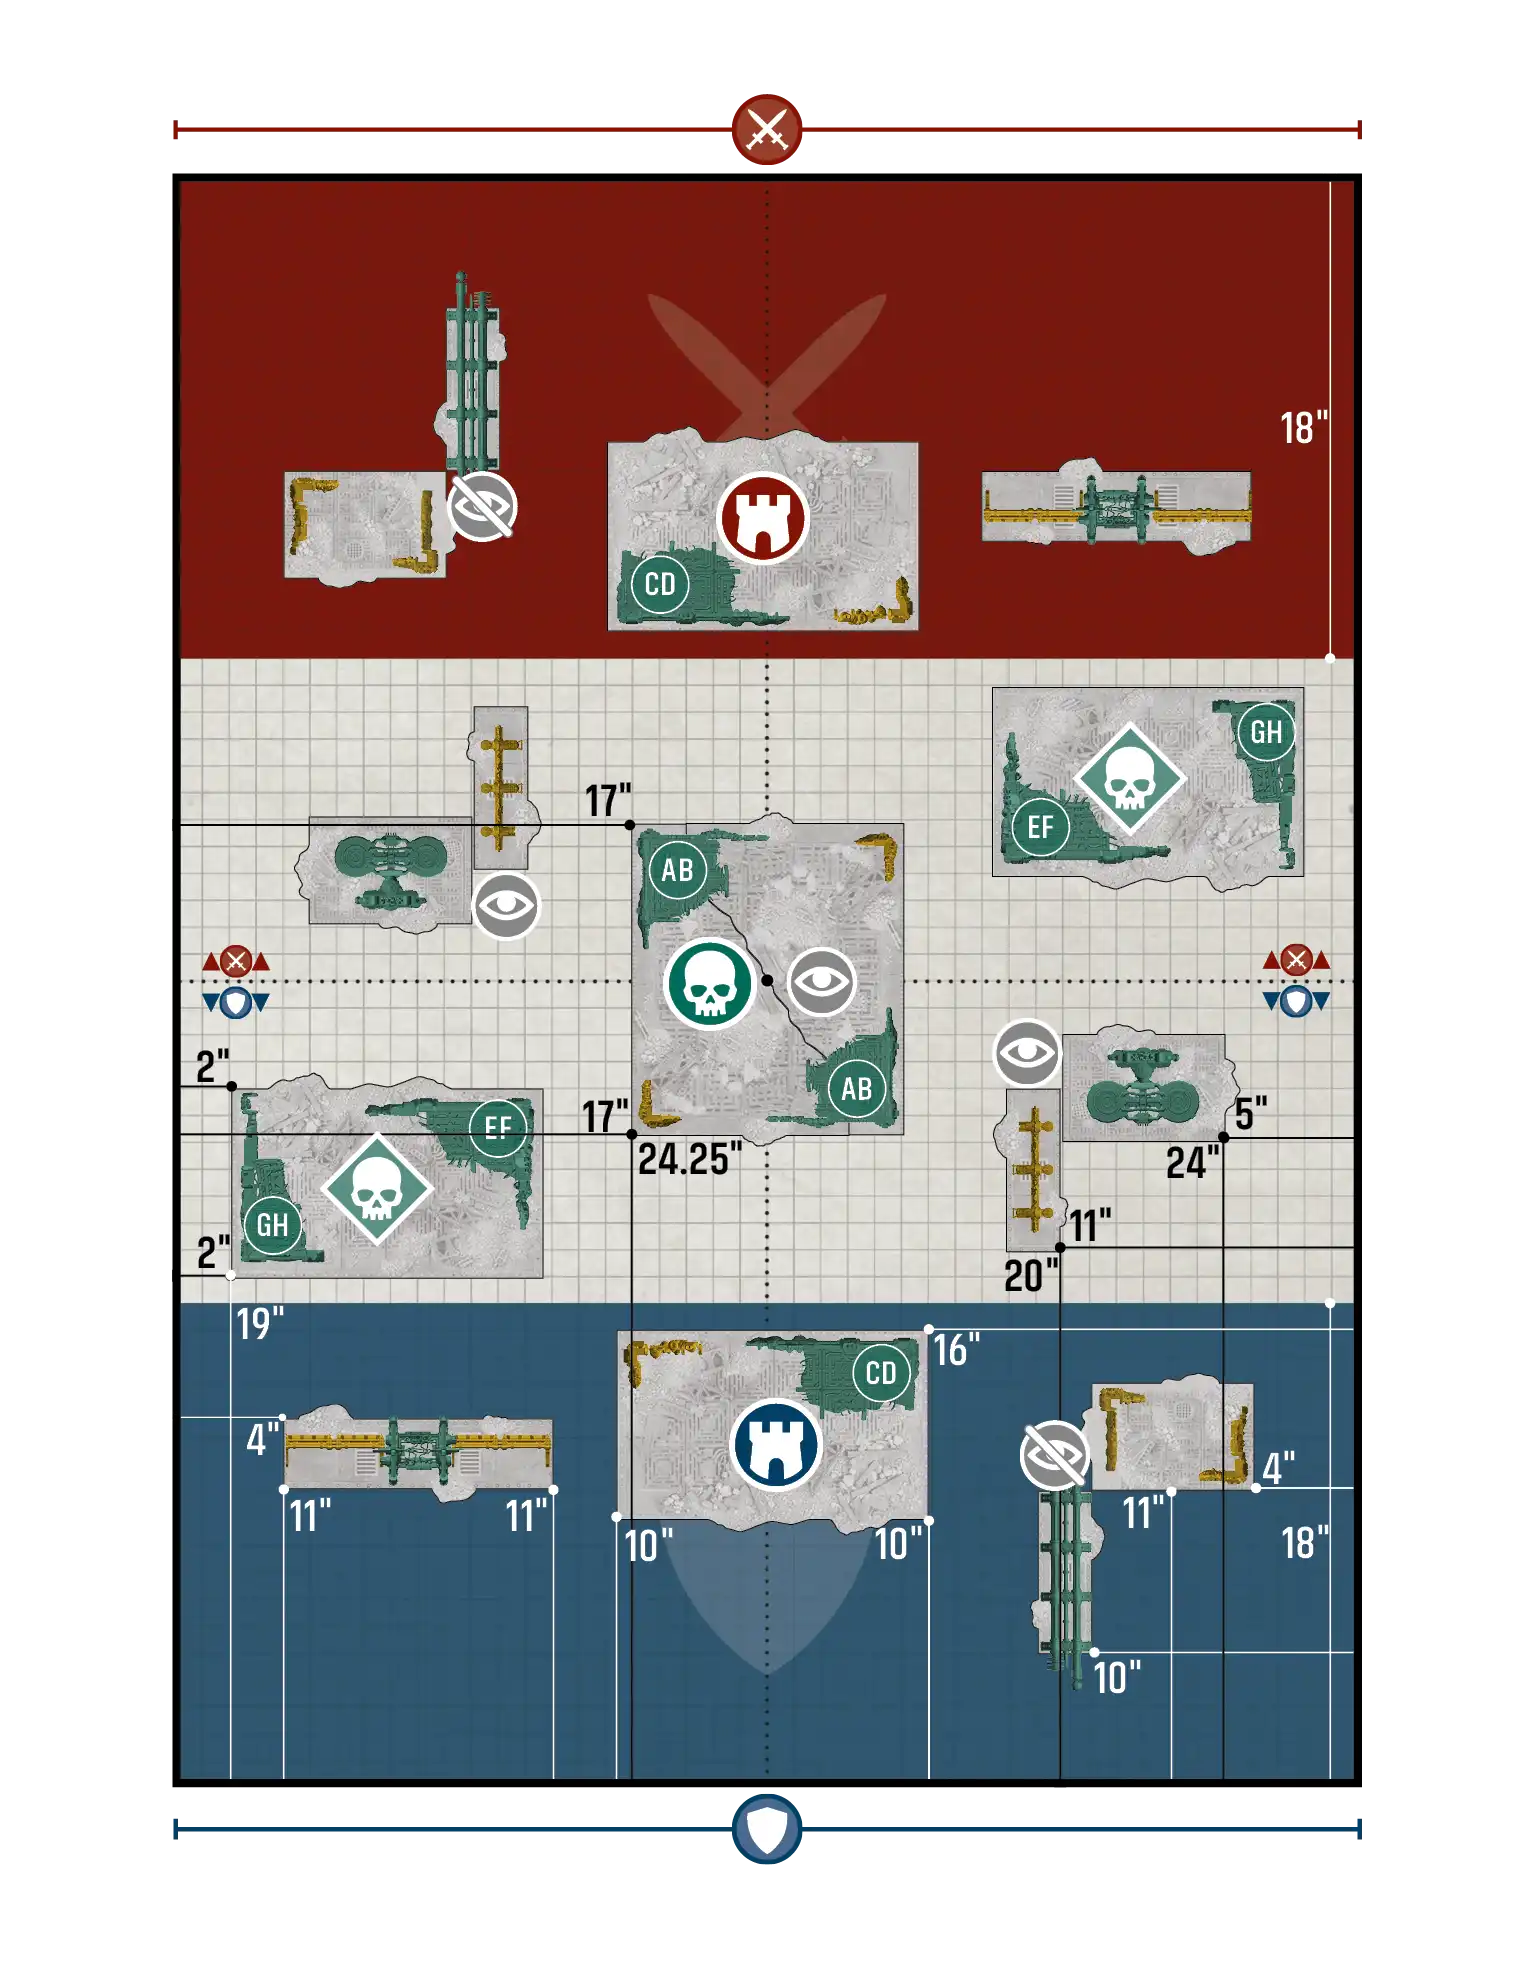
Take and Hold / Priority Assets - Layout A#
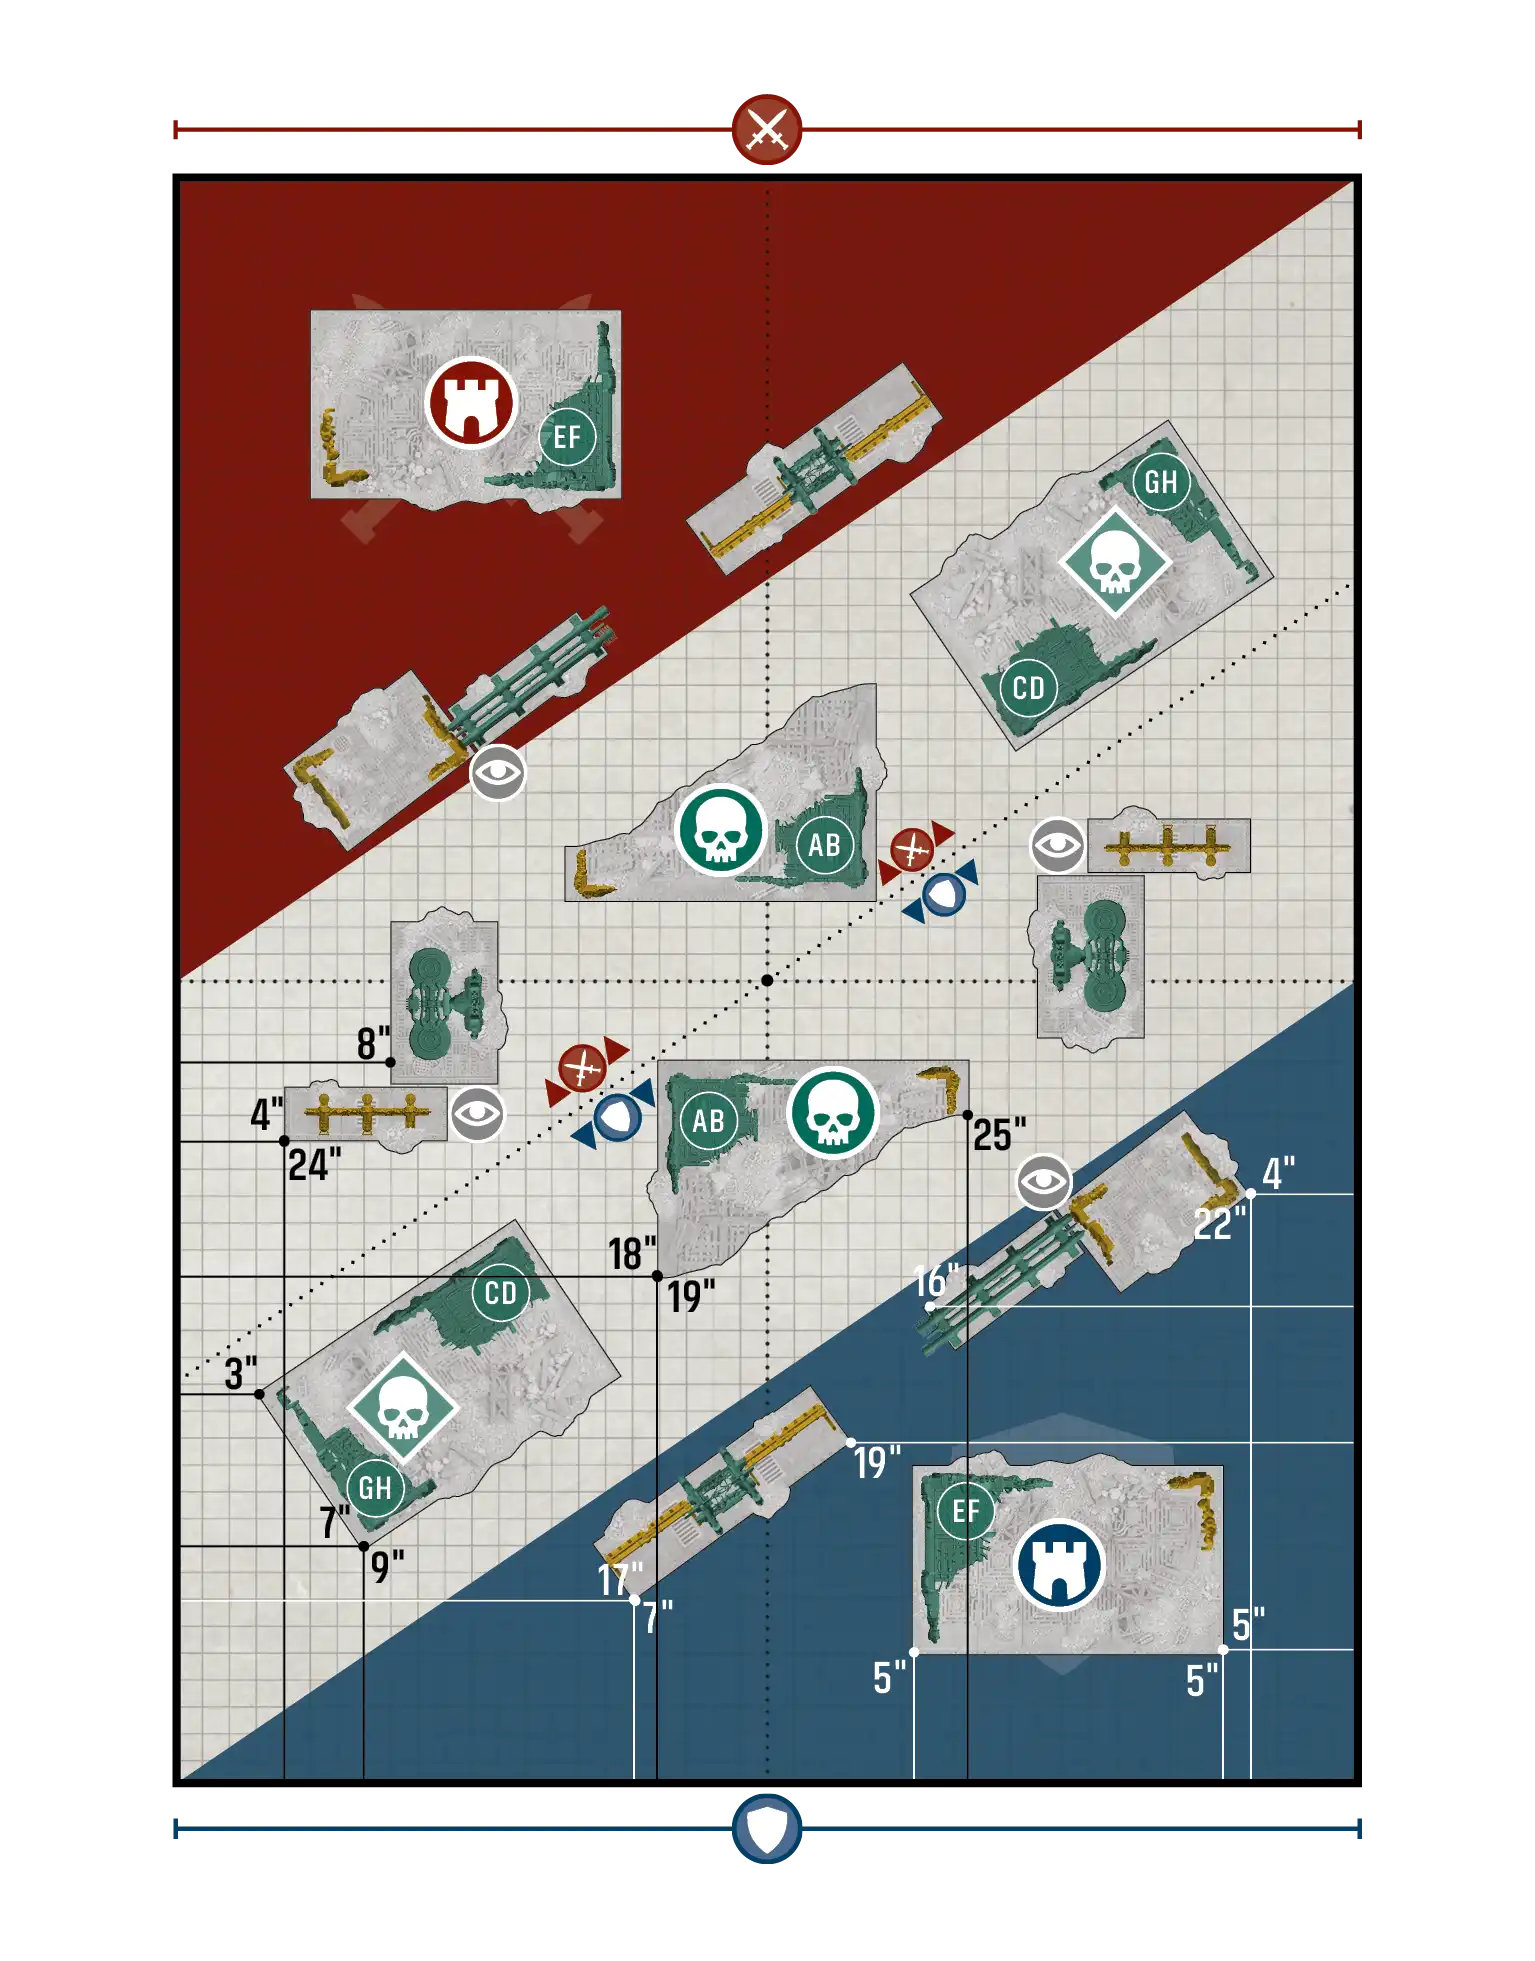
Take and Hold / Priority Assets - Layout B#
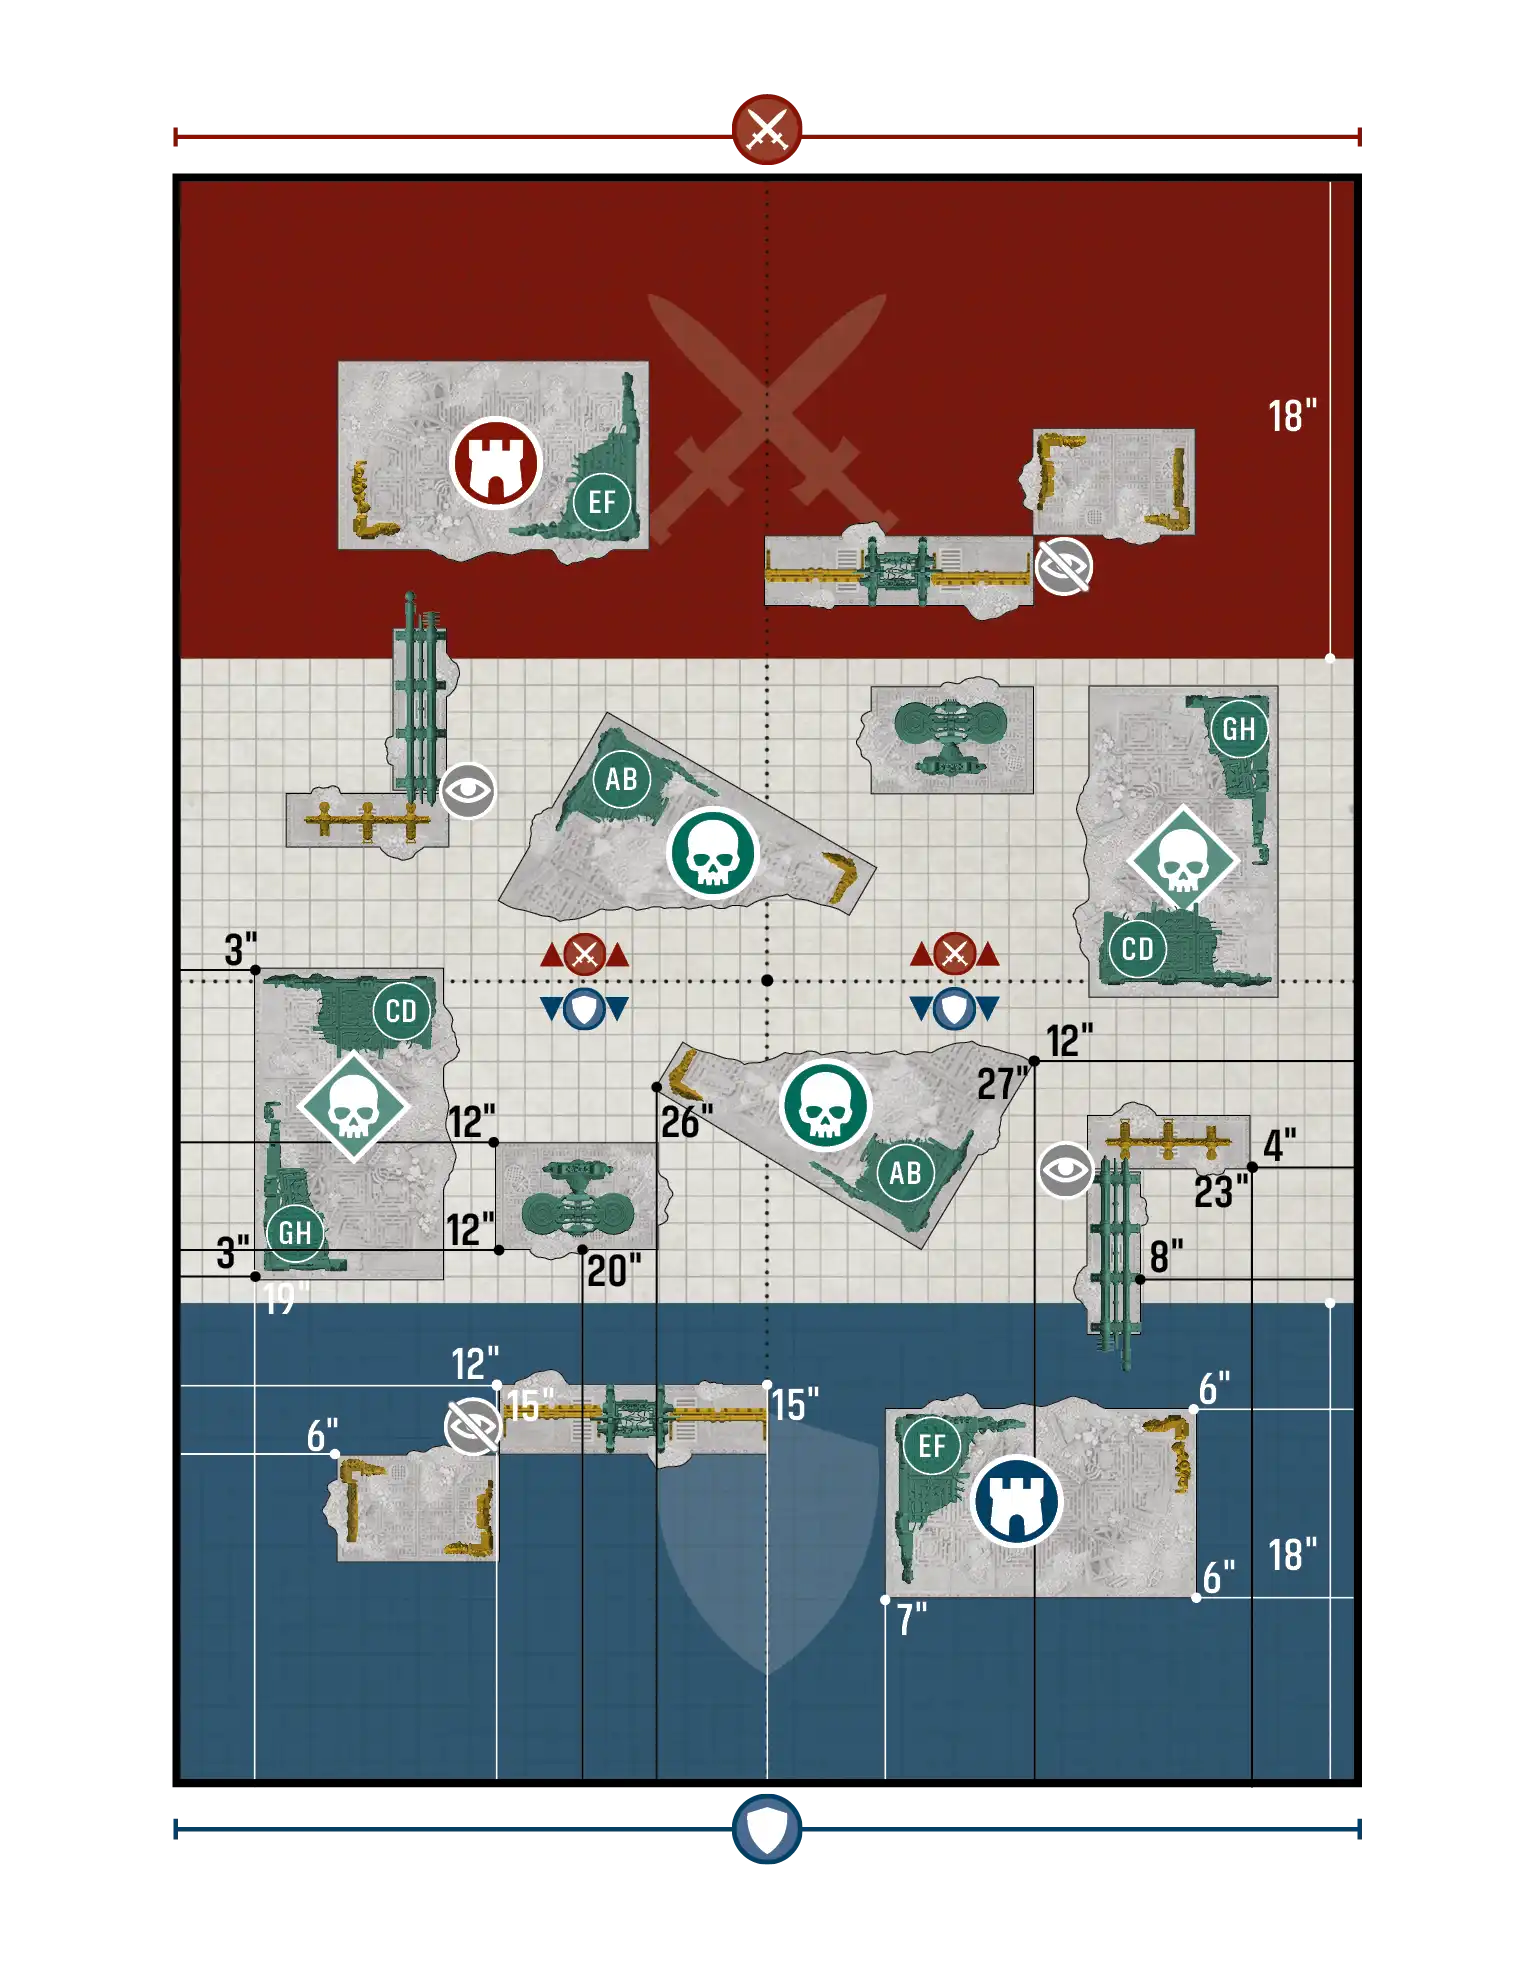
Take and Hold / Priority Assets - Layout C#
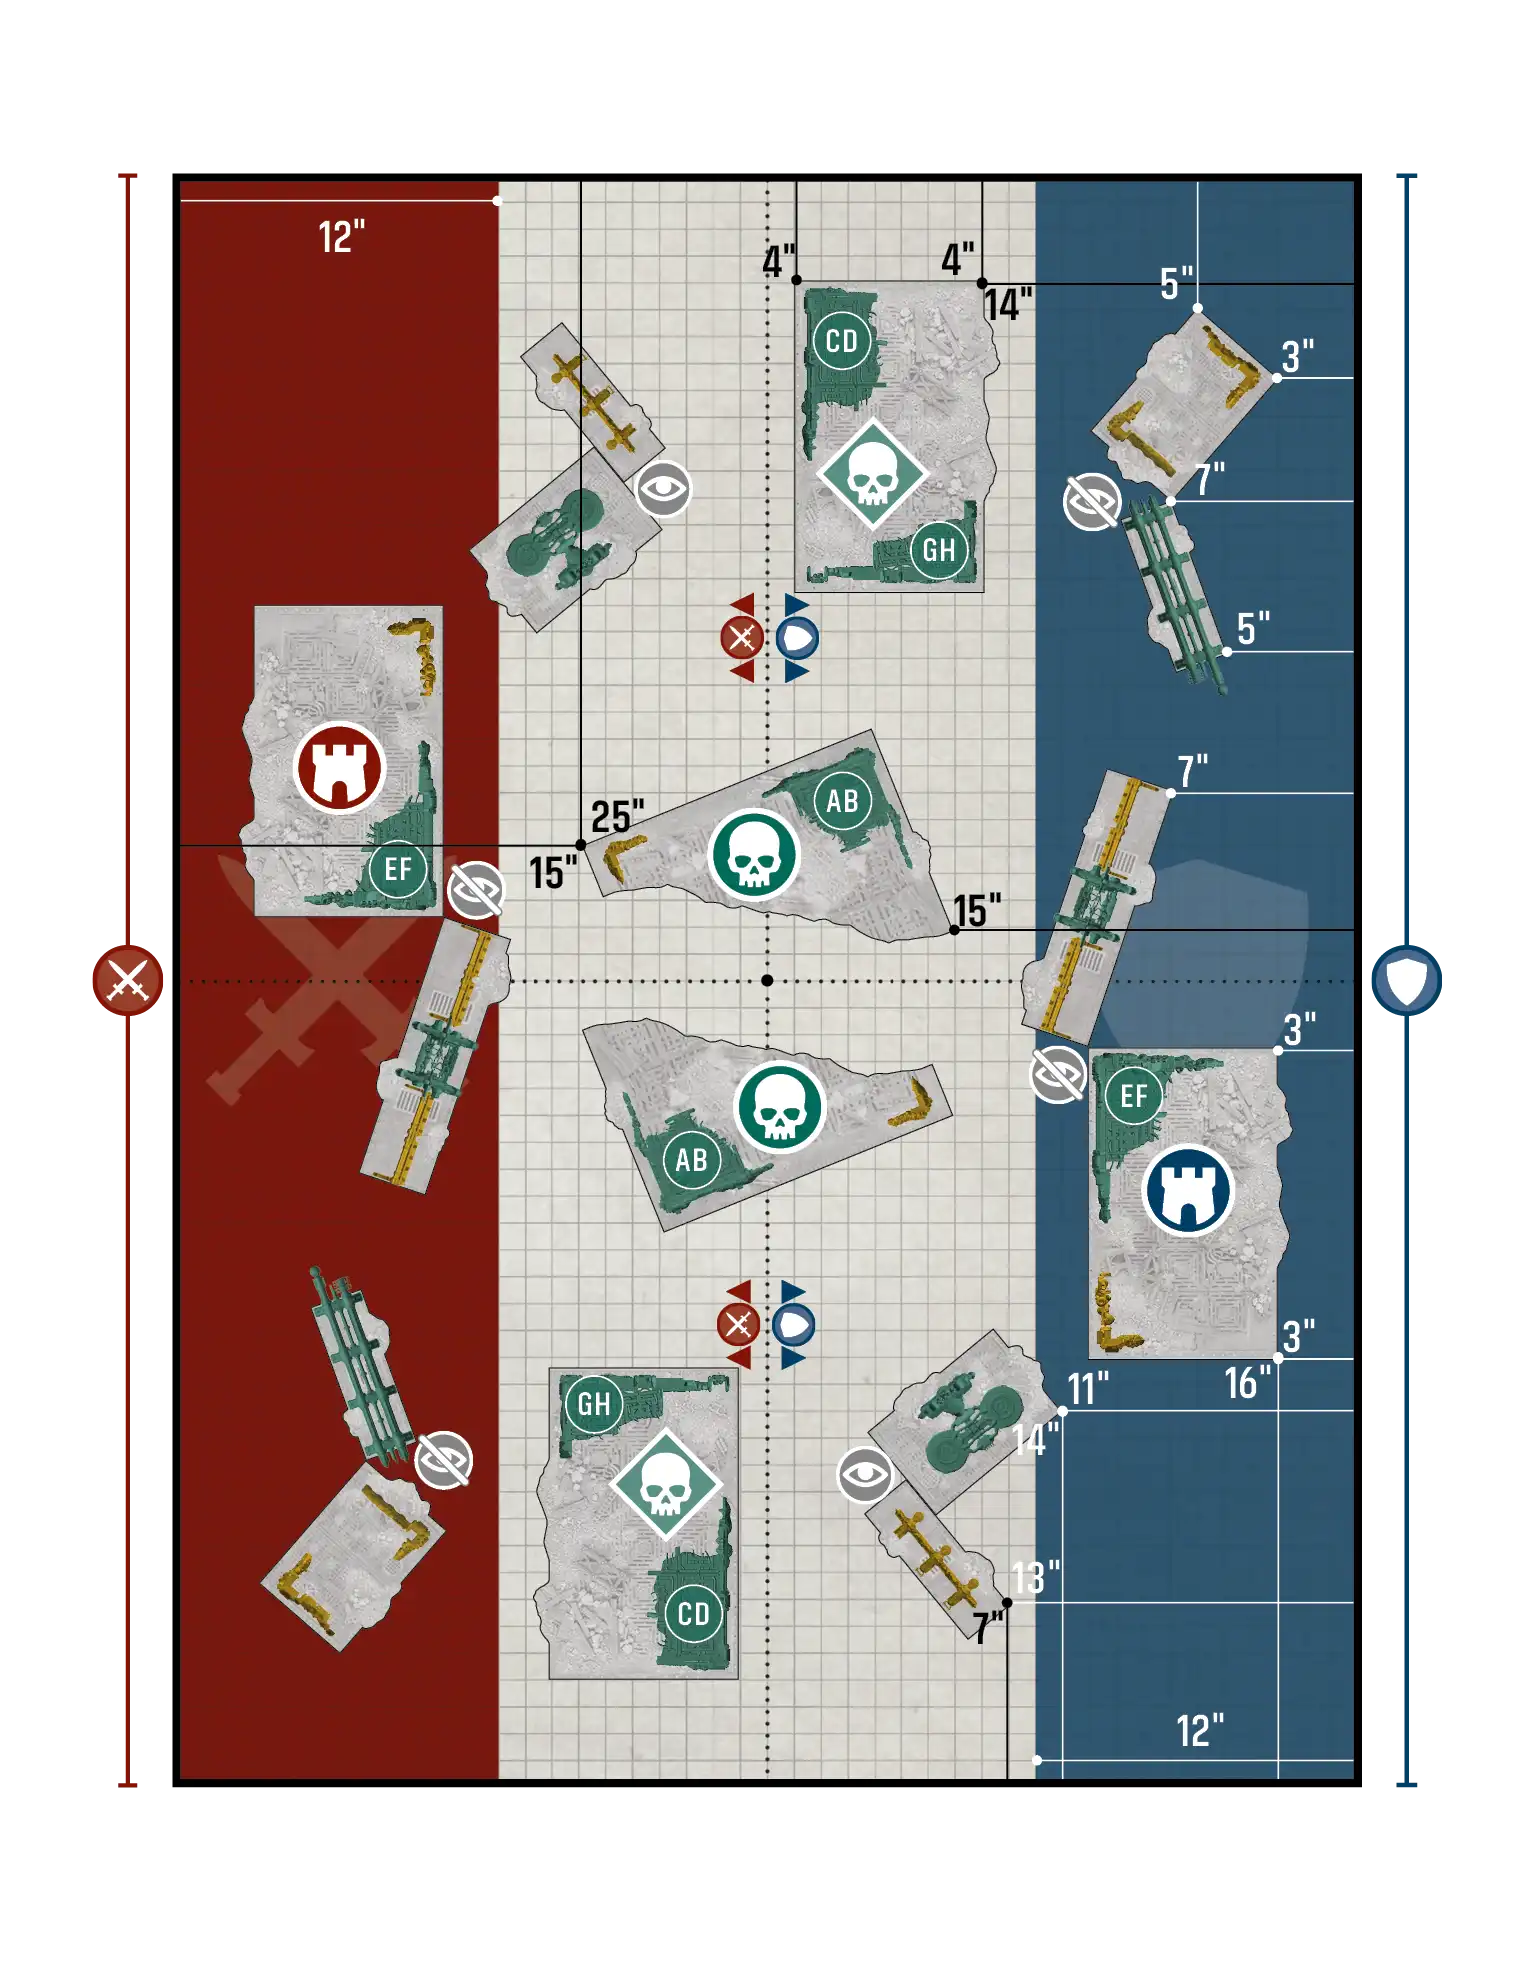
Take and Hold / Purge the Foe - Layout A#
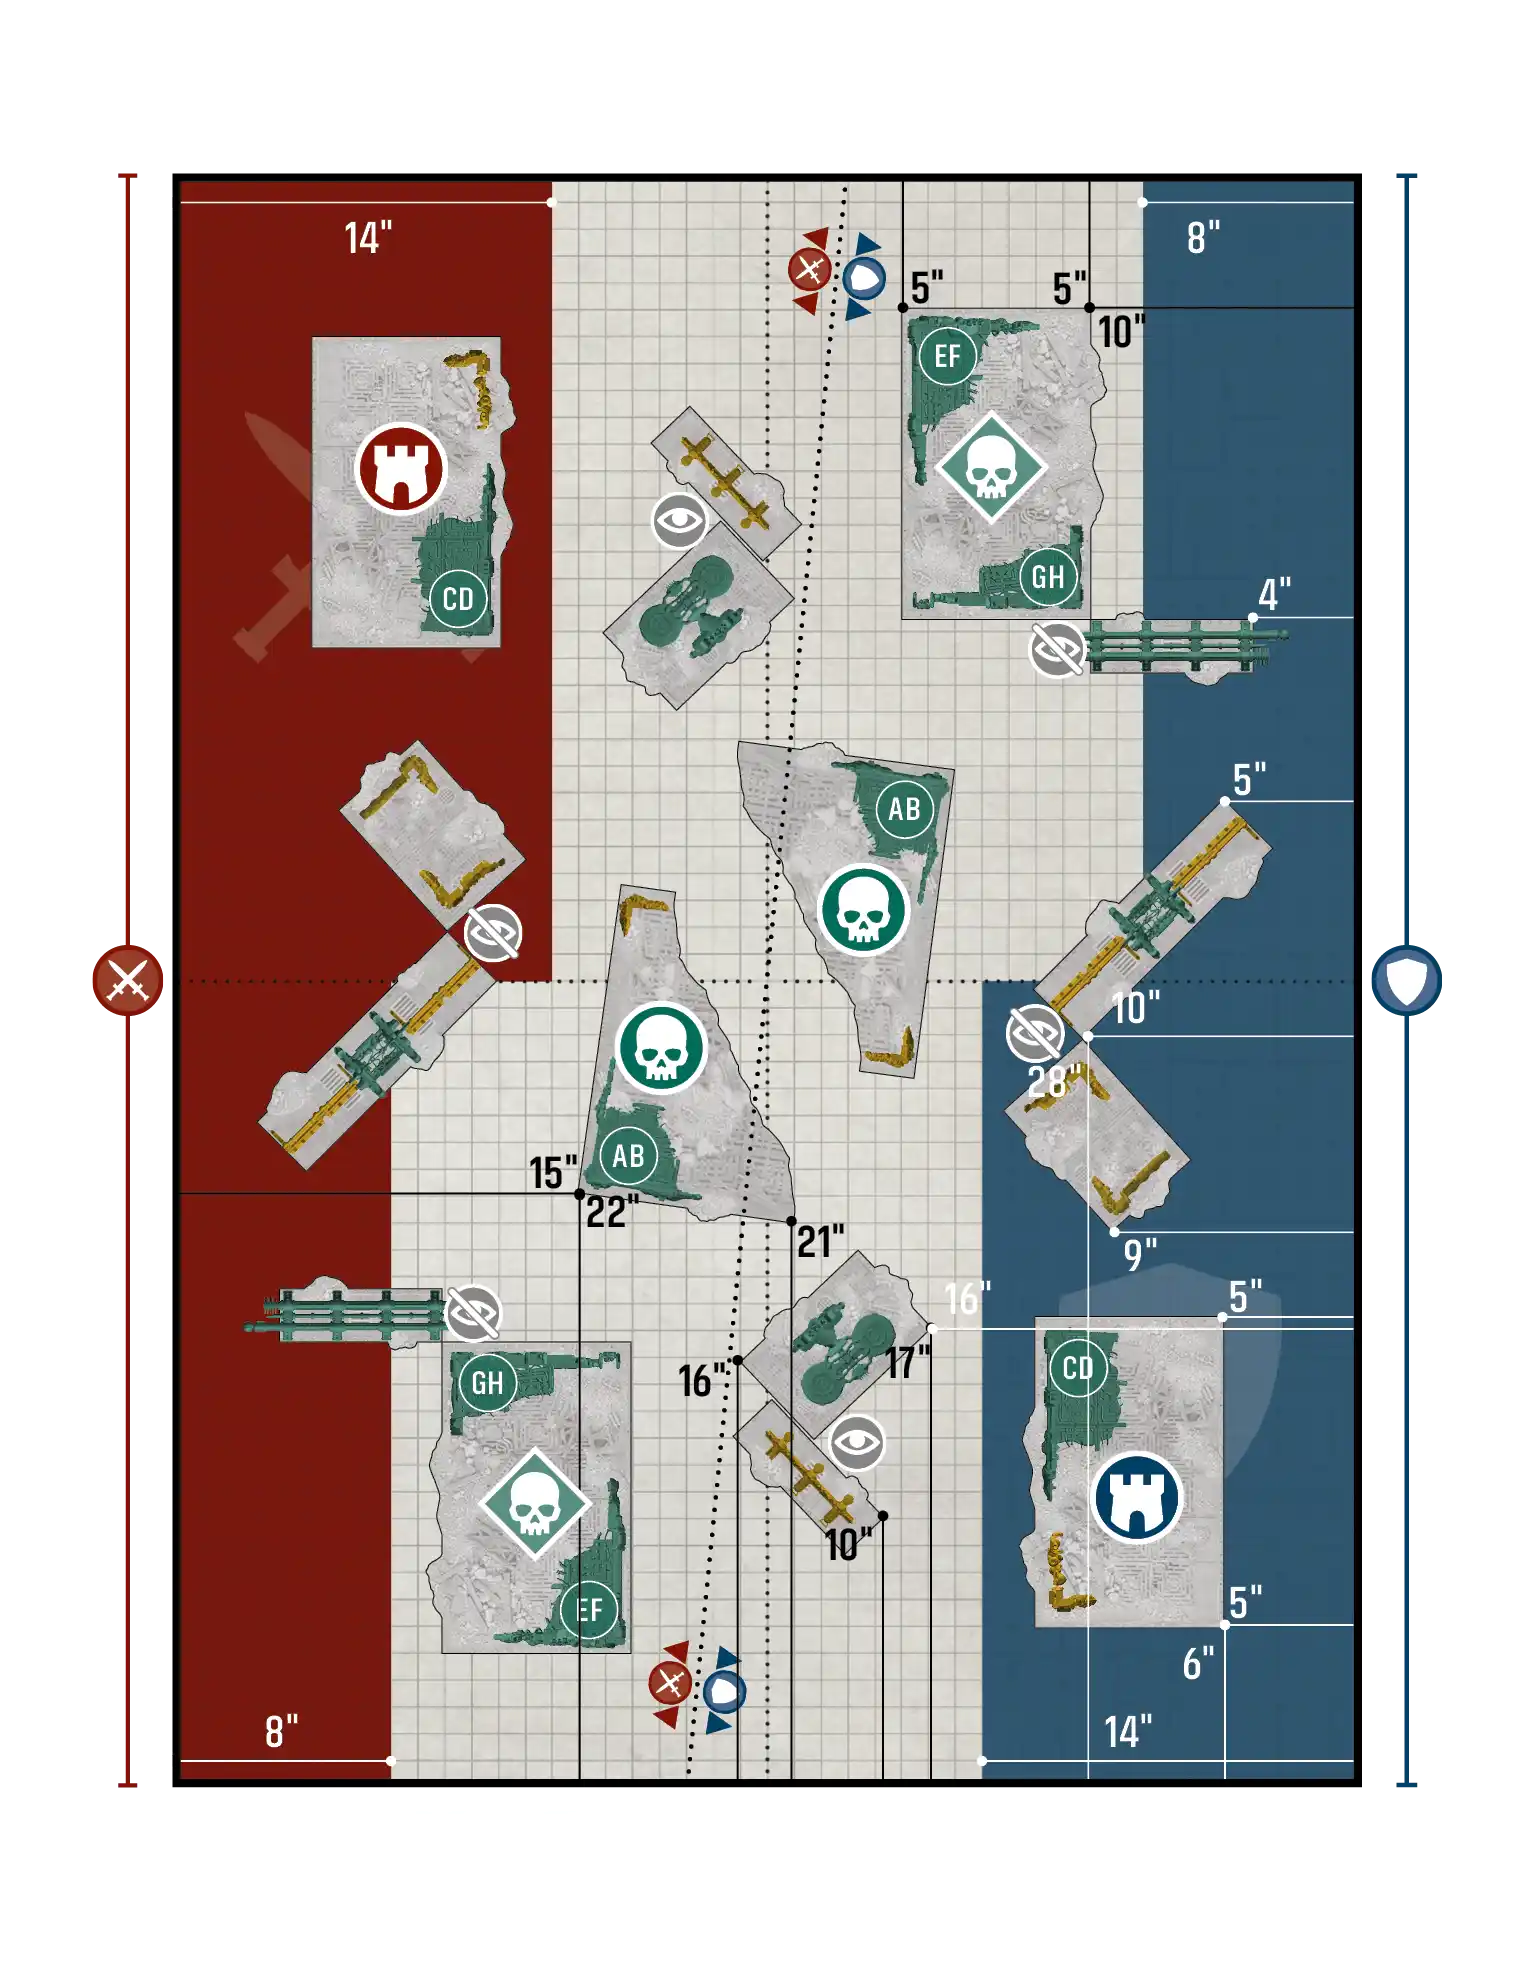
Take and Hold / Purge the Foe - Layout B#
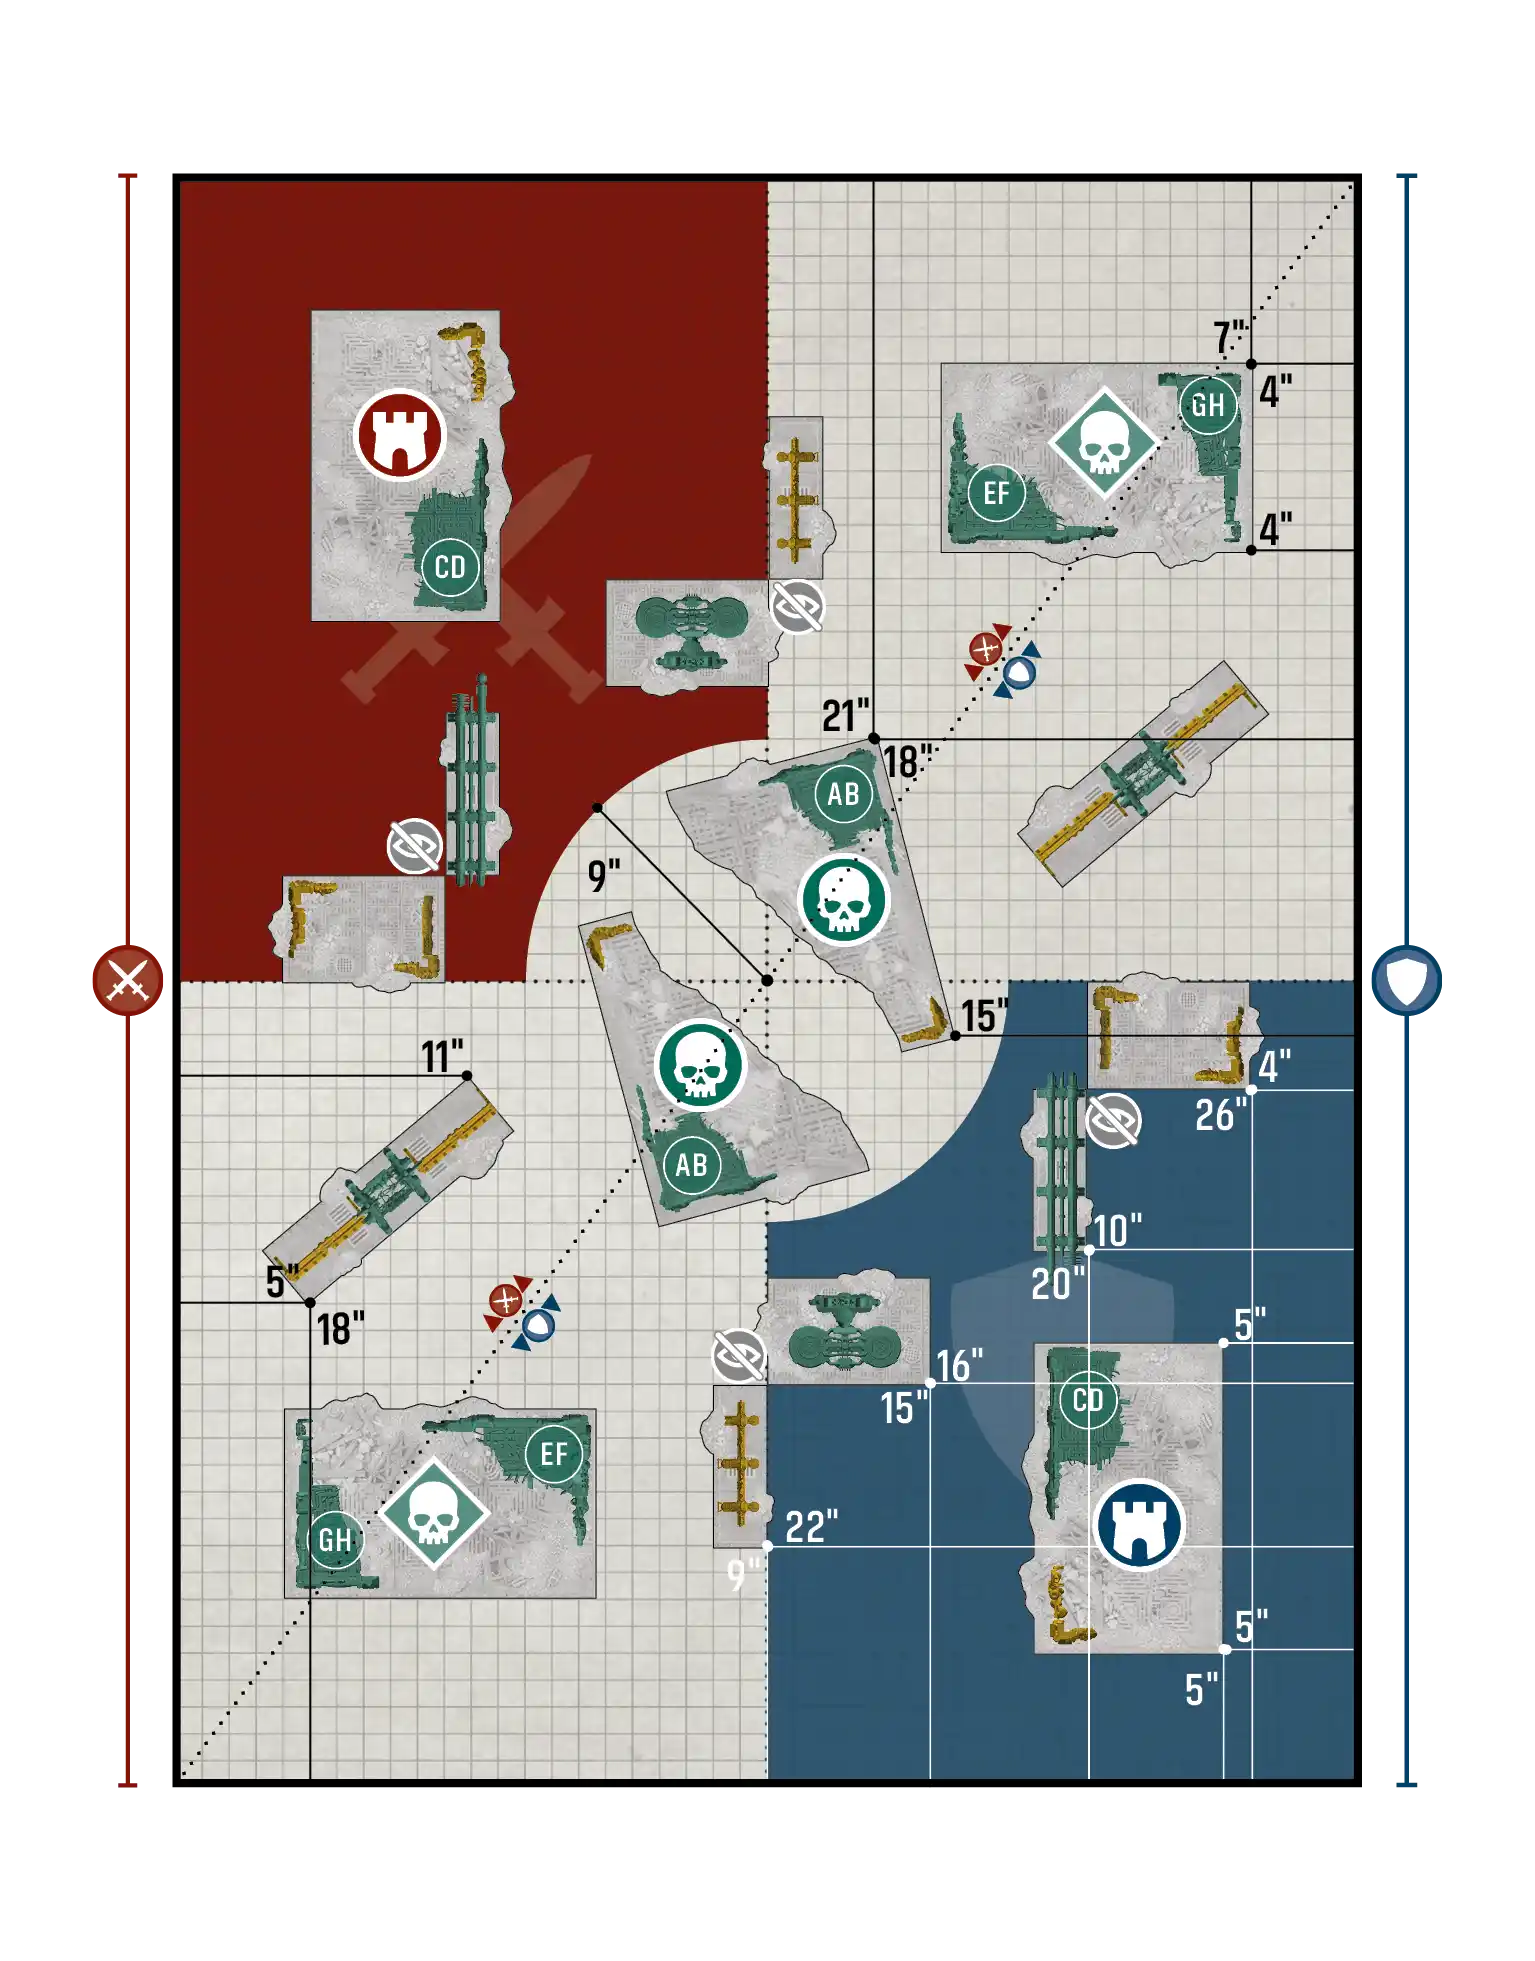
Take and Hold / Purge the Foe - Layout C#
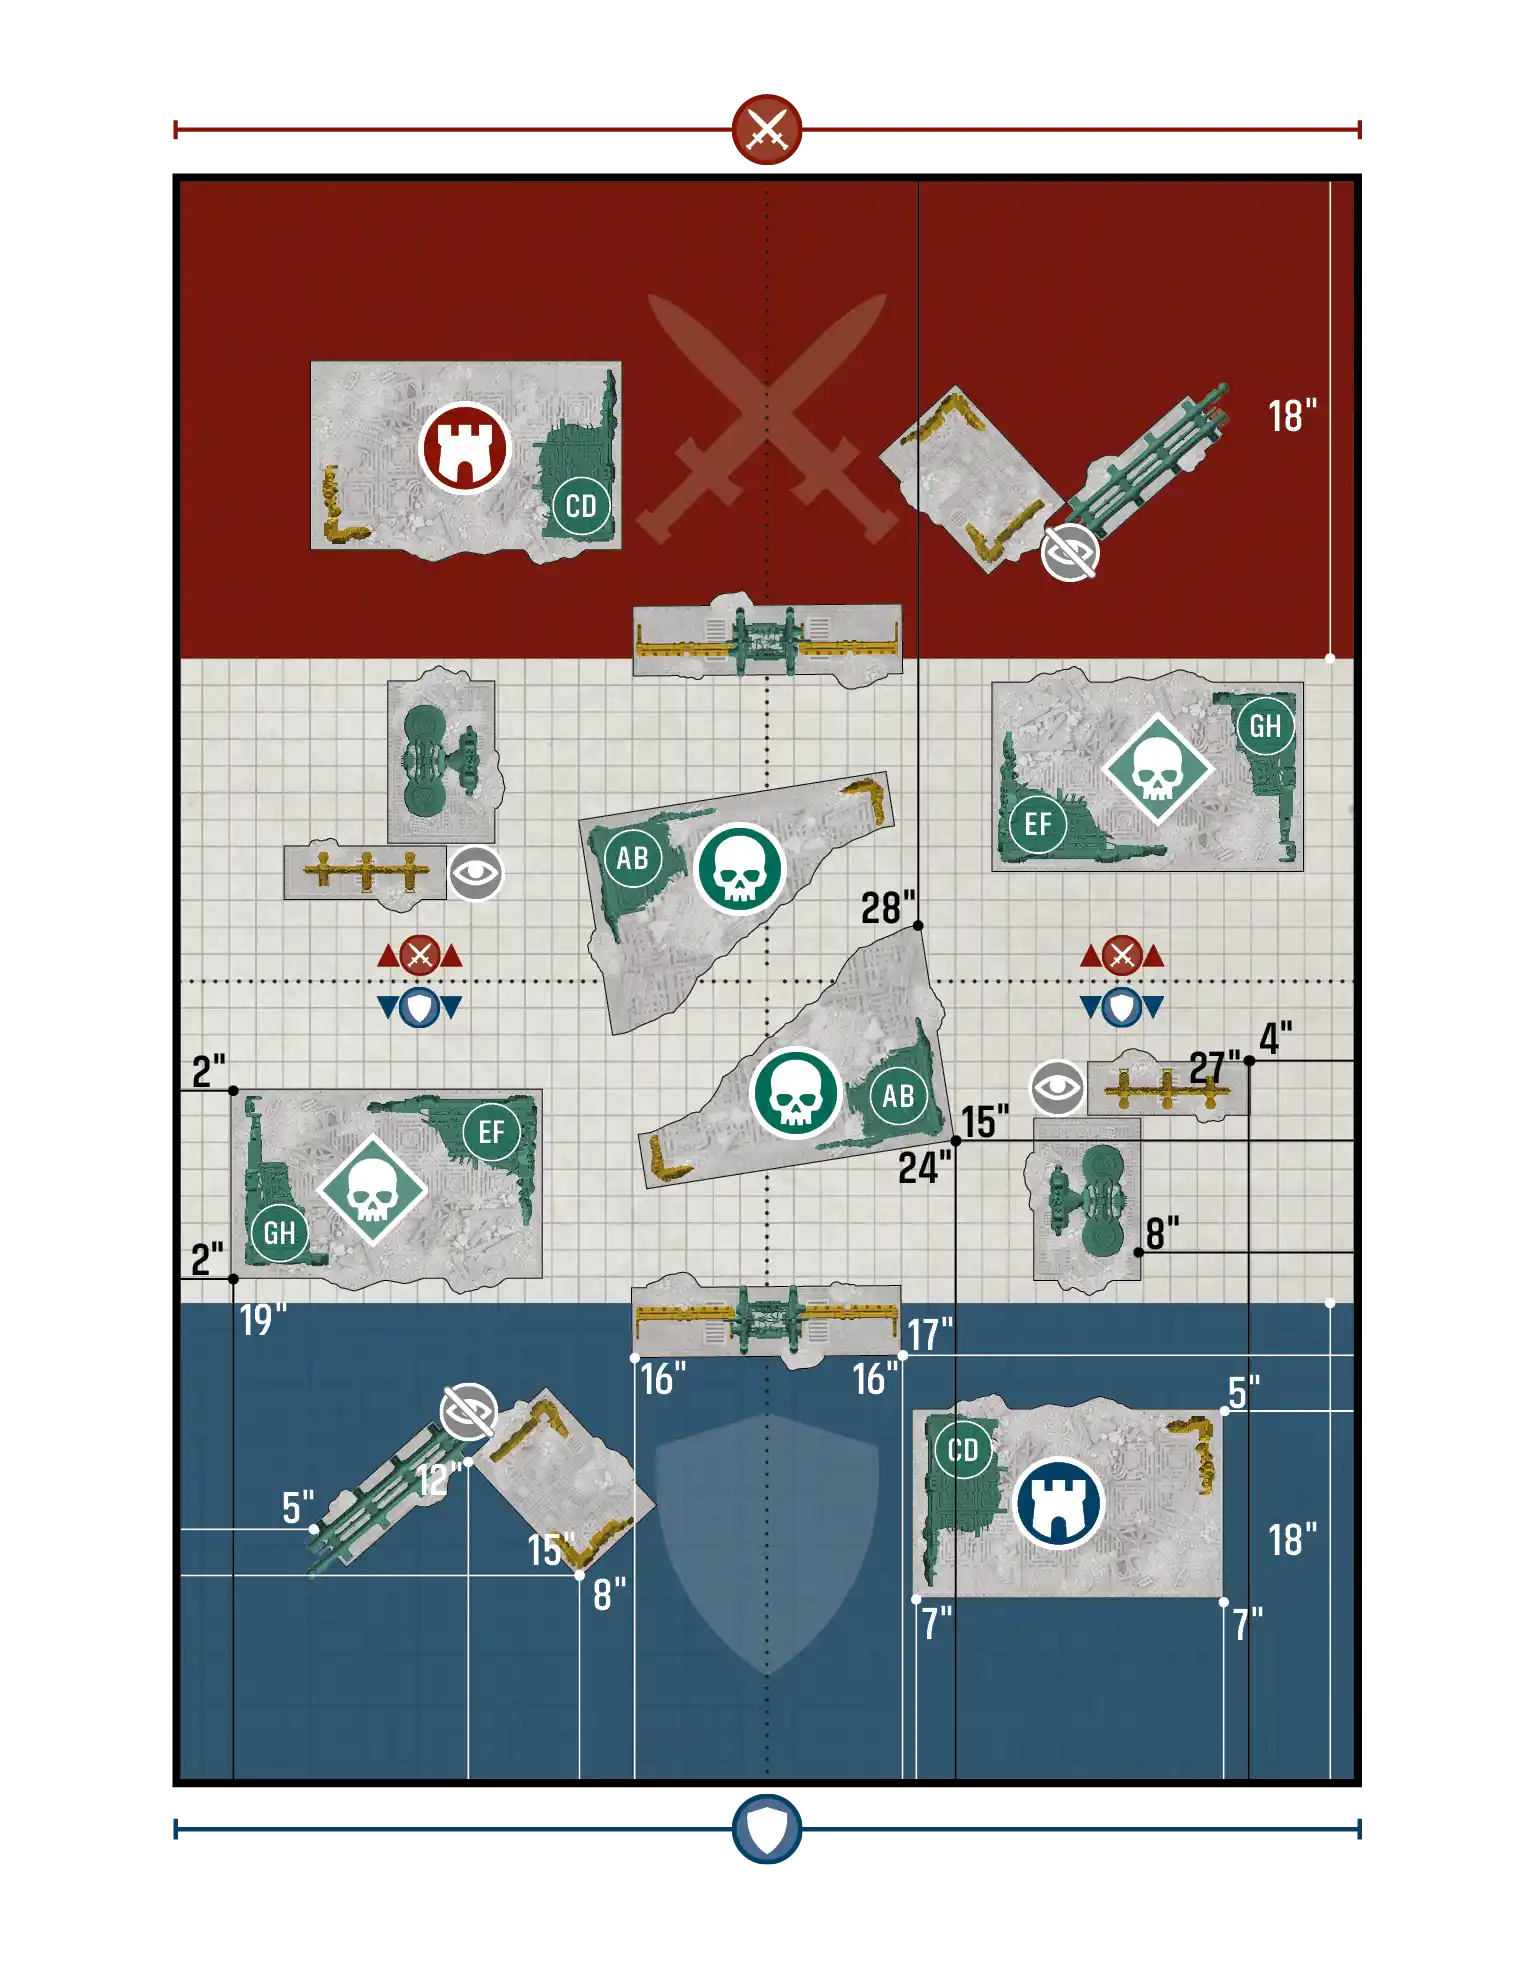
Take and Hold / Reconnaissance - Layout A#
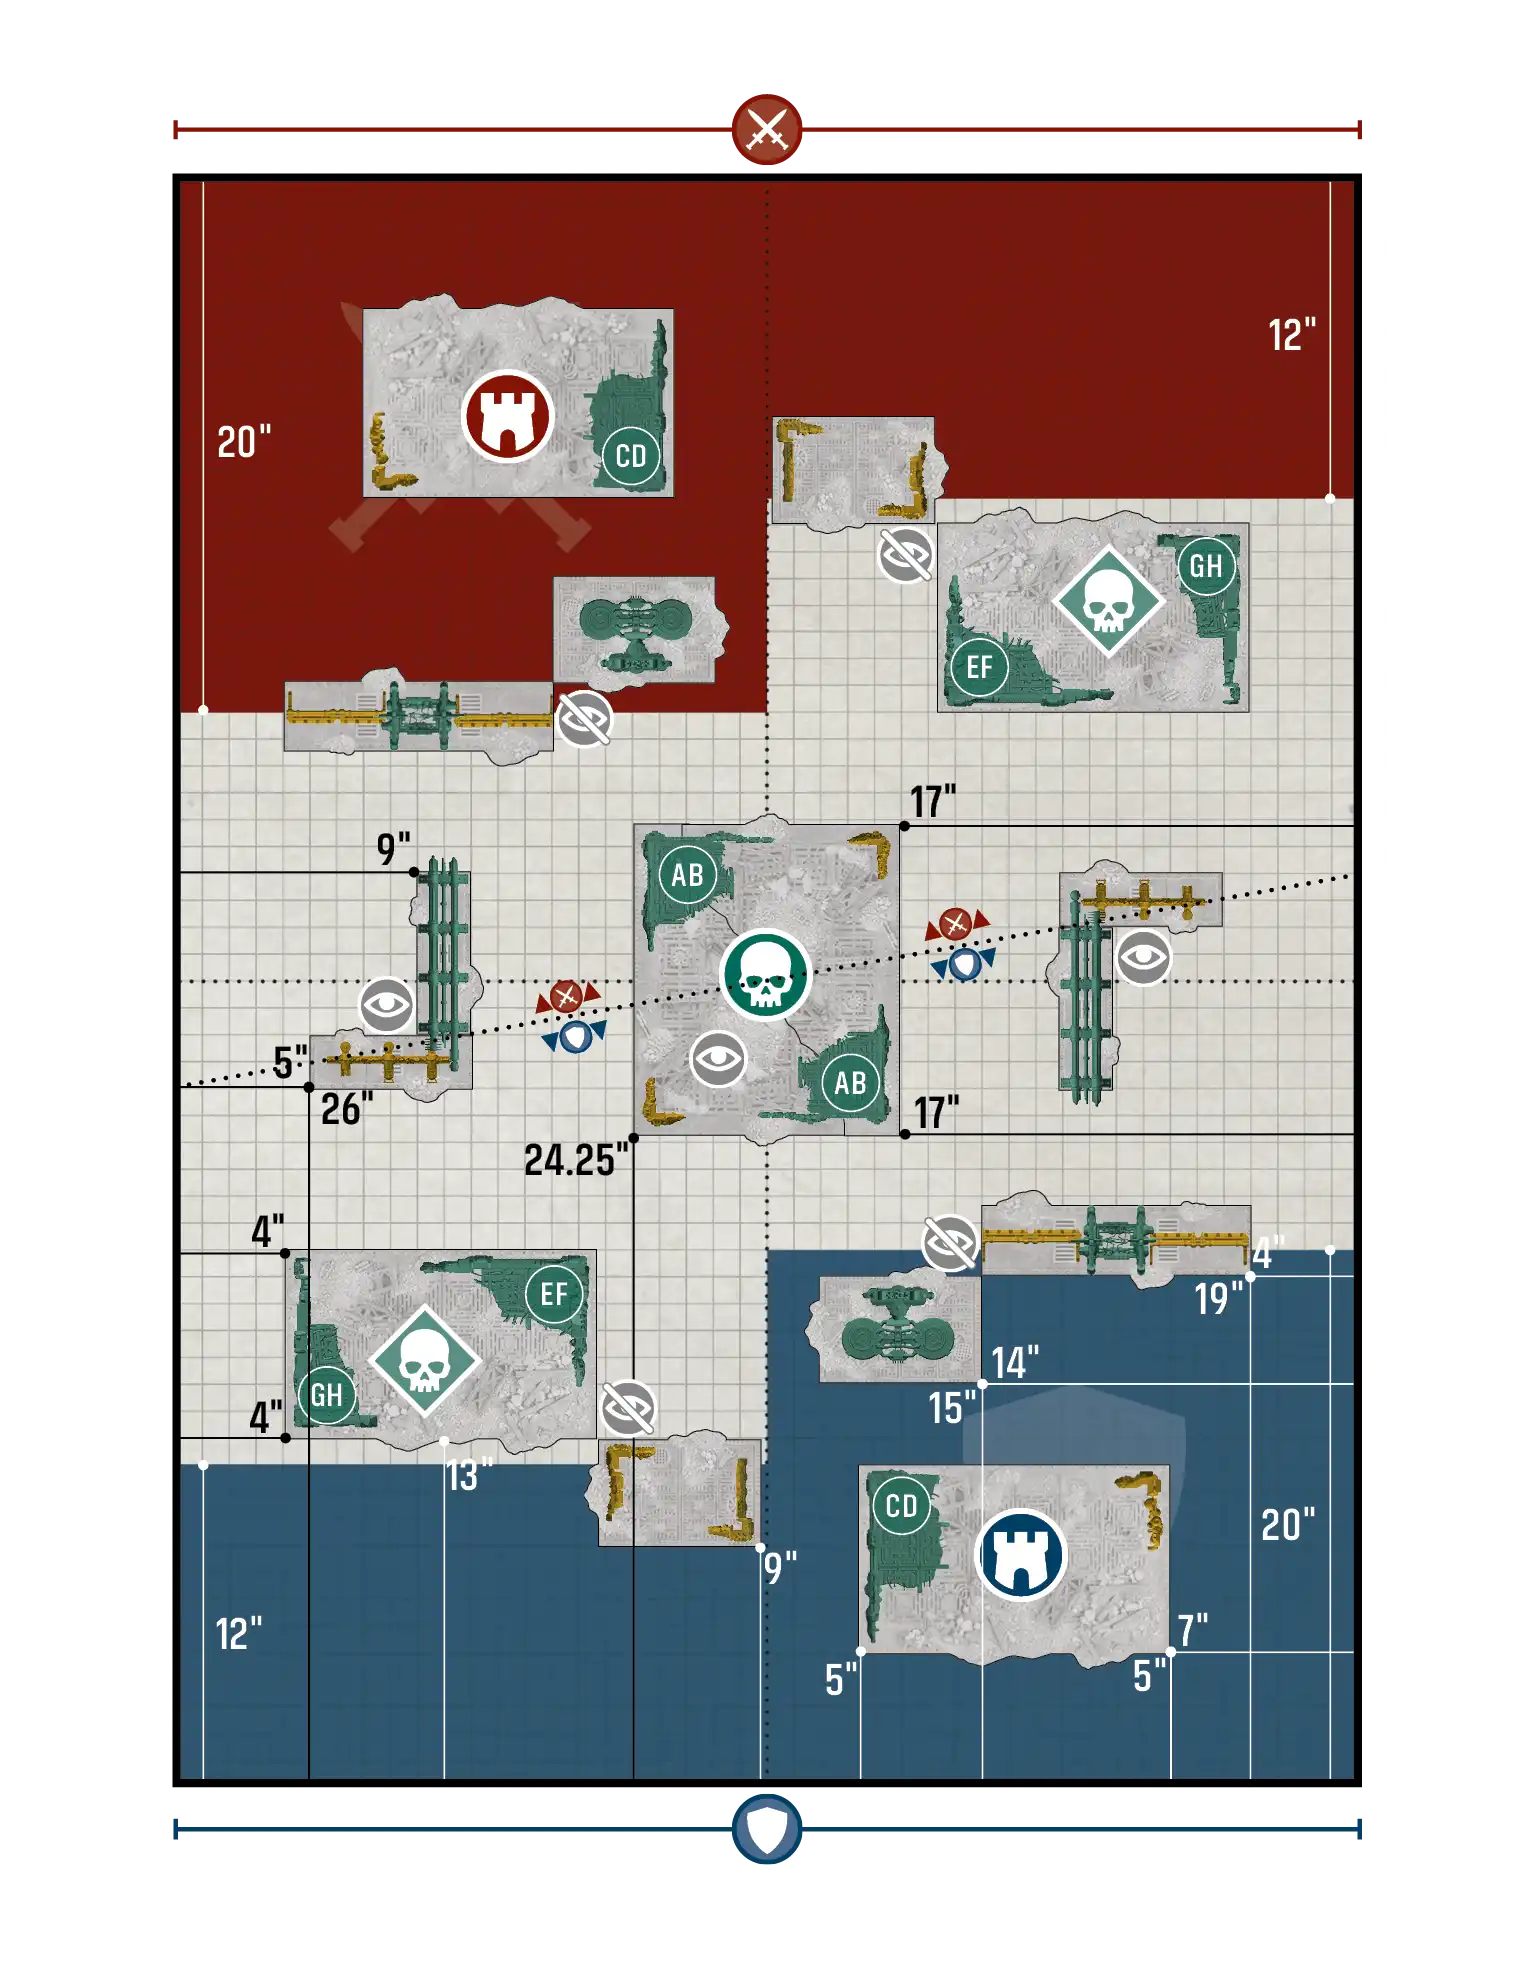
Take and Hold / Reconnaissance - Layout B#
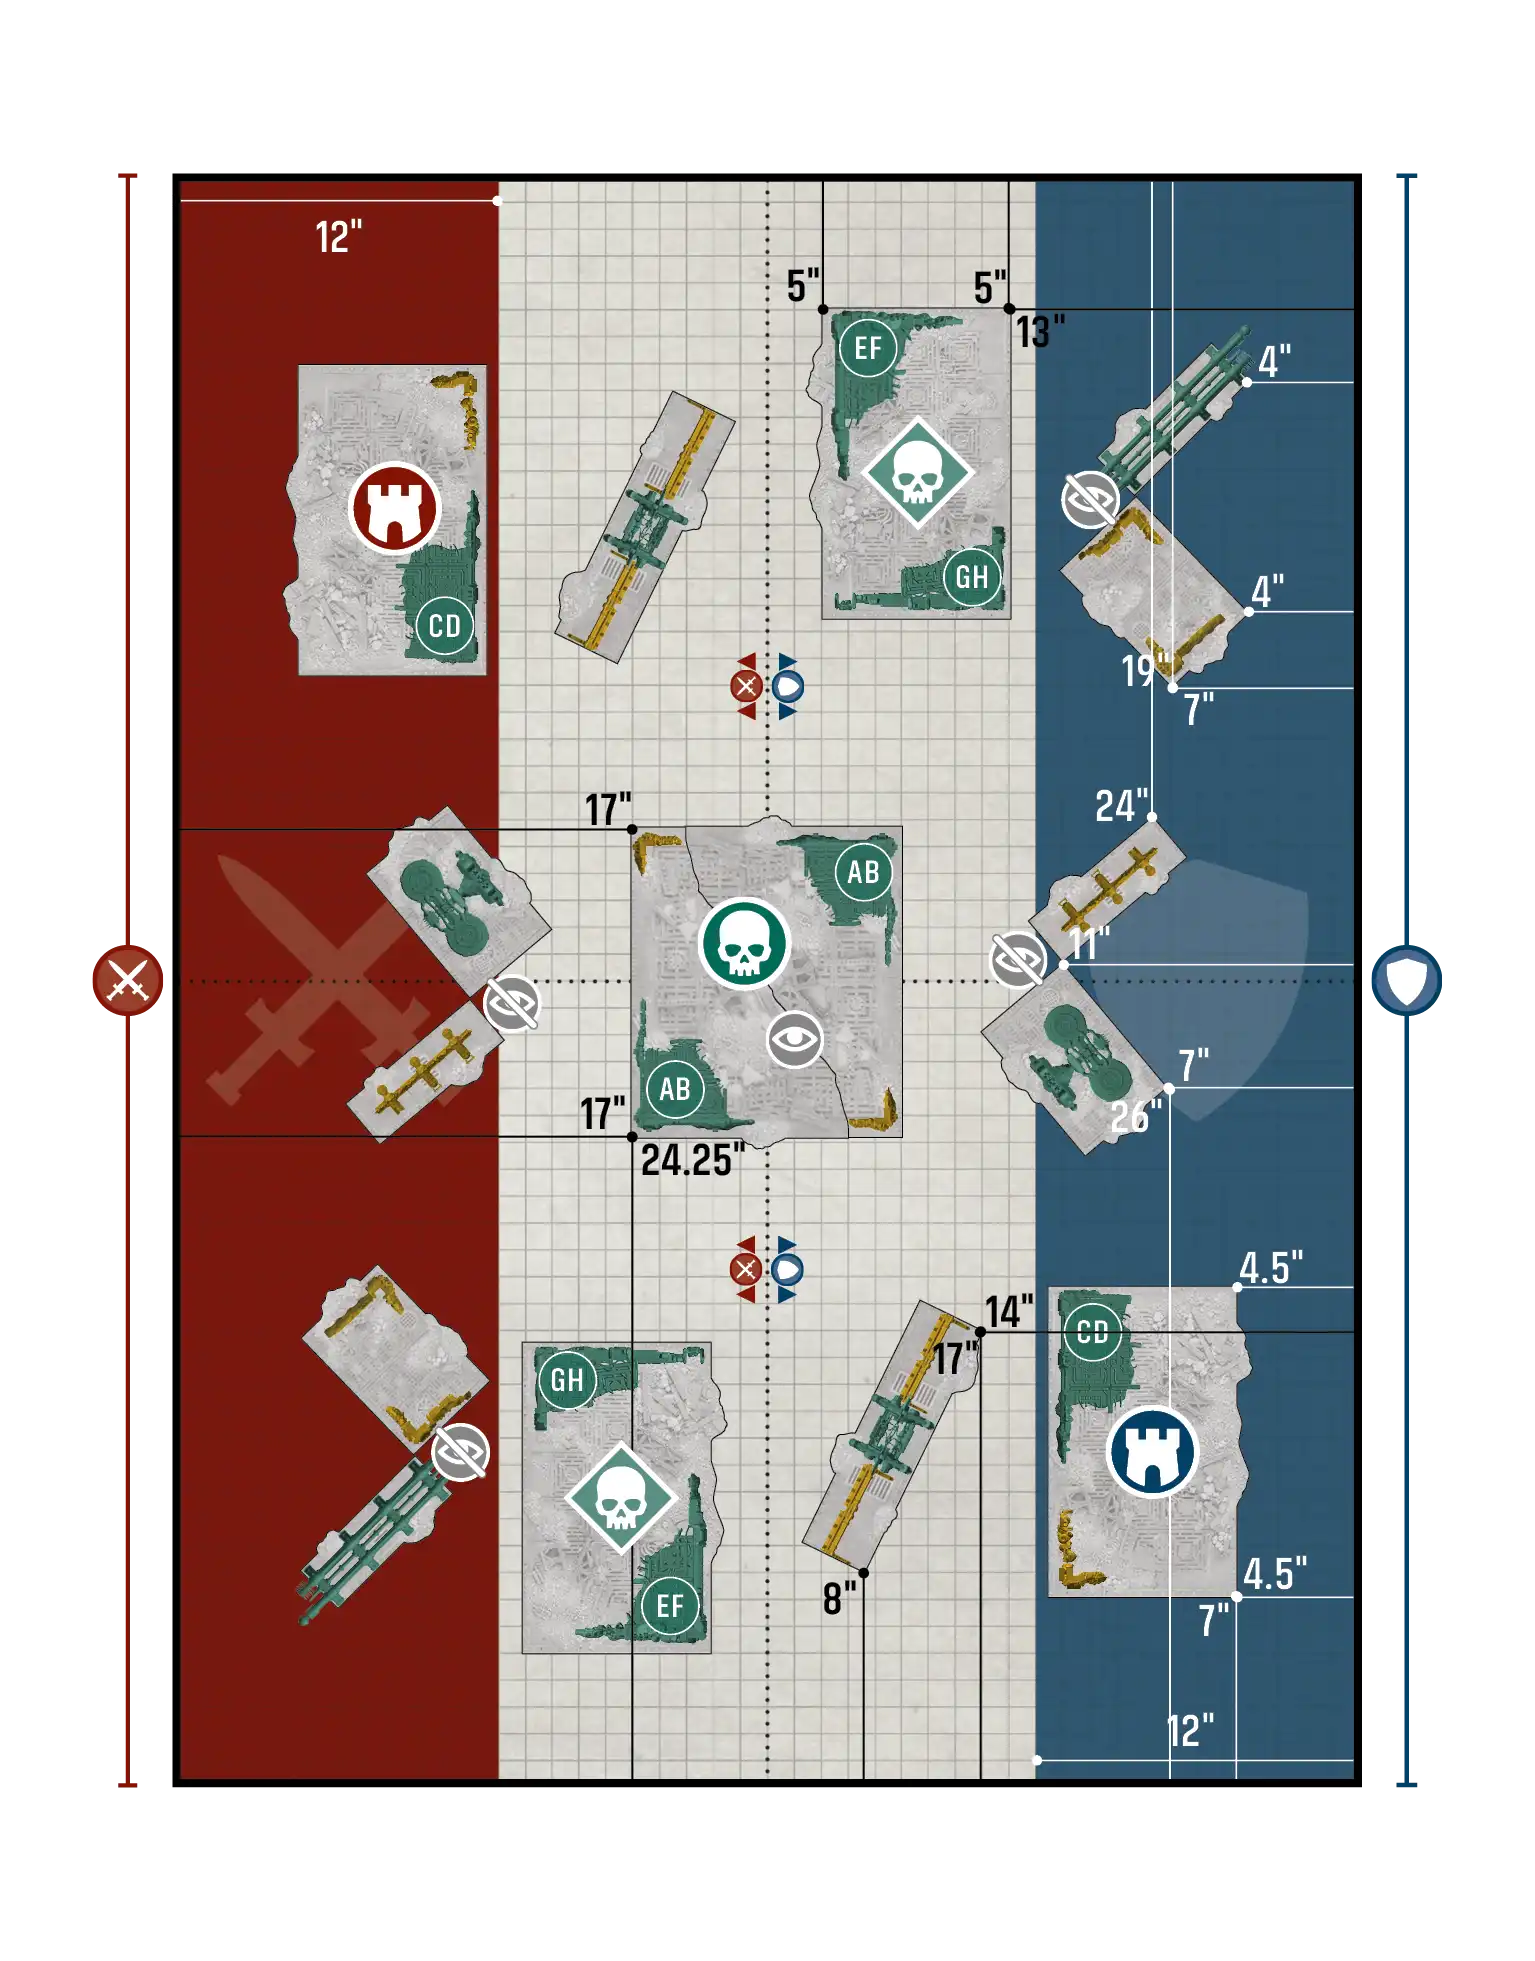
Take and Hold / Reconnaissance - Layout C#
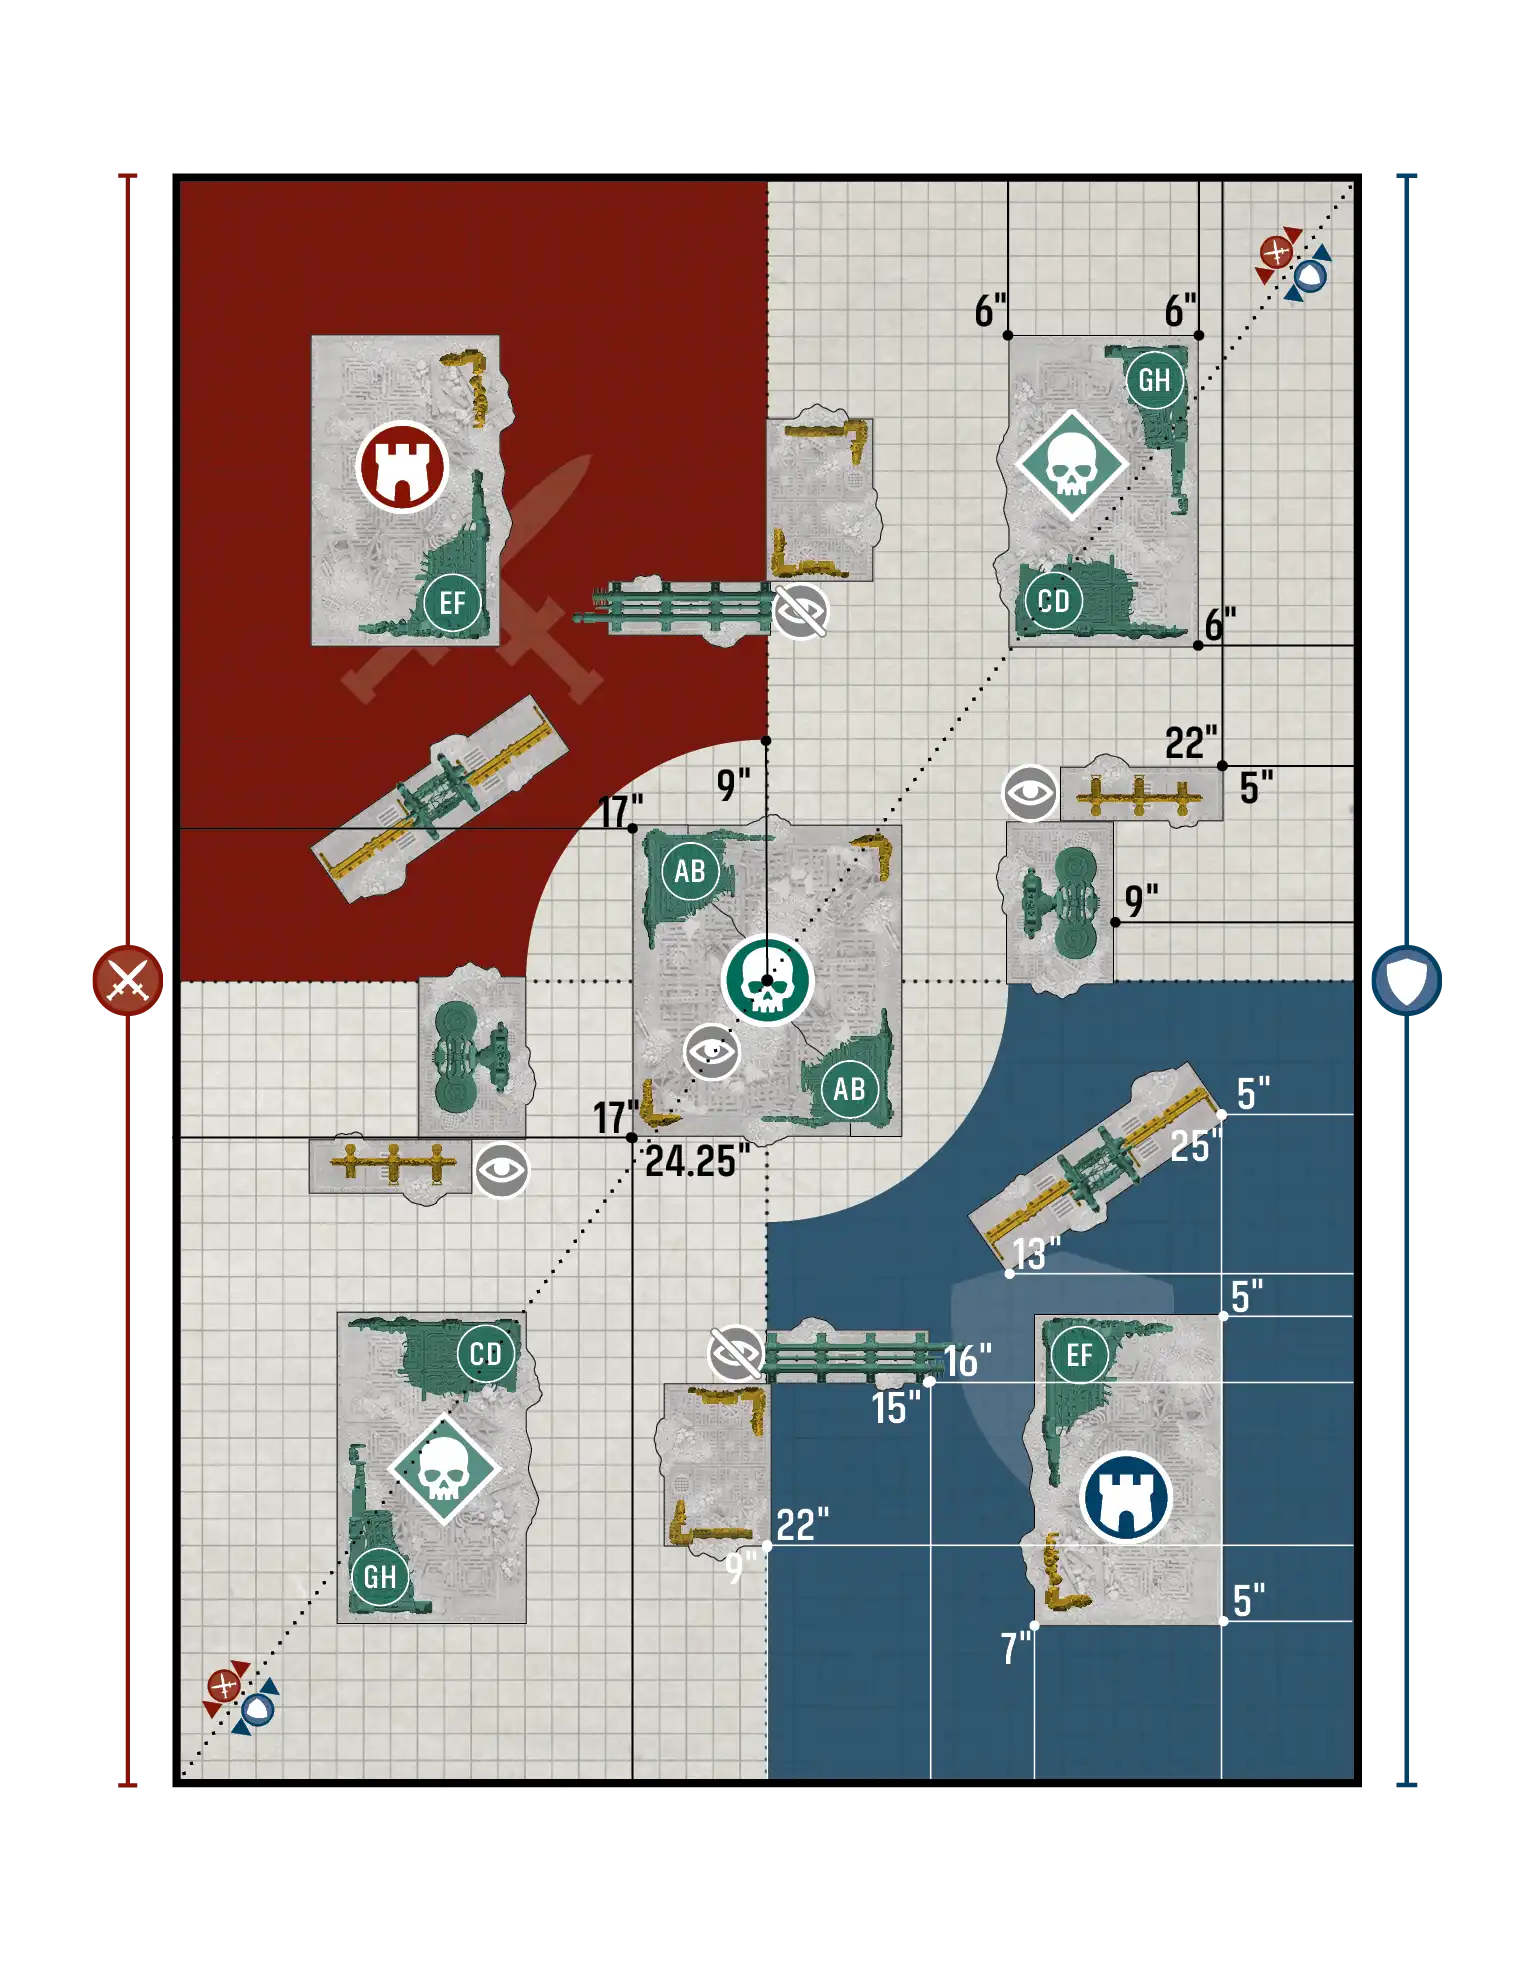
Take and Hold / Take and Hold - Layout A#
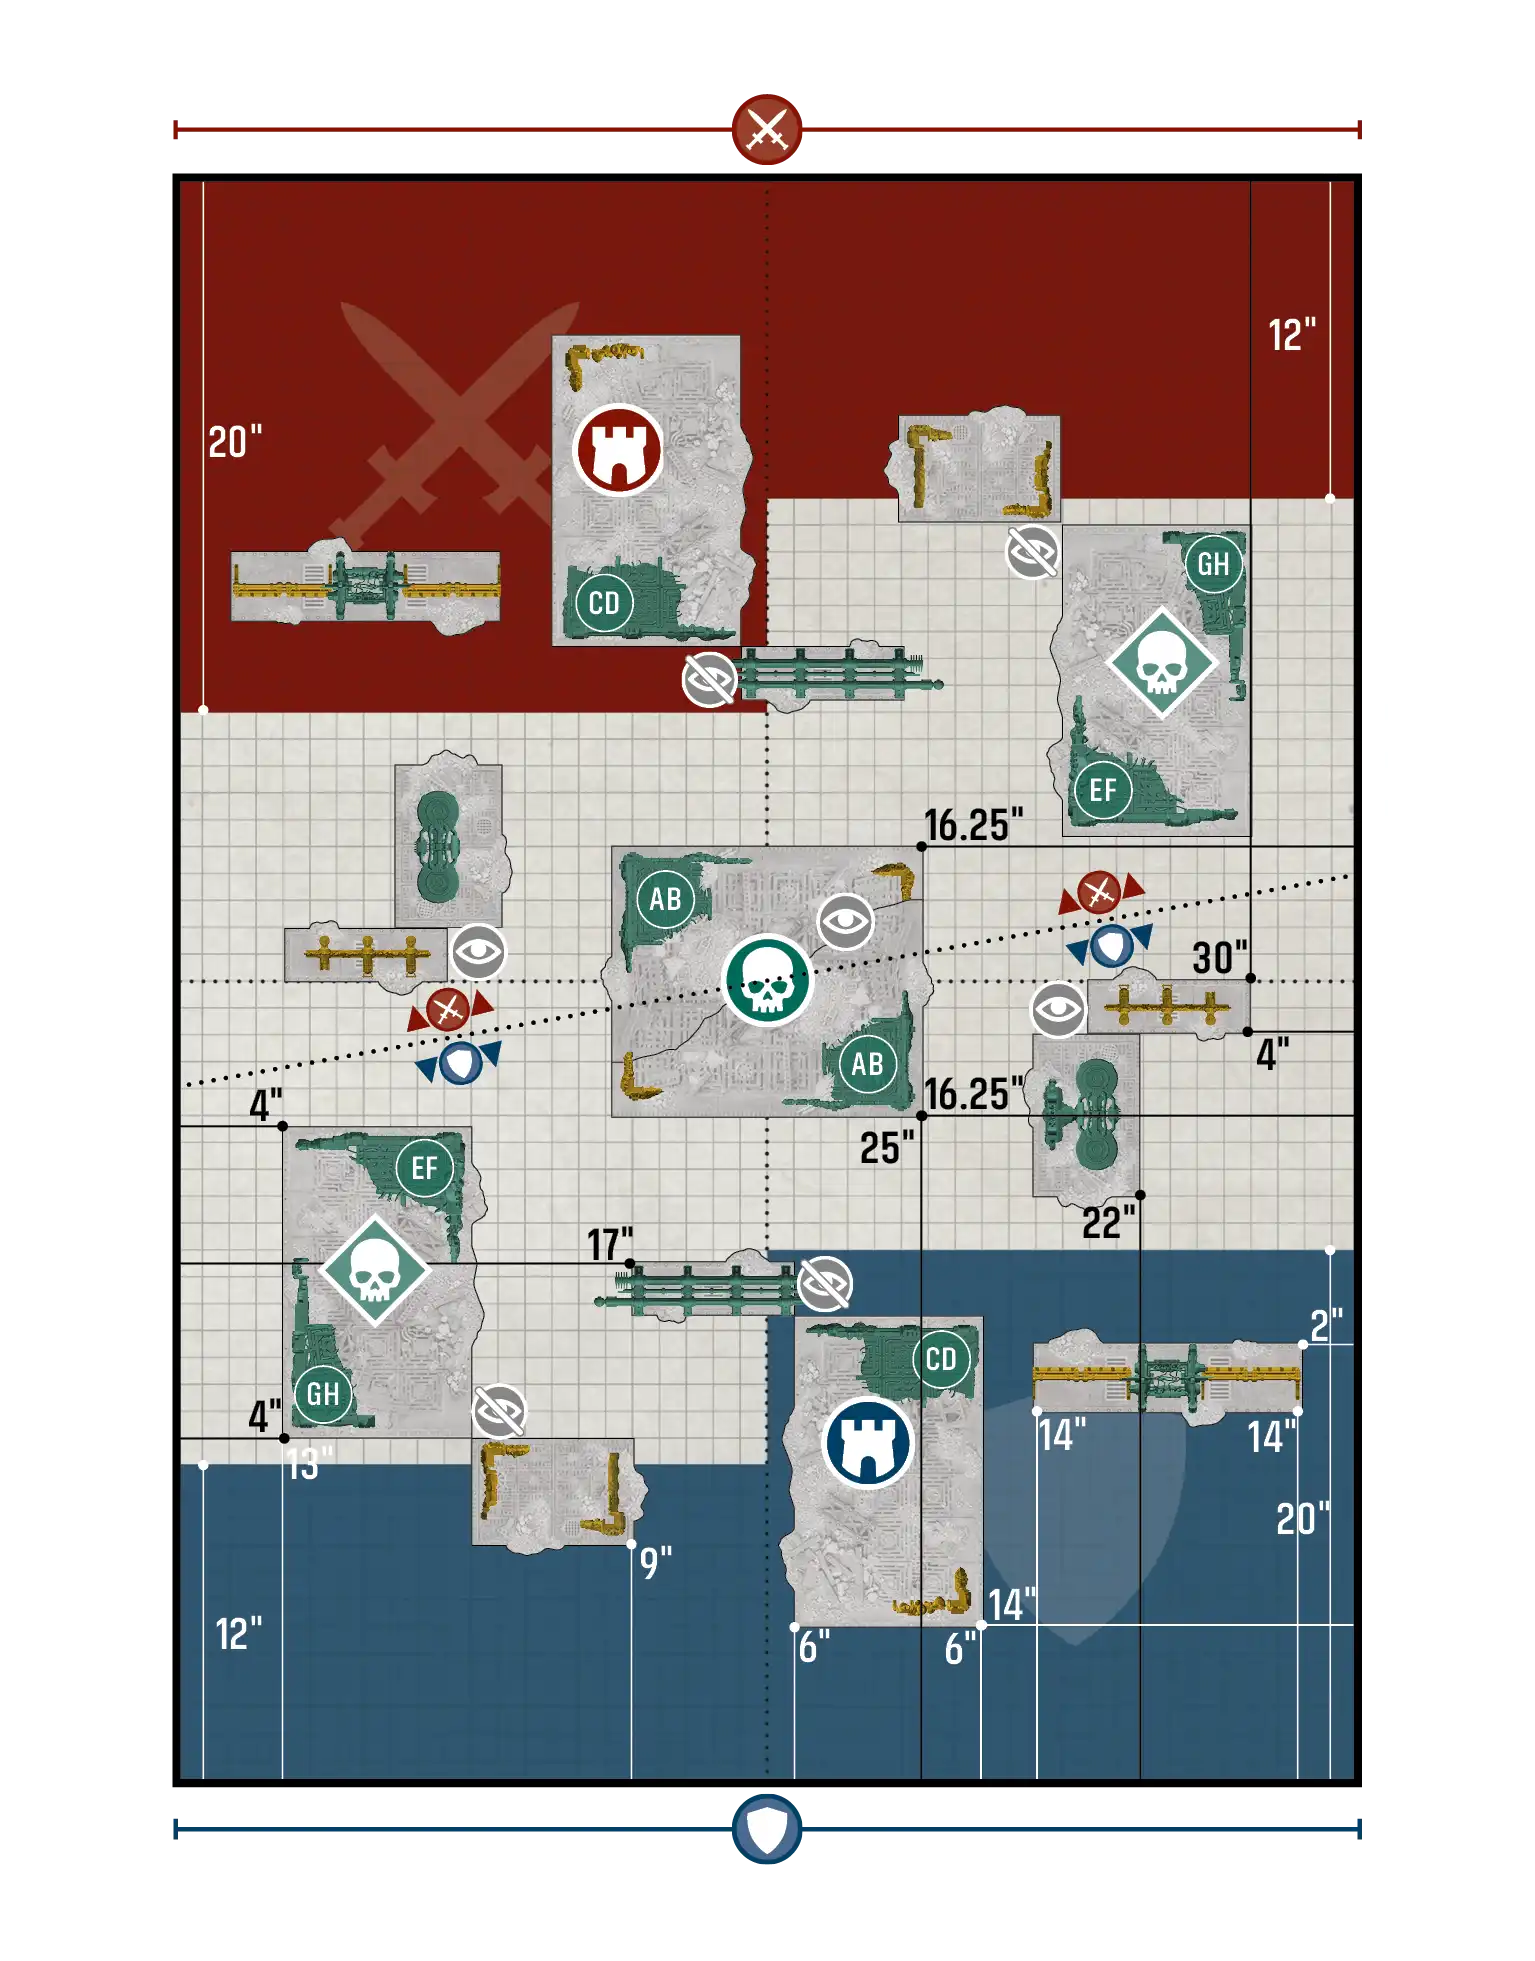
Take and Hold / Take and Hold - Layout B#
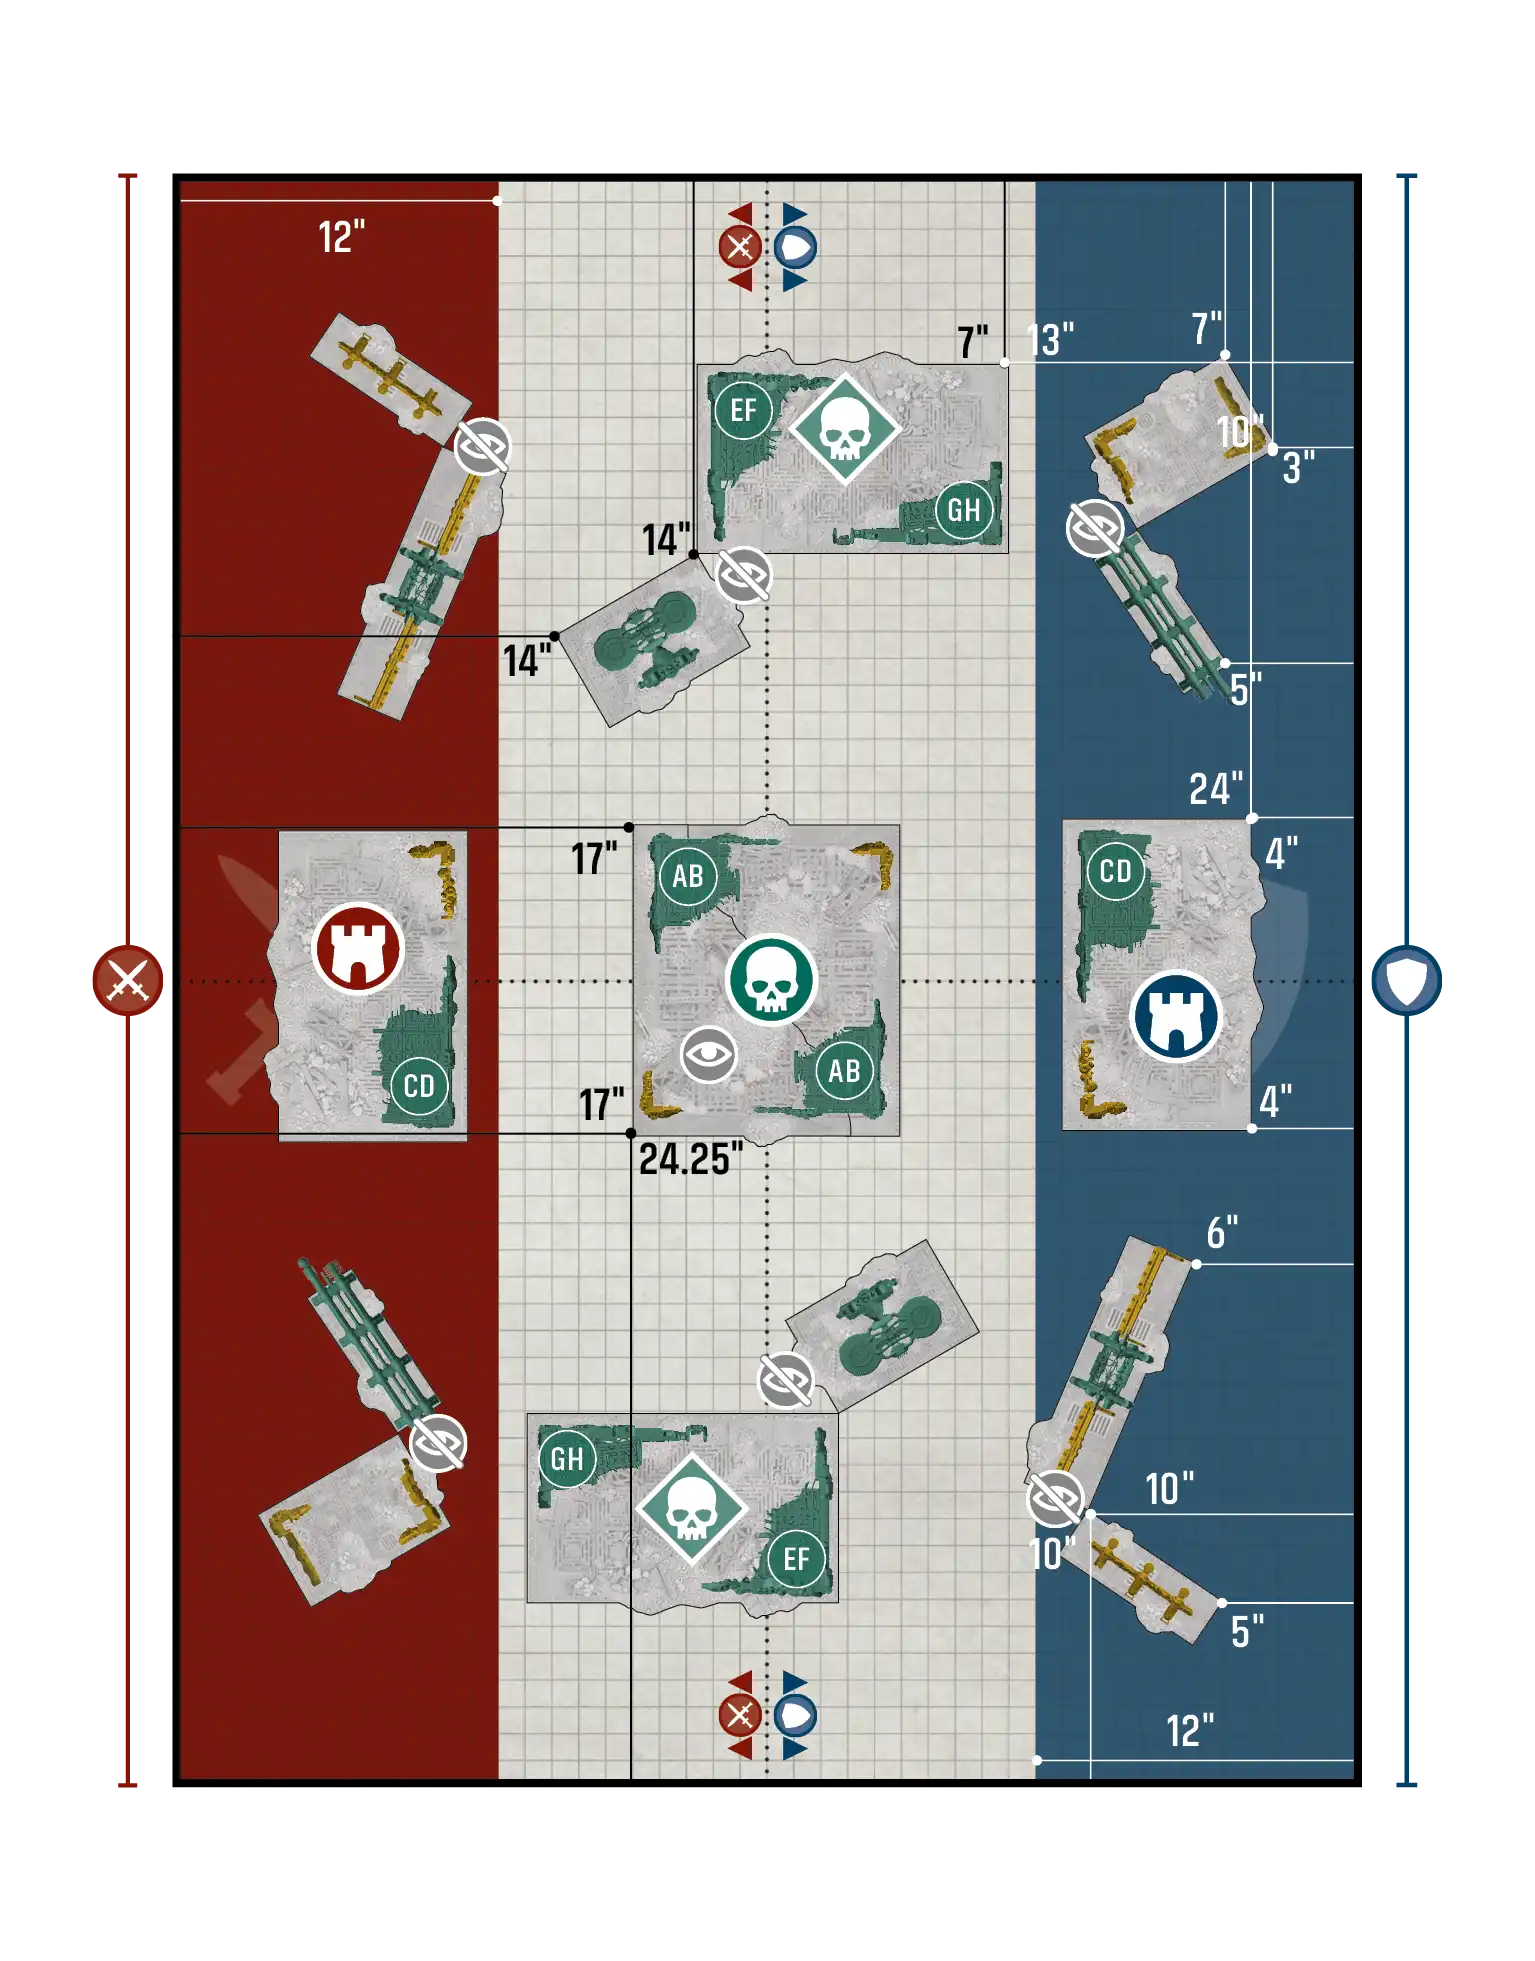
Take and Hold / Take and Hold - Layout C#